ZeroToMasteryZero to Mastery Learn PyTorch for Deep Learning上的课程学习
chapter 1
设置seed,计算tensor的点乘以及tensor数据类型等基础操作,搭配官方文档即可.1
2
3
4
5
6
7
8
9
10
11# Set seed
torch.manual_seed(7)
# Create random tensor
x = torch.rand(1,1,1,10)
# Remove single dimensions
y = torch.squeeze(x)
# Print out tensors and their shapes
print(x,x.shape)
print(y,y.shape)
此外还有一些常用方法,比如torch.squeeze,torch.cat,torch.stack,torch.unsqueeze,torch.Tensor.view,torch.Tensor.reshape,torch.Tensor.transpose,torch.Tensor.permute等等
chapter 2
pytorch workflow
1 | # Create PyTorch linear regression model by subclassing nn.Module |
1 |
|
1 | # Training loop |
save trained model
1 |
|
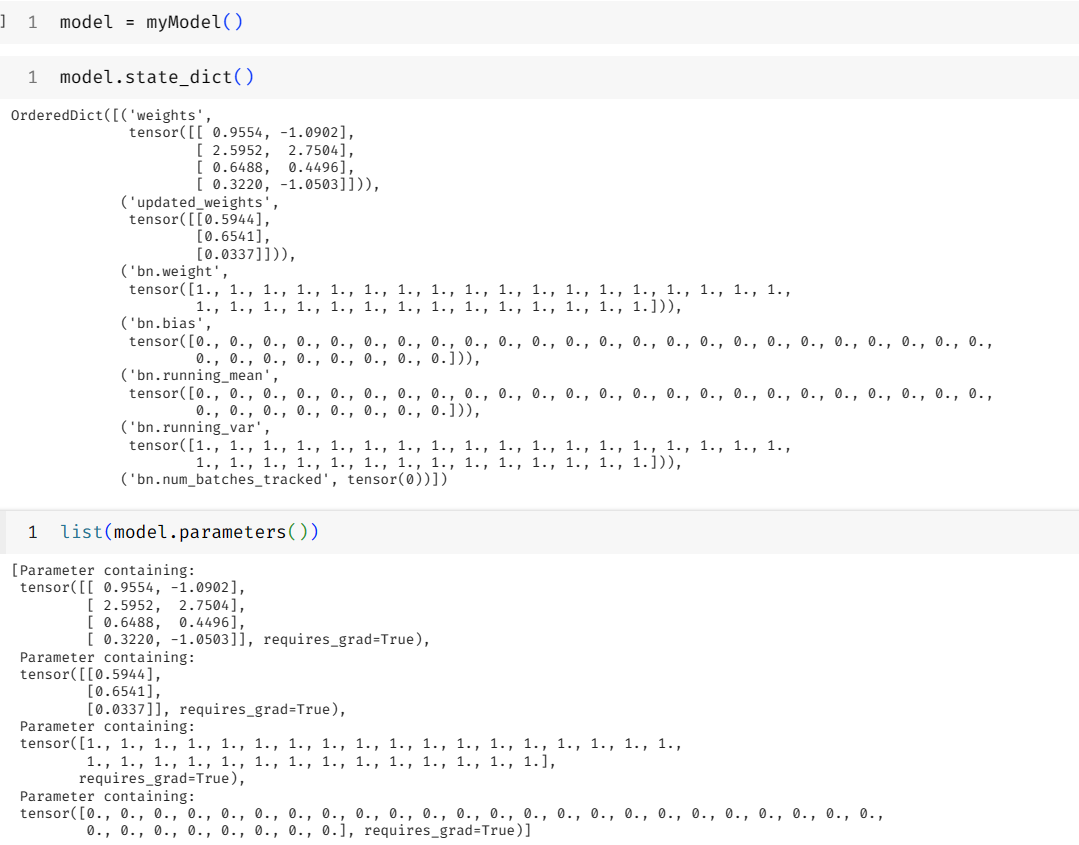
关键要区分model.parameters,model.state_dict,model.named_parameters
parameters和named_parameters差别是后者会有对应的key.
state_dict会包含running_var和running_mean这些值.
继承模型时对于nn.Parameter需要更新的参数设置requires_grad=True
chapter 3
使用torch.inference_mode替代torch.no_grad
常用的loss和optimizer
| Stochastic Gradient Descent (SGD) optimizer | Classification, regression, many others. | torch.optim.SGD() |
|---|---|---|
| Adam Optimizer | Classification, regression, many others. | torch.optim.Adam() |
| Binary cross entropy loss | Binary classification | torch.nn.BCELossWithLogits or torch.nn.BCELoss |
| Cross entropy loss | Mutli-class classification | torch.nn.CrossEntropyLoss |
| Mean absolute error (MAE) or L1 Loss | Regression | torch.nn.L1Loss |
| Mean squared error (MSE) or L2 Loss | Regression | torch.nn.MSELoss |
machine learning - PyTorch torch.no_grad vs torch.inference_mode - Stack Overflow
使用torchmetrics作为衡量标准的库方便.使用tensorboardtensorboard_with_pytorch.ipynb - Colaboratory (google.com)查看loss,acc等.1
2
3
4
5
6
7
8
9
10
11
12
13!pip install -q tensorboard
# load tensorboard
from torch.utils.tensorboard import SummaryWriter
write = SummaryWriter("./logs")
# do train and evalute
writer.add_scalar() # 添加变量
writer.add_image() #添加图像
writer.add_graph()
writer.flush()
writer.close()
!tensorboard --logdir=runs
使用tensorboard.dev分享到公网.1
2
3!tensorboard dev upload --logdir runs \
--name "My latest experiment" \
--description "Simple comparison of several hyperparameters"
在colab上使用魔法命令1
%tensorboard --logdir logs
端口冲突解决1
2lsof -i:<port>
kill -9 PID
多GPU训练1
2
3
4
5
6
7
8
9
10
11
12def data_parallel(module, input, device_ids, output_device=None):
if not device_ids:
return module(input)
if output_device is None:
output_device = device_ids[0]
replicas = nn.parallel.replicate(module, device_ids)
inputs = nn.parallel.scatter(input, device_ids)
replicas = replicas[:len(inputs)]
outputs = nn.parallel.parallel_apply(replicas, inputs)
return nn.parallel.gather(outputs, output_device)
In general, pytorch’s nn.parallel primitives can be used independently. We have implemented simple MPI-like primitives:
- replicate: replicate a Module on multiple devices
- scatter: distribute the input in the first-dimension
- gather: gather and concatenate the input in the first-dimension
- parallel_apply: apply a set of already-distributed inputs to a set of already-distributed models.
chapter 4
创建自己的图片数据集,使用ImageFolder1
2
3
4
5
6
7
8
9
10
11
12
13
14
15train_dir = image_path / "train"
test_dir = image_path / "test"
train_data = datasets.ImageFolder(root=train_dir,transform=data_transform,target_transform=None)
test_data = datasets.ImageFolder(root=test_dir,transform=data_transform)
# Turn train and test Datasets into DataLoaders
from torch.utils.data import DataLoader
train_dataloader = DataLoader(dataset=train_data,
batch_size=1, # how many samples per batch?
num_workers=1, # how many subprocesses to use for data loading? (higher = more)
shuffle=True) # shuffle the data?
test_dataloader = DataLoader(dataset=test_data,
batch_size=1,
num_workers=1,
shuffle=False) # don't usually need to shuffle testing data
找到某个文件夹下的类1
2
3
4
5
6
7
8
9
10
11
12
13
14
15
16
17
18
19
20
21
22
23
24
25
26# Make function to find classes in target directory
def find_classes(directory: str) -> Tuple[List[str], Dict[str, int]]:
"""Finds the class folder names in a target directory.
Assumes target directory is in standard image classification format.
Args:
directory (str): target directory to load classnames from.
Returns:
Tuple[List[str], Dict[str, int]]: (list_of_class_names, dict(class_name: idx...))
Example:
find_classes("food_images/train")
>>> (["class_1", "class_2"], {"class_1": 0, ...})
"""
# 1. Get the class names by scanning the target directory
classes = sorted(entry.name for entry in os.scandir(directory) if entry.is_dir())
# 2. Raise an error if class names not found
if not classes:
raise FileNotFoundError(f"Couldn't find any classes in {directory}.")
# 3. Create a dictionary of index labels (computers prefer numerical rather than string labels)
class_to_idx = {cls_name: i for i, cls_name in enumerate(classes)}
return classes, class_to_idx1
2
3
4
5
6
7
8
9
10
11
12
13
14
15
16
17
18
19
20
21
22
23
24
25
26
27
28
29
30
31
32
33
34
35
36
37
38
39
40
41
42
43
44
45
46
47
48
49
50
51
52
53
54
55
56class ImageFolderCustom(Dataset):
def __init__(self, targ_dir: str, transform=None) -> None:
# 3. Create class attributes
# Get all image paths
self.paths = list(pathlib.Path(targ_dir).glob("*/*.jpg")) # note: you'd have to update this if you've got .png's or .jpeg's
# Setup transforms
self.transform = transform
# Create classes and class_to_idx attributes
self.classes, self.class_to_idx = find_classes(targ_dir)
def load_image(self,index:int) -> Image.Image:
image_path = self.paths[index]
return Image.open(image_path)
def __len__(self) -> int:
return len(self.paths)
def __getitem__(self,index:int) -> Tuple[torch.Tensor,int]:
img = self.load_image(index)
cls_name = self.paths[index].parent.name
cls_idx = self.class_to_idx[cls_name]
if self.transform:
return self.transform(img),cls_idx
else:
return img,cls_idx
# Augment train data
train_transforms = transforms.Compose([
transforms.Resize((64, 64)),
transforms.RandomHorizontalFlip(p=0.5),
transforms.ToTensor()
])
# Don't augment test data, only reshape
test_transforms = transforms.Compose([
transforms.Resize((64, 64)),
transforms.ToTensor()
])
train_data_custom = ImageFolderCustom(targ_dir=train_dir,
transform=train_transforms)
test_data_custom = ImageFolderCustom(targ_dir=test_dir,
transform=test_transforms)
# Turn train and test custom Dataset's into DataLoader's
from torch.utils.data import DataLoader
train_dataloader_custom = DataLoader(dataset=train_data_custom, # use custom created train Dataset
batch_size=1, # how many samples per batch?
num_workers=0, # how many subprocesses to use for data loading? (higher = more)
shuffle=True) # shuffle the data?
test_dataloader_custom = DataLoader(dataset=test_data_custom, # use custom created test Dataset
batch_size=1,
num_workers=0,
shuffle=False) # don't usually need to shuffle testing data
train_dataloader_custom, test_dataloader_custom
反思对于pytorch的学习,拿来进行tensor计算以及更高效地处理深度学习模型.
下面会介绍一些workflow和可能用到的方法.
nn.ModuleList nn.ModuleDict nn.Sequential
nn.Sequential内部实现了forward函数,因此可以不用写forward函数。而nn.ModuleList和nn.ModuleDict则没有实现内部forward函数。nn.Sequential需要严格按照顺序执行,而其它两个模块则可以任意调用。
nn.Sequential里面的模块按照顺序进行排列的,所以必须确保前一个模块的输出大小和下一个模块的输入大小是一致的。nn.Sequential中可以使用OrderedDict来指定每个module的名字
nn.ModuleList里面储存了不同 module,并自动将每个 module 的 parameters 添加到网络之中的容器(注册),里面的module是按照List的形式顺序存储的,但是在forward中调用的时候可以随意组合。
可以任意将 nn.Module 的子类 (比如 nn.Conv2d, nn.Linear 之类的) 加到这个 list 里面,方法和 Python 自带的 list 一样,也就是说它可以使用 extend,append 等操作。
ModuleDict可以像常规Python字典一样索引,同样自动将每个module的parameters添加到网络之中的容器(注册)。- 同样的它可以使用OrderedDict、dict或者ModuleDict对它进行update,也就是追加。
register_hook
用来导出指定张量的梯度,或修改这个梯度值1
2
3
4
5v = torch.tensor([0., 0., 0.], requires_grad=True)
h = v.register_hook(lambda grad: grad * 2) # double the gradient
v.backward(torch.tensor([1., 2., 3.]))
v.grad
h.remove() # removes the hook
register_forward_hook
用来导出指定子模块(可以是层、模块等nn.Module类型)的输入输出张量,但只可修改输出,常用来导出或修改卷积特征图1
2
3
4
5
6
7
8inps, outs = [],[]
def layer_hook(module, inp, out):
inps.append(inp[0].data.cpu().numpy())
outs.append(out.data.cpu().numpy())
hook = net.layer1.register_forward_hook(layer_hook)
output = net(input)
hook.remove()
register_backward_hook
用来导出指定子模块的输入输出张量的梯度,但只可修改输入张量的梯度(即只能返回gin),输出张量梯度不可修改。1
2
3
4
5
6
7
8
9
10
11
12
13gouts = []
def backward_hook(module, gin, gout):
print(len(gin),len(gout))
gouts.append(gout[0].data.cpu().numpy())
gin0,gin1,gin2 = gin
gin1 = gin1*2
gin2 = gin2*3
gin = tuple([gin0,gin1,gin2])
return gin
hook = net.layer1.register_backward_hook(backward_hook)
loss.backward()
hook.remove()
Torch2.0 New
torch.compile1
2
3
4
5
6
7
8
9import torch
import torchvision
model = torchvision.models.resnet50() # note: this could be any
compiled_model = torch.compile(model) # <- magic happens!
### Train model ### <- faster!
### Test model ### <- faster!
全局设置GPU1
2
3
4
5
6
7
8
9
10
11
12import torch
# Set the device
device = "cuda" if torch.cuda.is_available() else "cpu"
# Set the device globally
torch.set_default_device(device)
# All tensors created will be on the global device by default
layer = torch.nn.Linear(20, 30)
print(f"Layer weights are on device: {layer.weight.device}")
print(f"Layer creating data on device: {layer(torch.randn(128, 20)).device}")