通过阅读一系列文章,分析摘要、介绍每个section的组织形式,方便写出一些列现代八股文.
写一篇论文之前需要阅读N篇论文,如何阅读论文? 这里给一个简单方法:首先看标题摘要和结论,确定论文主要方向和贡献,确定是否在深这篇论文的方向.
再粗看整篇论文,了解用到的大概技术,了解方法的每一块,看懂图表,看自己是否了解prerequisite,看这篇文章的创新或者基于哪些之前的贡献,确定是否在深入理解方法细节.
最后看method和experiment,精读整篇论文,知道每一段话在干什么,这篇工作能有什么改进.
整篇论文(除了类似综述之外的)就是为了讲述一个故事(或者产品)并验证它的有效性.
Abstract
大概五到六句话. 首先介绍背景,关键知识. 然后一转提到不足,引出Motivation. 再说本篇文章提出了什么,补一句介绍以及大致方法. 最后做实验证明了什么. 最后可以补一句代码链接.
introduction
分四段,最后贡献写三点. 介绍部分可以加张综合的图,比如有的论文将一些综合的benchmark放在了intro部分.
降低成本的一个直观方法是利用现有单个代理感知模型的通用潜力,将它们调整为合作感知模型。预先训练好的单个代理模型已经证明了极佳的可移植性,这就为重新使用它们对观察结果的通用表征提供了可能性.
首先第一段介绍背景,它的光明前景,优点. 第二段介绍最新情况,开始diss. 第三段讲讲可以怎么做,从而转进第四段介绍自己的方法.
Related work
介绍涉及到的主要领域,通常2-3个,每个领域简单介绍一些背景然后对现有方法简单分类并据一些最近的方法,然后进行diss说明不足,可以写一点本篇工作的差异.
Methodology
方法介绍见仁见智了. 一种常用的方法是,首先介绍方法步骤、组件,然后分别进行介绍.
Experiments实验
实验部分介绍使用的数据集,评价指标,实现细节(实验设置),定量分析,定性分析以及消融实验等.
首先介绍论文进行了comprehensive的实验,然后分别介绍数据集,随后介绍评价指标/方法.
We conduct experiments on two public benchmark datasets (OPV2V [4], V2V4Real [2]) for the V2V cooperative perception task. OPV2V is a large-scale simulated dataset for V2V cooperative perception, which is collected by CARLA simulator and OpenCDA [28]. It contains 73 divergent scenes with various numbers of connected vehicles ([1, 5]), and its training/validation/testing set is split into 6,764, 1,981 and 2,719 frames, respectively. V2V4Real is a real-world, large-scale dataset with diverse driving scenarios, which is collected by two CAVs driving simultaneously in Columbus, Ohio, USA. It’s split into the train/validation/test set with 14,210/2,000/3,986 frames, respectively.
实现细节(Experiment setup)
介绍使用的框架、工具以及训练的GPU设备.
然后介绍训练时的细节,比如使用的optimizer和lr_scheduler,batch_size,epochs等.然后介绍自己的算法中的参数设置,最后介绍一些细节等.
评价指标和方法也可以放这.
定量分析
使用不同指标进行对比.
定量分析这一节的写法
Table 1 shows the 3D detection performance comparison results on the three datasets. We compare the following methods. No Fusion as a baseline considers only the point cloud data of ego vehicles without collaboration. Late Fusion allows agents to exchange detected results and utilizes non-maximum suppression to produce the final outputs. Early Fusion means the raw LiDAR point clouds are shared to complete the perception view. Meanwhile, the existing state-of-the-art (SOTA) models are fully considered, including When2com [20], V2VNet [28], AttFuse [37], V2X-ViT [36], DiscoNet [17], CoBEVT [34], and Where2comm [10]. Intuitively, the proposed SCOPE outperforms No Fusion, Late Fusion, and Early Fusion by large margins across all datasets, demonstrating the superiority of our perception paradigm. Moreover, our method significantly outperforms previous SOTA models in simulated and real-world (DAIR-V2X) scenarios. In particular, the SOTA performance is improved by 3.63% and 7.41% on the V2XSet and OPV2V datasets separately in AP@0.7. Compared to single-frame and collaborationonly based efforts [10, 17, 20, 28, 36], SCOPE proves the effectiveness and rationality of simultaneously considering the temporal context, collaboration, and ego characteristics.
We first test the methods on noisy settings with only localization error at different levels of 𝜎𝑙𝑜𝑐 , as shown in Fig 5. The results showed that early fusion and some state-of-theart intermediate methods could detect and predict object vehicles with high precision in ideal settings, but their detection precision degraded quickly as the degree of error increased. Methods with robust designs, such as V2X-ViT [25] and ICP and OT [18], exhibit higher precision in noisy settings, but their performance still decrease significantly in intense noise conditions. In contrast, our FeaCo demonstrate high robustness and retain similar precision levels in high pose-error environments, attributed to the effect of our PRM and multi-scale CAM. Furthermore, methods are compared in V2V4Real dataset [24] to better illustrate the effectiveness of FeaCo in noisy environments. As results displayed in 1, classic [3, 26] and SOTA[23, 25] methods show different degrees of degradation in high-noise settings. In constrast, FeaCo successfully maintains the best performance and robustness in real-world environment, especially in intense noise conditions. We then evaluate the methods on environments with both localization and heading errors, which are common in real-world settings. We set the 𝜎𝑙𝑜𝑐 and 𝜎ℎ𝑒𝑎𝑑 to the same value to unify the noise level. Our experiments are based on two given test sets, 𝐷𝑒 𝑓 𝑎𝑢𝑙𝑡 𝑇 𝑒𝑠𝑡 in Tab 2 and 𝑇 𝑒𝑠𝑡 𝐶𝑢𝑙𝑣𝑒𝑟 𝐶𝑖𝑡𝑦 in Tab 3, validating that our FeaCo outperform all the other methods in various noise settings and remain detection robustness in noisy conditions close to reality. Overall, our evaluation demonstrated the superior performance and robustness of FeaCo in various environment settings, making it a promising collaborative perception framework for real-world applications.
Latex常用
众所周知,不用latex写出来的只能是文章,不能是论文(暴言).

LATEX 中单引号 ‘ 和 ’ 分别用 ` 和 ‘ 输入;双引号 “ 和 ” 分别用 `` 和 ‘’ 输入
文章标题、作者注解
主要用于表示一些共一、通信作者,作者与单位的关系以及一些额外信息等.
有几种不同方式.
使用\footnote 命令可以在页面底部生成一个脚注.
有些情况下(比如在表格环境、各种盒子内)使用 \footnote 并不能正确生成脚注。我们 可以分两步进行,先使用 \footnotemark 为脚注计数,再在合适的位置用 \footnotetext 生成脚注。
对于单位或者邮箱,1
\renewcommand{\thefootnote}{\fnsymbol{footnote}}
表示用9个特殊字符编号1
2{\tt\small $\{$test,test2$\}$@xxx.edu.cn}
# 使用\vspace \quad空格
\fnsymbol 一系列符号,用于 \thanks 命令生成的脚注
对文字操作
比如\textbf等等能使文字改变(包括公式),这些还是非常有用的.
引入宏包1
2
3\usepackage{amsmath}
\usepackage{amssymb}
\usepackage{bm}
对于排版数学公式,主要使用amsmath宏,而amssymb提供许多数学符号
\underline 命令生成下划线的样式不够灵活,不同的单词可能生成高低各异的下划线,并 且无法换行。ulem 宏包提供了更灵活的解决方案,它提供的 \uline 命令能够轻松生成自动换行的下划线
行内和行间公式
数学公式有两种排版方式:其一是与文字混排,称为行内公式;其二是单独列为一行排版, 称为行间公式。
简单来说行内公式使用$$$$,行间公式使用\equation.
equation 环境为公式自动生成一 个编号,这个编号可以用 \label 和 \ref 生成交叉引用,amsmath 的 \eqref 命令甚至为引用 自动加上圆括号;还可以用 \tag 命令手动修改公式的编号,或者用 \notag 命令取消为公式编 号
如果需要直接使用不带编号的行间公式,则将公式用命令 [ 和 ] 包裹,与之等效的是 displaymath 环境。有的人更喜欢 equation* 环境,体现了带星号和不带星号的环境之间的区别。1
2
3
4
5
6
7
8
9\begin{equation*}
a^2 + b^2 = c^2
\end{equation*}
For short:
\[ a^2 + b^2 = c^2 \]
Or if you like the long one:
\begin{displaymath}
a^2 + b^2 = c^2
\end{displaymath}
当用户使用 $ 开启行内公式输入,或是使用 [ 命令、equation 环境时,LATEX 就进入了 数学模式。
- 数学模式中输入的空格被忽略。数学符号的间距默认由符号的性质(关系符号、运算符等) 决定。需要人为引入间距时,使用 \quad 和 \qquad 等命令
不允许有空行(分段)。行间公式中也无法用 \ 命令手动换行,排版多行公式需要使用其他环境
所有的字母被当作数学公式中的变量处理,字母间距与文本模式不一致,也无法生成单词 之间的空格。想在数学公式中输入正体的文本,简单情况下可用 \mathrm 命令。或者用 amsmath 提供的 \text 命令
一般符号
希腊字母符号的名称就是其英文名称,如 α (\alpha)、β (\beta) 等等。大写的希腊字母为 首字母大写的命令,如 Γ (\Gamma)、∆ (\Delta) 等等。无穷大符号为 ∞ (\infty)。
hyperref
1 | \documentclass{article} |
1 | \usepackage{hyperref} |
colorlinks就是说超链接是否带颜色;
linkcolor就是目录,公式,图表等内部链接的颜色;
filecolor就是文件型链接的颜色;
urlcolor就是网页链接的颜色;
citecolor就是参考文献连接的颜色pagebackref=true
:在参考文献中添加返回页码的链接。breaklinks=true`:允许链接跨行断开。letterpaper=true:将页面大小设置为Letter纸张尺寸。
bookmarks=false:禁用书签生成。
amssymb 宏包提供了一些次常用的符号.
hyperref 宏包提供了直接书写超链接的命令,用于在 PDF 中生成 URL:1
\url{⟨url⟩} \nolinkurl{⟨url⟩}
xcolor
文本设置颜色1
2
3
4
5
6
7
8
9
10
11\documentclass{article}
\usepackage{xcolor}
\begin{document}
\textcolor{red}{这是红色的文本。}
\colorbox{blue!30}{这是一个蓝色背景的盒子。}
\definecolor{mygreen}{rgb}{0,0.5,0}
\textcolor{mygreen}{这是自定义的绿色文本。}
\end{document}
soul
下划线和删除线等1
2
3\st{This text has a strikethrough.}
\hl{\ul{Highlighted and underlined text.}}
\st{\ul{Strikethrough and underlined text.}}
times
times宏包用于将文档的字体设置为Times字体。使用\usepackage{times}命令导入该宏包即可1
2
3
4
5
6\documentclass{article}
\usepackage{times}
\begin{document}
This is some text in Times font.
\end{document}
epsfig宏包
epsfig宏包用于在LaTeX文档中插入EPS格式的图像文件。使用\usepackage{epsfig}命令导入该宏包即可1
2
3
4
5
6
7
8
9
10\documentclass{article}
\usepackage{epsfig}
\begin{document}
\begin{figure}
\centering
\epsfig{file=example.eps, width=0.5\textwidth}
\caption{An example EPS figure.}
\end{figure}
\end{document}
graphicx
graphicx宏包是LaTeX中最常用的图形处理宏包之一,用于插入和操作各种图像文件格式。使用\usepackage{graphicx}命令导入该宏包即可。1
2
3
4
5
6
7
8
9
10\documentclass{article}
\usepackage{graphicx}
\begin{document}
\begin{figure}
\centering
\includegraphics[width=0.5\textwidth]{example.png}
\caption{An example PNG image.}
\end{figure}
\end{document}1
2\graphicspath{{resource/}} % organize your images and other figures under resource/ folder
bbding
bbding宏包提供了一系列特殊符号和图标,如手势、箭头、勾号、叉号等。使用\usepackage{bbding}命令导入该宏包即可。1
2
3
4
5
6
7
8
9
10
11
12\documentclass{article}
\usepackage{bbding}
\begin{document}
\Checkmark \quad \XSolidBrush \quad \HandRight
\end{document}
# 打勾叉
\Checkmark
\CheckmarkBold
\XSolid
\XSolidBold
\XSolidBrush
subcaption
1 | \documentclass{article} |
1 | As shown in Figure \ref{fig:example}, subfigure \subref{subfig:1} is interesting. |
使用\subref引用子图
\nicefrac
\nicefrac命令是由nicefrac宏包提供的。它用于生成更紧凑的分数符号,比如1/2、3/4等。通常在文本模式下使用,可以将其用于正文、标注或其他地方需要使用分数的场景。例如:1
2
3
4
5
6\documentclass{article}
\usepackage{nicefrac}
\begin{document}
The result is \nicefrac{1}{2}.
\end{document}
microtype
microtype宏包提供了微调字距和字形的功能,以改善文本的排版效果。它可以自动调整字符之间的间距、字号和字形,以提高视觉效果和可读性。要使用microtype宏包,只需在导言区使用\usepackage{microtype}命令导入即可。
fancyhdr
fancyhdr宏包用于自定义页眉和页脚的样式。它允许在页面的顶部和底部添加自定义内容,如文档标题、章节标题、页码等。通过使用fancyhdr宏包,您可以灵活地控制和设计页面的页眉和页脚。要使用fancyhdr宏包,只需在导言区使用\usepackage{fancyhdr}命令导入即可。
画表格
三线表在论文里面基本是必须的.1
2
3
4
5\begin{tabular}[⟨align⟩]{⟨column-spec⟩}
⟨item1⟩ & ⟨item2⟩ & … \\
\hline
⟨item1⟩ & ⟨item2⟩ & … \\
\end{tabular}
表格有个列格式,包括l,c,r,p以及|和@{}.每行的数目不能多于列格式个数.还有简单法\
*{n}{ 科技论文排版中广泛应用的表格形式是三线表,形式干净简明。三线表由 booktabs 宏包 支持,它提供了 \toprule、\midrule 和 \bottomrule 命令用以排版三线表的三条线,以及和 \cline 对应的 \cmidrule。除此之外,最好不要用其它横线以及竖线 合并单元格可以使用 ⟨width⟩ 为合并后单元格的宽度,可以填 * 以使用自然宽度 或者在线生成Create LaTeX tables online – TablesGenerator.com 一些数字符号的形态在不同地方需要不一样,比如公式中 一般来说,不同的数学字体往往带有不同的语义,如矩阵、向量等常会使用粗体或粗斜体, 而数集常会使用 对于数学符号加粗,使用 内容丰富的文章或者书籍往往包含许多图片和表格等内容。这些内容的尺寸往往太大,导致 分页困难。LATEX 为此引入了浮动体的机制,令大块的内容可以脱离上下文,放置在合适的位置 LATEX 预定义了两类浮动体环境 figure 和 table。习惯上 figure 里放图片,table 里放表格,但并没有严格限制,可以在任何一个浮动体里放置文字、公式、表格、图片等等任意内容 双栏排版环境下,LATEX 提供了 table 和 figure 环境用来排版跨栏的浮动体。它们的用法与 table 和 figure 一样,不同之处为双栏的 ⟨placement⟩ 参数只能用 tp 两个位置. 浮动体的位置选取受到先后顺序的限制。如果某个浮动体由于参数限制、空间限制等原因在 当前页无法放置,就要推迟到之后处理,并使得之后的同类浮动体一并推迟。 float 宏包为浮动体提供了 H 位置参数,不与 htbp 及 ! 混用。使用 H 位置参数时,会取消浮动机制,将浮动体视为一般的盒子插入当前位置。这在一些特殊情况下很有用(如使用 multicol 宏包排版分栏内容的时候),但尺寸过大的浮动体可能使得分页比较困难。 LATEX 支持生成简单的标题页。首先需要给定标题和作者等信息: 其中前两个命令是必须的(不用 \title 会报错;不用 \author 会警告),\date 命令可选。LATEX 还提供了一个 \today 命令自动生成当前日期,\date 默认使用 \today。 在 \title、\author 等命令内可以使用 \thanks 命令生成标题页的脚注,用 \and 隔开多个人名。 多行公式,amsmath 宏包的 multline 环境提供了书写折行长公式的方便环境。它允许用 \ 折行,将 公式编号放在最后一行。多行公式的首行左对齐,末行右对齐,其余行居中。多行公式的首行左对齐,末行右对齐,其余行居中 最常用的是 align 环境,它将公式用 & 隔为两部分并对齐。分隔符通常放在等号左边 align 环境会给每行公式都编号。然可以用 \notag 去掉某行的编号。为了对齐等号,将分隔符放在右侧,并且此时需要在等号后添加一对括号 {} 以产生正常的 间距 align 还能够对齐多组公式,除等号前的 & 之外,公式之间也用 & 分隔 如果不需要按等号对齐,只需罗列数个公式,gather 将是一个很好用的环境 align 和 gather 有对应的不带编号的版本 align 和 gather。 另一个常见的需求是将多个公式组在一起公用一个编号,编号位于公式的居中位置。为此, amsmath 宏包提供了诸如 aligned、gathered 等环境,与 equation 环境套用。以 -ed 结尾的 环境用法与前一节不以 -ed 结尾的环境用法一一对应 amsmath 宏包提供了诸如 aligned、gathered 等环境,与 equation 环境套用。以 -ed 结尾的 环境用法与前一节不以 -ed 结尾的环境用法 区别是 split 只能 将每行的一个公式分两栏,aligned 允许每行多个公式多栏. 空格键和 Tab 键输入的空白字符视为“空格”。连续的若干个空白字符视为一个空格。一行开头的空格忽略不计。 行末的换行符视为一个空格;但连续两个换行符,也就是空行,会将文字分段。多个空行被 视为一个空行。也可以在行末使用 \par 命令分段。 文字在单词间的“空格”处断行时,“空格”生成的间距随之舍去。我们可以使用字符 ~ 输入一个不会断行的空格.常用于图标等引用,这样使它们断行时在一起. 手动断行 \ 可以带可选参数 ⟨length⟩,用于在断行处向下增加垂直间距(见 5.3.5 小节),而 \newline 不带可选参数;二是 \ 也在表格、公式等地方用于换行,而 \newline 只用于文本段落中。带星号的 \ 表示禁止在断行处分页 断页的命令有两个: \newpage \clearpage 第一,在双栏排版模式中 \newpage 起到另起一栏的作用,\clearpage 则能够另起一页;第二,在涉及浮动体的排版上行为不同 LATEX 还默认在 \chapter、\section 等章节标题命令之后的第一段不缩进,可以调用 indentfirst 宏包,令第一段的首行缩进照常。 段落间的垂直间距为 \parskip,如设置段落间距在 0.8ex 到 1.5ex 变动: \setlength{\parskip}{1ex plus 0.5ex minus 0.2ex} 设置段落的左缩进、右缩进和首行缩进,和设置行距的命令一样,在分段时生效 默认为将单词之间的“空格”转化为水平间距。如果需要在文中手动插入额外的水平间距,可使用 \hspace 命令 可以使用\stretch{⟨n⟩} 生成一个特殊弹性长度,参数 ⟨n⟩ 为权重。它的基础长度为 0pt,但可 以无限延伸,直到占满可用的空间。如果同一行内出现多个 \stretch{⟨n⟩},这一行的所有可用 空间将按每个 \stretch 命令给定的权重 ⟨n⟩ 进行分配。 命令 \fill 相当于 \stretch{1} 如果我们想要人为地增加段落之间的垂直间距,可以在两个段落之间的位置使用 \vspace 命令生成的垂直间距在一页的顶端或底端可能被“吞掉”,类似 \hspace 在一行的 开头和末尾那样。对应地,\vspace* 命令产生不会因断页而消失的垂直间距。\vspace 也可用 \stretch 设置无限延伸的垂直长度。 命令 预定义的页眉页脚样式如下 article 文档类,twoside 选项 偶数页为页码和节标题,奇数页为小节标题和页码 article 文档类,oneside 选项 页眉为节标题和页码; \pagenumbering 命令令能够改变页眉页脚中的页码样式 如果要手动更改页眉页脚的内容, LATEX 默认将页眉的内容都转为大写字母。如果需要保持字母的大小写,可以尝试以下代码 对于 article 文档类,与两个页眉相关的命令分别为 \sectionmark 和 \subsectionmark。 可以使用fancyhdr定义页眉页脚,命令为: ⟨position⟩ 为 L(左)/ C(中)/ R(右)以及与 O(奇数页)/ E(偶数页)字母的组合. \fancyhf 用于同时定义页眉和页脚,习惯上使用 \fancyhf{} 来清空页眉页脚的设置 fancyhdr 还支持用 \fancypagestyle 为自定义的页眉页 手工方法 使用bibtex, 第一步:准备一份 BIBTEX 数据库,假设数据库文件名为 books.bib,和 LATEX 源代码一般 位于同一个目录下 第二步:在源代码中添加必要的命令。假设源代码名为 demo.tex 时下许多学术期刊比较喜欢使用人名——年份的引用方式,形如 (Axford et al., 2013)。natbib 宏包提供了对这种“自然”引用方式的处理。 除了 \cite 之外,natbib 宏包在正文中支持两种引用方式. 它们分别生成形如 (Axford et al., 2013) 和 Axford et al. (2013) 的人名——年份引用, Algorithms - Overleaf, Online LaTeX Editor 推荐使用 如果已经加载了algpseudocode,则不应加载algorithm2e、algcompatible和algorithmic包. 如果需要一个带标题的算法,还需要 algpseudocode,algocimpatible和algorithmic包提供的语法既支持大写和首字母大写语法,algorithmic指令只支持全大写. algorithm2e包的语法结构与algpseudocode、algcompatible和algorithmic包完全不同. LATEX 本身不支持插图功能,需要由 graphicx 宏包辅助支持 我看通常使用的是pdf引入. 需要[t]表示在当页的顶部. 文件名可能需要用相对路径或绝对路径表示。图片文件的扩展名一般可不写。另外一定要注意,文件名里既不要空格(类似 \include),也不要有多余的英文点号。另外 graphicx 宏包还提供了 \graphicspath 命令,用于声明一个或多个图片文件存放的目 录,使用这些目录里的图片时可不用写路径 LATEX 不允许使用 \newcommand 定义一个与现有命令重名的命令。 如果需要修改命令定义 的话,使用 \renewcommand 命令。 它使用与命令 \newcommand 相同的语法。 在某些情况之下,使用 \providecommand 命令是一种比较理想的方案:在命令未定义时,它相当于 \newcommand;在命令已定义时,沿用已有的定义 欢迎关注我的其它发布渠道\hline可以用于绘制横线,但现在多用\cline替代可以绘制跨越部分单元格的横线. 1
2
3
4
5
6\begin{tabular}{|c|c|c|}
\hline
4 & 9 & 2 \\ \cline{2-3}
3 & 5 & 7 \\ \cline{1-1}
8 & 1 & 6 \\ \hline
\end{tabular}\multicolumn{<n>}{<column-spec>}{<item>}以及\multirow{⟨n⟩}{⟨width⟩}{⟨item⟩}\cmidrule 命令用于绘制带有中间规格线的表格。其中,<trim> 是用于控制规格线修剪的参数。<trim> 可以是以下几种取值之一:l: 在左侧修剪规格线,使其不与左边界相连。r: 在右侧修剪规格线,使其不与右边界相连。lr: 在左右两侧修剪规格线,使其不与左右边界相连。数字符号控制
\mathbb表示。出于内容与格式分离以及方便书写的考虑,可以为它们定义新 的命令。
\mathbf获得直立加粗,也可以使用bm 宏包提供的\bm 命令得到粗斜体.非常有用的LaTeX字体设置 - morxio - 博客园 (cnblogs.com)浮动体
\clearpage命令会在另起一页之前,先将所有推迟处理的浮动体排版成页,此时 htbp 等位置限制被完全忽略。标题页
1
\title{⟨title⟩} \author{⟨author⟩} \date{⟨date⟩}
公式环境
1
2
3
4
5
6
7\begin{multline}
a + b + c + d + e + f
+ g + h + i \\
= j + k + l + m + n\\
= o + p + q + r + s\\
= t + u + v + x + z
\end{multline}1
2
3
4
5
6
7\begin{align}
a ={} & b + c \\
={} & d + e + f + g + h + i
+ j + k + l \notag \\
& + m + n + o \\
={} & p + q + r + s
\end{align}1
2
3
4
5
6\begin{gather}
a = b + c \\
d = e + f + g \\
h + i = j + k \notag \\
l + m = n
\end{gather}1
2
3
4
5
6
7
8\begin{equation}
\begin{aligned}
a &= b + c \\
d &= e + f + g \\
h + i &= j + k \\
l + m &= n
\end{aligned}
\end{equation}空格与分段
1
2It's difficult to find \ldots\\
It's dif{}f{}icult to f{}ind \ldots断行和断页
1
2\\[⟨length⟩] \\*[⟨length⟩]
\newline段落格式
1
2
3\setlength{\leftskip}{⟨length⟩}
\setlength{\rightskip}{⟨length⟩}
\setlength{\parindent}{⟨length⟩}1
2This\hspace{1.5cm}is a space
of 1.5 cm.1
2
3x\hspace{\stretch{1}}
x\hspace{\stretch{3}}
x\hspace{\fill}x\vspace 命令1
2
3A paragraph.
\vspace{2ex}
Another paragraph.页眉页脚
\pagestyle 来修改页眉页脚的样式1
\pagestyle{⟨page-style⟩}
\thispagestyle 只影响当页的页眉页脚样式1
\thispagestyle{⟨page-style⟩}

1
\pagenumbering{⟨style⟩}
1
2\markright{⟨right-mark⟩}
\markboth{⟨left-mark⟩}{⟨right-mark⟩}1
\renewcommand\chaptermark[1]{% \markboth{Chapter \thechapter\quad #1}{}} \renewcommand\sectionmark[1]{% \markright{\thesection\quad #1}}
1
\fancyhf[⟨position⟩]{…} \fancyhead[⟨position⟩]{…} \fancyfoot[⟨position⟩]{…}
1
2
3
4
5
6
7
8
9
10
11% 在导言区使用此代码
\usepackage{fancyhdr}
\pagestyle{fancy}
\renewcommand{\chaptermark}[1]{\markboth{#1}{}}
\renewcommand{\sectionmark}[1]{\markright{\thesection\ #1}}
\fancyhf{}
\fancyfoot[C]{\bfseries\thepage}
\fancyhead[LO]{\bfseries\rightmark}
\fancyhead[RE]{\bfseries\leftmark}
\renewcommand{\headrulewidth}{0.4pt} % 注意不用 \setlength
\renewcommand{\footrulewidth}{0pt}1
2\fancypagestyle{myfancy}{% \fancyhf{} \fancyhead{...} \fancyfoot{...} } % 使用样式
\pagestyle{myfancy}参考文献
1
2
3
4\cite{⟨citation⟩}
\begin{thebibliography}{⟨widest label⟩}
\bibitem[⟨item number⟩]{⟨citation⟩} ...
\end{thebibliography}1
\bibliography{⟨bib-name⟩}

1
2\citep{⟨citation⟩}
\citet{⟨citation⟩}伪代码
algpseudocode搭配algorithm1
2
3
4
5
6
7
8
9
10
11
12
13
14\documentclass{article}
\usepackage{algpseudocode}
\begin{document}
\begin{algorithmic}
\State $i \gets 10$
\If{$i\geq 5$}
\State $i \gets i-1$
\Else
\If{$i\leq 3$}
\State $i \gets i+2$
\EndIf
\EndIf
\end{algorithmic}
\end{document}algpseudocode提供了algorithmic环境,如果想在算法中添加行号,使用\begin{algorithmic}[1]algorithm像表和图这样的浮块,因此可以添加浮点数位置修饰符[hbt!]在\begin{algorithm}之后algorithm,上述算法示例没有标题,也没有编号.如果你需要一个带标题的算法,还需要使用算法包1
2
3
4\begin{algorithm}
\caption{...}
...
\end{algorithm}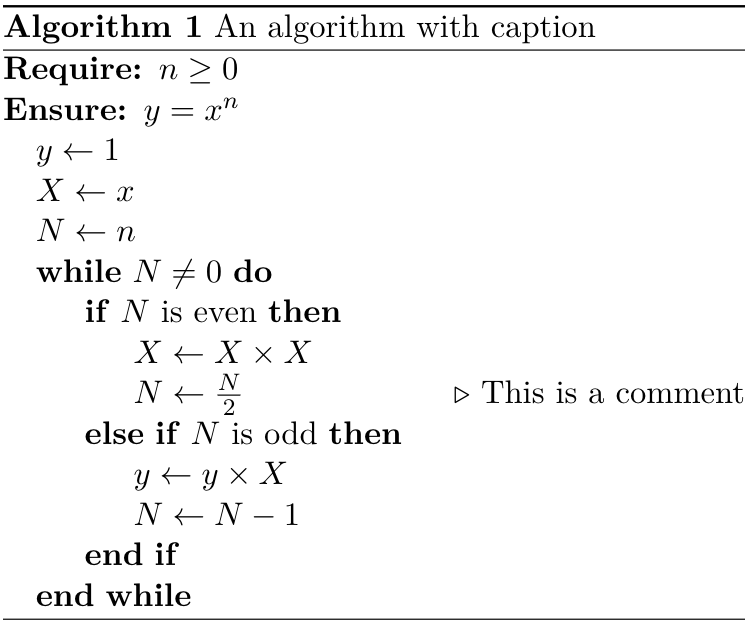
1
2
3
4
5
6
7
8
9
10
11
12
13
14
15
16
17
18
19
20
21
22
23
24
25\documentclass{article}
\usepackage{algorithm}
\usepackage{algpseudocode}
\begin{document}
\begin{algorithm}
\caption{An algorithm with caption}\label{alg:cap}
\begin{algorithmic}
\Require $n \geq 0$
\Ensure $y = x^n$
\State $y \gets 1$
\State $X \gets x$
\State $N \gets n$
\While{$N \neq 0$}
\If{$N$ is even}
\State $X \gets X \times X$
\State $N \gets \frac{N}{2}$ \Comment{This is a comment}
\ElsIf{$N$ is odd}
\State $y \gets y \times X$
\State $N \gets N - 1$
\EndIf
\EndWhile
\end{algorithmic}
\end{algorithm}
\end{document}algcompatible/algorithmic和algorithm包
1
2
3
4
5
6
7
8
9
10
11
12
13
14
15
16\documentclass{article}
\usepackage{algcompatible}
% OR \usepackage{algorithmic}
\begin{document}
\begin{algorithmic}
\STATE $i\gets 10$
\IF {$i\geq 5$}
\STATE $i\gets i-1$
\ELSE
\IF {$i\leq 3$}
\STATE $i\gets i+2$
\ENDIF
\ENDIF
\end{algorithmic}
\end{document}1
2
3
4
5
6
7
8
9
10
11
12
13
14
15
16
17\documentclass{article}
\usepackage{algorithm2e}
\begin{document}
\begin{algorithm}
$i\gets 10$\;
\eIf{$i\geq 5$}
{
$i\gets i-1$\;
}{
\If{$i\leq 3$}
{
$i\gets i+2$\;
}
}
\end{algorithm}
\end{document}引入图片
1
2
3
4
5
6
7
8 \begin{figure}[t]
\centering
\includegraphics[width=\linewidth]{imgs/temporal.pdf}
\caption{(a) The architecture of the proposed CIA component, including selective information filtering (\textit{left}) and spatio-temporal feature integration (\textit{middle}). (b) The multi-scale convolutional structure in the pyramid LSTM.
}
\label{temporal}
\vspace{-9pt}
\end{figure}1
\includegraphics[⟨options⟩]{⟨filename⟩}
定义新命令
1
\newcommand{\⟨name⟩}[⟨num⟩]{⟨definition⟩}
\newcommand 的基本用法需要两个必选参数,第一个参数 ⟨name⟩ 是要定义的命令名称(带反斜线),第二个参数 ⟨definition⟩ 是命令的具体定义。方括号里的参数 ⟨num⟩ 是可选的,用于指定 新命令所需的参数数目(最多 9 个)。如果缺省可选参数,默认就是 0,也就是新定义的命令不带任何参数,如果使用多参数的话,在命令的定义中,标记 #1 代表指定的参数。 如果想使用多个参数,可以依次使用 #2、……、#9 等标记.1
2
3
4\newcommand{\sayHello}[2]{
Hi!\emph{#1}
}
\sayHello{Jack}参考资料