之前写了Python,现在写点NodeJS的,当然目前JS的运行时还有Deno和Bun,不过还是需要时间检验.而Node的后端框架也不少,其中佼佼者当属Nest.js,而更小的有Express这种.
这里就写写Express,Koa,Fastify以及Nest这几个框架的介绍以及示例代码,以供后续技术选型使用.
首先完全可以不使用框架写一些api1
2
3
4
5
6
7
8
9
10
11
12const http = require('http')
const url = require('url')
const app = http.createServer((req, res) => {
const parsedURL = url.parse(req.url, true)
if (parsedURL.pathname === '/api') {
res.setHeader('content-type', 'text/plain; charset=utf-8')
res.end(`Hey ${parsedURL.query.name} ${parsedURL.query.lastname}`)
}
})
app.listen(4000)
Express
1 | npm i express |
久经考验的node后端小框架,本身功能挺少的,感觉还不如Flask.没有特重载,需要使用nodemon.1
2
3
4
5
6
7
8
9
10
11
12
13
14
15
16const express = require('express')
const app = express()
app.get('/', function (req, res) {
res.send('Hello World')
})
const port = 3000;
app.listen(port, () => {
console.log(`Example app listening on port ${port}`)
})
app.get('/api/:name/:age', (req, res) => {
console.log(req.params)
res.send({
'name': req.params.name,
})
})
重要概念是Middleware,通过使用这个中间件1
2
3
4
5
6
7
8
9
10
11
12
13
14
15
16
17
18
19
20
21
22
23
24
25
26
27
28
29
30
31
32
33const express = require("express");
const app = express();
// GET method route
app.get("/", (req, res) => {
res.send("sddsaf");
});
app.get("/api/:name/:age", (req, res) => {
console.log(req.params);
res.send({
name: req.params.name,
});
});
// POST method route
app.post("/", (req, res) => {
res.send("POST request to the homepage");
});
const myLogger = function (req, res, next) {
console.log("LOGGED");
next();
};
app.use(myLogger);
app.all("/secret", (req, res, next) => {
console.log("Accessing the secret section ...");
next(); // pass control to the next handler
});
const port = 3000;
app.listen(port, () => {
console.log(`Example app listening on port ${port}`);
});
express的可魔改性挺高的,可以使用多种中间件以及重载express的API
中间件分为应用级,路由级以及一些自带的和第三方的.
应用级中间件
应用级直接使用app.use()也可以使用app.get等.1
2
3
4
5
6
7
8
9
10
11
12
13
14
15
16
17
18
19
20
21
22
23
24
25
26
27
28app.use('/user/:id', (req, res, next) => {
console.log('Request Type:', req.method)
next()
})
# 使用use可以连续定义多个中间件
app.use('/user/:id', (req, res, next) => {
console.log('Request URL:', req.originalUrl)
next()
}, (req, res, next) => {
console.log('Request Type:', req.method)
next()
})
# 使用app.get可以连续定义多个中间件
function logOriginalUrl (req, res, next) {
console.log('Request URL:', req.originalUrl)
next()
}
function logMethod (req, res, next) {
console.log('Request Type:', req.method)
next()
}
const logStuff = [logOriginalUrl, logMethod]
app.get('/user/:id', logStuff, (req, res, next) => {
res.send('User Info')
})
要跳过一个路由的中间件中的其他中间件函数,可调用 next(‘route’) 将控制权传递给下一个路由。注意:next(‘route’) 只适用于通过 app.METHOD() 或 router.METHOD() 函数加载的中间件函数。
注意区分对应路由的handler和middleware.(感觉差别其实不是很大)前者一般负责主要事务逻辑比较多,后者负责一些logging啥的.
路由级中间件
1 | const router = express.Router() |
使用 router.use() 和 router.METHOD() 函数加载路由器级中间件。相当于细分颗粒度了,使用一个router的中间件作为app级别的中间件.1
2
3
4
5
6
7
8
9
10
11
12
13
14
15
16
17
18const express = require('express')
const app = express()
const router = express.Router()
// predicate the router with a check and bail out when needed
router.use((req, res, next) => {
if (!req.headers['x-auth']) return next('router')
next()
})
router.get('/user/:id', (req, res) => {
res.send('hello, user!')
})
// use the router and 401 anything falling through
app.use('/admin', router, (req, res) => {
res.sendStatus(401)
})
上面代码使用路由中间件,如果访问没有x-auth头,就跳过其他中间件直到handlers
错误处理中间件
1 | app.use((err, req, res, next) => { |
自带中间件
- express.static serves static assets such as HTML files, images, and so on.
- express.json parses incoming requests with JSON payloads. NOTE: Available with Express 4.16.0+
- express.urlencoded parses incoming requests with URL-encoded payloads. NOTE: Available with Express 4.16.0+
第三方中间件1
npm install cookie-parser
1
2
3
4
5
6const express = require('express')
const app = express()
const cookieParser = require('cookie-parser')
// load the cookie-parsing middleware
app.use(cookieParser())
重写express API
1 | app.response.sendStatus = function (statusCode, type, message) { |
express的模板引擎可以使用Pug,Mustache,Ejs等
错误处理函数,包括一个默认的,这个默认的错误处理中间件函数被添加到中间件函数栈的末尾,也可添加自定义的.1
2
3
4app.use((err, req, res, next) => {
console.error(err.stack)
res.status(500).send('Something broke!')
})
Koa
1 | npm i koa |
1 | const Koa = require('koa'); |
koa的中间件想法跟express不太一样,而且本身没有route.比如下面的输出依次是logger,res,start,1,Hello,GET / - 1ms1
2
3
4
5
6
7
8
9
10
11
12
13
14
15
16
17
18
19
20
21
22
23
24
25
26
27
28
29
30
31
32
33
34
35const Koa = require('koa');
const app = new Koa();
// logger
app.use(async (ctx, next) => {
console.log("logger")
await next();
console.log("Hello")
const rt = ctx.response.get('X-Response-Time');
console.log(`${ctx.method} ${ctx.url} - ${rt}`);
});
// x-response-time
app.use(async (ctx, next) => {
const start = Date.now();
console.log("res")
await next();
const ms = Date.now() - start;
console.log(ms)
ctx.set('X-Response-Time', `${ms}ms`);
});
// response
app.use(async ctx => {
console.log("start")
// html
ctx.body = 'Hello World';
// json
// ctx.body = { foo: 'bar' };
});
app.listen(3000);
koa中有个context,可以给它增加属性.1
2
3
4
5app.context.db = db();
app.use(async ctx => {
console.log(ctx.db);
});
ctx里面包含了基本所有需要的东西,包括request和response.
ctx.headerctx.headersctx.methodctx.method=ctx.urlctx.url=ctx.originalUrlctx.originctx.hrefctx.pathctx.path=ctx.queryctx.query=ctx.querystringctx.querystring=等ctx.bodyctx.body=ctx.statusctx.status=ctx.messagectx.message=ctx.length=ctx.lengthctx.type=ctx.typectx.headerSentctx.redirect()ctx.attachment()ctx.set()ctx.append()ctx.remove()ctx.lastModified=ctx.etag=
路由还需要下载koa-router,koa本身不包含中间件.1
2
3
4
5
6
7
8
9
10
11
12
13
14
15
16
17
18
19const Koa = require('koa');
const Router = require('koa-router');
const app = new Koa();
const router = new Router();
router.get('/', async (ctx) => {
ctx.body = 'Home Page';
});
router.get('/about', async (ctx) => {
ctx.body = 'About Page';
});
app.use(router.routes());
app.listen(3000, () => {
console.log('Server started on port 3000');
});
错误处理1
2
3app.on('error', (err, ctx) => {
log.error('server error', err, ctx)
});
总价一下,koa本身比较简洁,使用中间件的逻辑有点怪,使用await会调用下一个中间件,如果没有其他中间件了再调用handler,然后再回去.没有自带路由,而且对模板引擎支持力度也不够,适合写API.
Fastify
特点就是快,而且github上star挺多的,一般表明生态不会太差.1
2
3
4
5
6
7
8
9
const fastify = require("fastify")
const app = fastify()
app.get("/api", (req, res) => {
res.send(`Hey ${req.query.name} ${req.query.name}`)
})
app.listen(4000)
fastify也有中间件这种叫做插件plugin的东西.1
2
3
4
5
6
7
8
9
10
11
12
13
14
15
16
17
18
19
20
21
22
23
24
25
26
27
28
29
30
const fastify = require("fastify")
const app = fastify(
{
logger:true
}
)
async function routes (app, options) {
app.get('/hi', async (request, reply) => {
return { hello: 'hi' }
})
}
app.register(routes)
app.get('/', async (request, reply) => {
return { hello: 'world' }
})
app.get("/api", (req, res) => {
res.send(`Hey ${req.query.name} ${req.query.name}`)
})
const start = async () => {
try {
await app.listen({ port: 3000 })
} catch (err) {
app.log.error(err)
process.exit(1)
}
}
start()
此外还有数据验证和序列化1
2
3
4
5
6
7
8
9
10
11
12
13
14
15
16
17
18
19
20
21
22
23
24
25
26
27
28
29
30
31const opts = {
schema: {
body: {
type: 'object',
properties: {
someKey: { type: 'string' },
someOtherKey: { type: 'number' }
}
}
}
}
fastify.post('/', opts, async (request, reply) => {
return { hello: 'world' }
})
const opts = {
schema: {
response: {
200: {
type: 'object',
properties: {
hello: { type: 'string' }
}
}
}
}
}
fastify.get('/', opts, async (request, reply) => {
return { hello: 'world' }
})
对于数据验证,该路由接受一个schema键,该schema键包含body、querystring、params和标头。
对于序列化,可以将序列化速度提高 2-3 倍。这还有助于防止潜在敏感数据的泄漏,因为 Fastify 将只序列化响应模式中的数据。
感觉它的文档写的不是很好啊,不过如果有其他框架基础倒还是好写.
对这种精小的框架,有对比I Built the Same API With Fastify, Express & Bare Node.js. Here Are the Differences (plainenglish.io)表明express还是占大头,即使fastify性能好一些,毕竟现在性能并不是一个应用的全部.
Nest.js
Nest是针对项目的,简单的几个api的话还是用express这种吧.Nest有controller,provider,interceptor这种东西了,还全面支持ts,相当于向spring MVC迈进.
app.controller.ts 带有单一路由的基本控制器。
app.controller.spec.ts 控制器的单元测试。
app.module.ts 应用程序的根模块。
app.service.ts 带有单一方法的基本服务。
main.ts 应用程序的入口文件,使用核心函数 NestFactory 创建 Nest 应用程序实例。
要创建 Nest 应用程序实例需要使用核心 NestFactory 类。NestFactory 提供了几个静态方法,用于创建应用程序实例。create() 方法会返回一个应用程序对象,该对象符合 INestApplication 接口。该对象提供了一系列方法.
Controllers
控制器负责处理接收到的请求,并将响应返回给客户端。
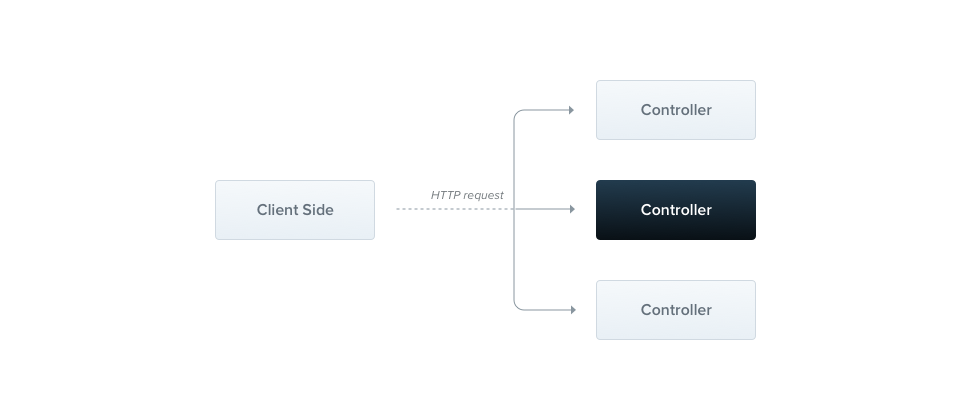
控制器的作用是接收应用程序的特定请求。路由机制控制哪个控制器接收哪些请求。通常情况下,每个控制器都有不止一个路由,不同的路由可以执行不同的操作。
为了创建基本控制器,我们使用类和装饰器。装饰器将类与所需的元数据关联起来,使 Nest 能够创建路由图(将请求绑定到相应的控制器)。
一个module下包括controller和provider(service).1
2
3
4
5
6
7
8
9
10
11
12
13
14
15
16
17
18
19
20
21
22
23
24
25
26
27
28
29
30
31
32
33
34import {
Controller,
Get,
Req,
Post,
Res,
Param,
HttpCode,
Body,
} from '@nestjs/common';
import { Request, Response } from 'express';
import { CreateCatDto } from './create-cat.dto';
('cats')
export class CatsController {
()
findAll(() request: Request, () param): string {
console.log(request.body);
console.log(param);
return 'This action returns all cats';
}
(':id')
find(() request: Request, () param): string {
console.log(request.body);
console.log(param);
return param.id;
}
()
(204)
async create(() createCatDto: CreateCatDto) {
return 'This action adds a new cat';
}
}1
2
3
4
5
6
7
8
9
10import { Module } from '@nestjs/common';
import { AppController } from './app.controller';
import { AppService } from './app.service';
import { CatsController } from './cats.controller';
({
imports: [],
controllers: [AppController, CatsController],
providers: [AppService],
})
export class AppModule {}
可以看到在modules.ts中写controller和provider,相当于把handler和route都写了.有很多修饰器可以使用
| 装饰器 | 方法 |
|---|---|
@Request(), @Req() | req |
@Response(), @Res()* | res |
@Next() | next |
@Session() | req.session |
@Param(key?: string) | req.params / req.params[key] |
@Body(key?: string) | req.body / req.body[key] |
@Query(key?: string) | req.query / req.query[key] |
@Headers(name?: string) | req.headers / req.headers[name] |
@Ip() | req.ip |
@HostParam() | req.hosts |
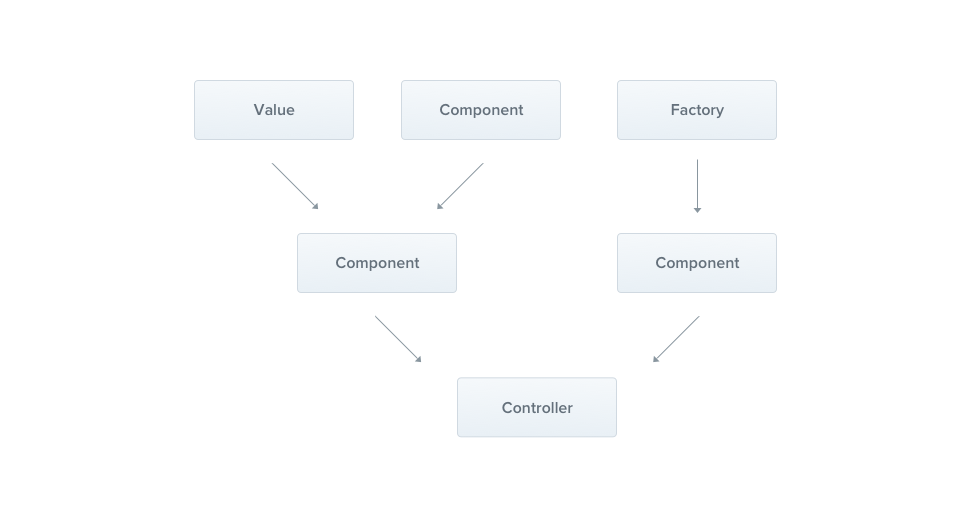
Providers
Nest 中的许多基本类都可以被视为提供者,如服services, repositories, factories, helpers等。提供者的主要理念是它可以作为依赖注入;这意味着对象之间可以创建各种关系,而 “连接 “这些对象的功能在很大程度上可以委托给 Nest 运行时系统。
可以创建一个service作为provider,@Injectable() 装饰器附加了元数据,声明 CatsService 是一个可由 Nest IoC 容器管理的类。1
2
3
4
5
6
7
8
9
10
11
12
13
14
15import { Injectable } from '@nestjs/common';
import { Cat } from './interfaces/cat.interface';
()
export class CatsService {
private readonly cats: Cat[] = [];
create(cat: Cat) {
this.cats.push(cat);
}
findAll(): Cat[] {
return this.cats;
}
}1
2
3
4
5export interface Cat {
name: string;
age: number;
breed: string;
}1
2
3
4
5
6
7
8
9
10
11
12
13
14
15
16
17
18
19import { Controller, Get, Post, Body } from '@nestjs/common';
import { CreateCatDto } from './dto/create-cat.dto';
import { CatsService } from './cats.service';
import { Cat } from './interfaces/cat.interface';
('cats')
export class CatsController {
constructor(private catsService: CatsService) {}
()
async create(() createCatDto: CreateCatDto) {
this.catsService.create(createCatDto);
}
()
async findAll(): Promise<Cat[]> {
return this.catsService.findAll();
}
}
CatsService 是通过类构造函数注入的。请注意 private 语法的使用。这种速记方法允许我们在同一位置立即声明和初始化 catsService 成员。
现在已经定义了一个提供者(CatsService),并且有了该服务的消费者(CatsController),我们需要向 Nest 注册该服务,以便它能执行注入。1
2
3
4
5
6
7
8
9
10
11import { Module } from '@nestjs/common';
import { AppController } from './app.controller';
import { AppService } from './app.service';
import { CatsController } from './cats.controller';
import { CatsService } from './cats.service';
({
imports: [],
controllers: [AppController, CatsController],
providers: [AppService, CatsService],
})
export class AppModule {}
controller中访问provider利用依赖注入1
constructor(private catsService: CatsService) {}
Modules
模块是一个用 @Module() 装饰器注解的类。@Module() 装饰器提供了 Nest 用来组织应用程序结构的元数据
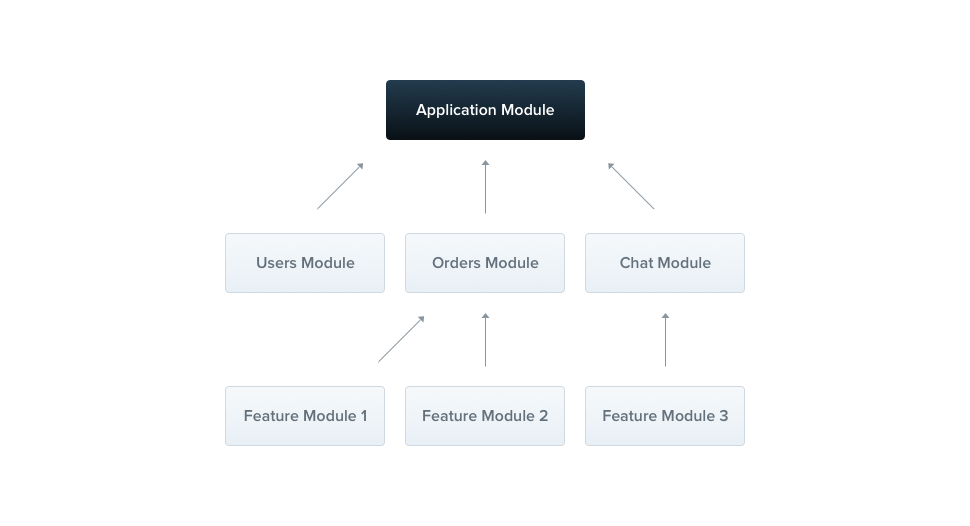
每个应用程序至少有一个模块,即根模块。根模块是 Nest 用来构建应用程序图的起点—Nest 用来解决模块和提供程序之间的关系和依赖关系的内部数据结构。
建议将模块作为组织组件的有效方式。因此,对于大多数应用程序而言,最终架构将采用多个模块,每个模块封装一组密切相关的功能。
| 模块中内容 | 作用 |
|---|---|
providers | the providers that will be instantiated by the Nest injector and that may be shared at least across this module |
controllers | the set of controllers defined in this module which have to be instantiated |
imports | the list of imported modules that export the providers which are required in this module |
exports | the subset of providers that are provided by this module and should be available in other modules which import this module. You can use either the provider itself or just its token (provide value) |
1 | import { Module } from '@nestjs/common'; |
同一个modules中的不同controller可以共享provider,此外不同modules可以import还可以导出provider1
2
3
4
5
6
7
8
9
10
11
12import { Module } from '@nestjs/common';
import { AppController } from './app.controller';
import { AppService } from './app.service';
import { CatsModule } from './cats/cats.module';
import { DogController } from './dog.controller';
import { DogService } from './dog.service';
({
imports: [CatsModule],
controllers: [AppController, DogController],
providers: [AppService, DogService],
})
export class AppModule {}
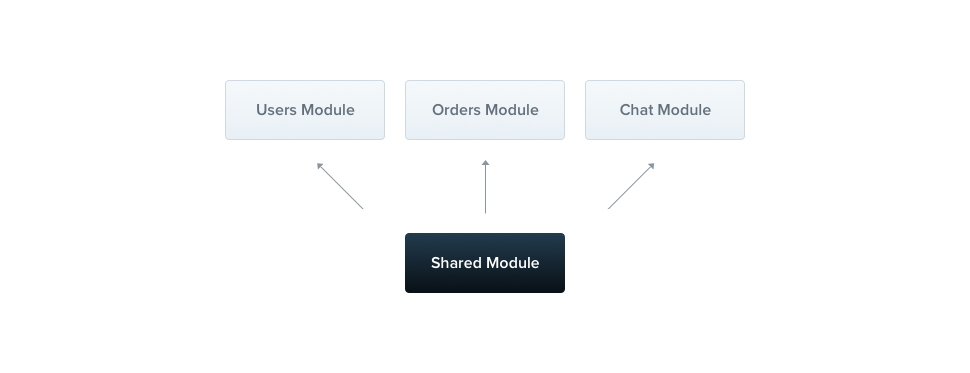
每个模块都自动成为共享模块。一旦创建,任何模块都可以重复使用。假设我们想在其他几个模块之间共享一个 CatsService 实例。为此,我们首先需要导出 CatsService 提供者,将其添加到模块的导出数组中
1
2
3
4
5
6
7
8
9
10import { Module } from '@nestjs/common';
import { CatsController } from './cats.controller';
import { CatsService } from './cats.service';
({
controllers: [CatsController],
providers: [CatsService],
exports: [CatsService]
})
export class CatsModule {}
现在,任何导入 CatsModule 的模块都可以访问 CatsService,并与所有导入该模块的其他模块共享同一个实例。此外还有全局modules和动态modules,1
2
3
4
5
6
7
8
9
10
11import { Module, Global } from '@nestjs/common';
import { CatsController } from './cats.controller';
import { CatsService } from './cats.service';
()
({
controllers: [CatsController],
providers: [CatsService],
exports: [CatsService],
})
export class CatsModule {}
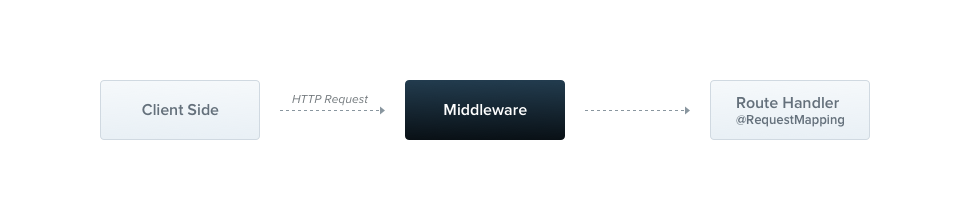
Middleware
中间件是在路由处理程序之前调用的函数。中间件函数可以访问请求和响应对象,以及应用程序请求-响应循环中的 next() 中间件函数。下一个中间件函数通常用名为 next 的变量来表示。
中间件功能可执行以下任务:
- 执行任何代码。
- 更改请求和响应对象。
- 结束请求-响应循环。
- 调用堆栈中的下一个中间件函数。
- 如果当前中间件函数没有结束请求-响应循环,则必须调用 next() 将控制权传递给下一个中间件函数。否则,请求将被挂起。
创建中间件1
2
3
4
5
6
7
8
9
10import { Injectable, NestMiddleware } from '@nestjs/common';
import { Request, Response, NextFunction } from 'express';
()
export class LoggerMiddleware implements NestMiddleware {
use(req: Request, res: Response, next: NextFunction) {
console.log('Request...');
next();
}
}
继承use方法,使用req,res以及next方法.
使用中间件,使用模块类的 configure() 方法来设置它们。包含中间件的模块必须实现 NestModule 接口。1
2
3
4
5
6
7
8
9
10
11
12
13
14import { Module, NestModule, MiddlewareConsumer } from '@nestjs/common';
import { LoggerMiddleware } from './common/middleware/logger.middleware';
import { CatsModule } from './cats/cats.module';
({
imports: [CatsModule],
})
export class AppModule implements NestModule {
configure(consumer: MiddlewareConsumer) {
consumer
.apply(LoggerMiddleware)
.forRoutes('cats');
}
}
实现NestModule接口并继承configure方法,使用consumer类
它提供了多种内置方法来管理中间件。所有这些方法都能以流畅的方式简单地串联起来。forRoutes() 方法可以接受一个字符串、多个字符串、一个 RouteInfo 对象以及controller类.使用consumer应用中间件在路由和controller类上.
此外也有全局中间件1
2
3const app = await NestFactory.create(AppModule);
app.use(logger);
await app.listen(3000);
Exception filtes
自带了一堆异常
BadRequestExceptionUnauthorizedExceptionNotFoundExceptionForbiddenExceptionNotAcceptableExceptionRequestTimeoutExceptionConflictExceptionGoneExceptionHttpVersionNotSupportedExceptionPayloadTooLargeExceptionUnsupportedMediaTypeExceptionUnprocessableEntityExceptionInternalServerErrorExceptionNotImplementedExceptionImATeapotExceptionMethodNotAllowedExceptionBadGatewayExceptionServiceUnavailableExceptionGatewayTimeoutExceptionPreconditionFailedException
1 | () |
也可以自己继承HttpException.1
2
3
4
5export class ForbiddenException extends HttpException {
constructor() {
super('Forbidden', HttpStatus.FORBIDDEN);
}
}
如果要更好的控制,可以继承ExceptionFilter使用catch专门处理某些异常.1
2
3
4
5
6
7
8
9
10
11
12
13
14
15
16
17
18
19
20import { ExceptionFilter, Catch, ArgumentsHost, HttpException } from '@nestjs/common';
import { Request, Response } from 'express';
(HttpException)
export class HttpExceptionFilter implements ExceptionFilter {
catch(exception: HttpException, host: ArgumentsHost) {
const ctx = host.switchToHttp();
const response = ctx.getResponse<Response>();
const request = ctx.getRequest<Request>();
const status = exception.getStatus();
response
.status(status)
.json({
statusCode: status,
timestamp: new Date().toISOString(),
path: request.url,
});
}
}
创建好filter后进行绑定到某个路由1
2
3
4
5()
(HttpExceptionFilter)
async create(() createCatDto: CreateCatDto) {
throw new ForbiddenException();
}
pipes and guards
pipes 是一个使用 @Injectable() 装饰器注解的类,它实现了 PipeTransform 接口。
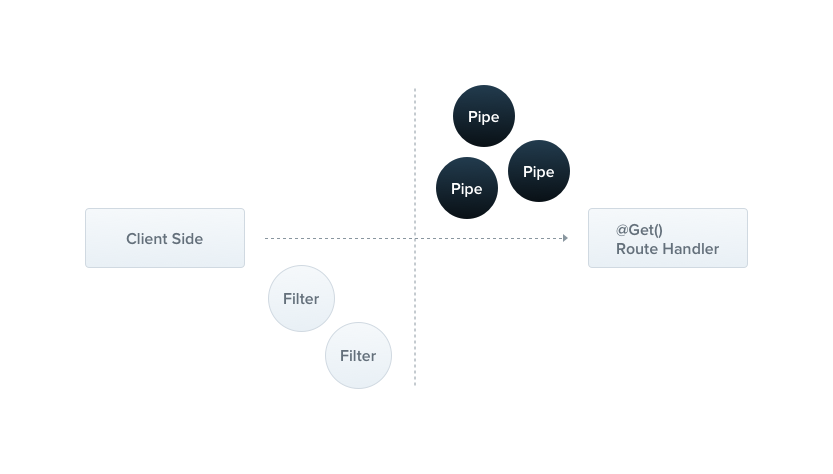
管道用于转换和校验数据.
ValidationPipeParseIntPipeParseFloatPipeParseBoolPipeParseArrayPipeParseUUIDPipeParseEnumPipeDefaultValuePipeParseFilePipe
1 | (':id') |
包括做数据类型转换的默认值等的pipe,还可以自定义pipe1
2
3
4
5
6
7
8import { PipeTransform, Injectable, ArgumentMetadata } from '@nestjs/common';
()
export class ValidationPipe implements PipeTransform {
transform(value: any, metadata: ArgumentMetadata) {
return value;
}
}
每个pipe管道都必须实现 transform() 方法以实现 PipeTransform 接口。该方法有两个参数:
- 值
- 元数据
数据校验也有很多种方法,下面是最简单的.创建数据类型.1
2
3
4
5
6
7
8
9()
async create(() createCatDto: CreateCatDto) {
this.catsService.create(createCatDto);
}
class CreateCatDto {
name: string;
age: number;
breed: string;
}
此外还可以使用zod第三方库.1
npm install --save zod
1
2
3
4
5
6
7
8
9
10
11
12
13
14
15
16
import { PipeTransform, ArgumentMetadata, BadRequestException } from '@nestjs/common';
import { ZodSchema  } from 'zod';

export class ZodValidationPipe implements PipeTransform {
  constructor(private schema: ZodSchema) {}

  transform(value: unknown, metadata: ArgumentMetadata) {
    try {
      const parsedValue = this.schema.parse(value);
      return parsedValue;
    } catch (error) {
      throw new BadRequestException('Validation failed');
    }
  }
}
应用 schema.parse() 方法,根据提供的模式验证输入的参数。
需要执行以下操作才能使用 ZodValidationPipe:
- 创建一个 ZodValidationPipe 实例
- 在pipe的类构造函数中传递特定于上下文的 Zod 模式
- 将pipe绑定到方法
1 | import { z } from 'zod'; |
guard 是一个使用 @Injectable() 装饰器注解的类,它实现了 CanActivate 接口。
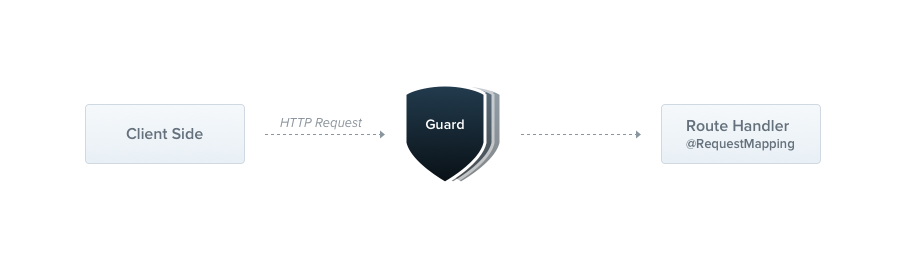
guard根据运行时存在的某些条件(如权限、角色、ACL 等),决定路由处理程序是否处理给定请求。这通常被称为授权.1
2
3
4
5
6
7
8
9
10
11
12import { Injectable, CanActivate, ExecutionContext } from '@nestjs/common';
import { Observable } from 'rxjs';
()
export class AuthGuard implements CanActivate {
canActivate(
context: ExecutionContext,
): boolean | Promise<boolean> | Observable<boolean> {
const request = context.switchToHttp().getRequest();
return validateRequest(request);
}
}
每个guard都必须实现 canActivate() 函数。该函数应返回一个布尔值,表明当前请求是否被允许。它可以同步或异步(通过 Promise 或 Observable)返回响应。Nest 使用返回值来控制下一步操作.1
2
3
4
5
6
7
8
9
10
11import { Injectable, CanActivate, ExecutionContext } from '@nestjs/common';
import { Observable } from 'rxjs';
()
export class RolesGuard implements CanActivate {
canActivate(
context: ExecutionContext,
): boolean | Promise<boolean> | Observable<boolean> {
return true;
}
}1
2
3('cats')
(RolesGuard)
export class CatsController {}
全局guard.1
2const app = await NestFactory.create(AppModule);
app.useGlobalGuards(new RolesGuard());
interceptors
拦截器是一个使用 @Injectable() 装饰器注解并实现 NestInterceptor 接口的类
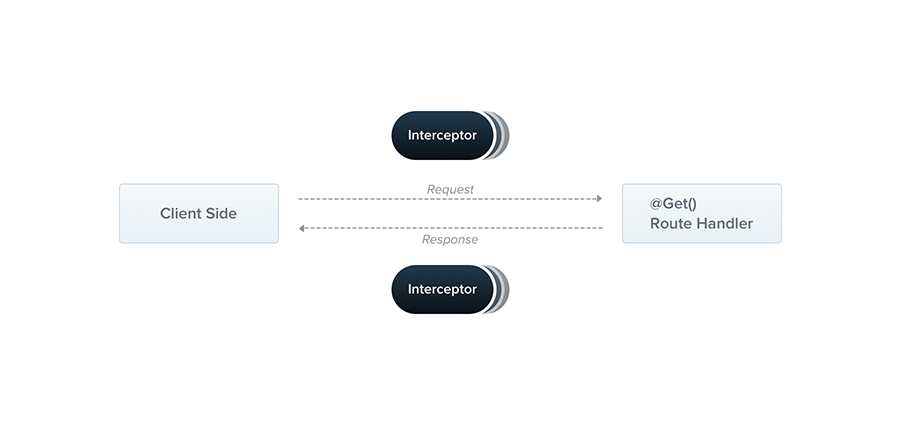
受面向方面编程(AOP)技术的启发,拦截器具有一系列有用的功能。它们可以
- 在方法执行前/后绑定额外逻辑
- 转换函数返回的结果
- 转换函数抛出的异常
- 扩展基本函数行为
- 根据特定条件(如缓存目的)完全重写函数
1 | import { Injectable, NestInterceptor, ExecutionContext, CallHandler } from '@nestjs/common'; |
绑定interceptor.1
2(LoggingInterceptor)
export class CatsController {}
全局拦截器1
2const app = await NestFactory.create(AppModule);
app.useGlobalInterceptors(new LoggingInterceptor());
自定义装饰器1
2
3
4
5
6
7
8
9
10
11
12
13
14import { createParamDecorator, ExecutionContext } from '@nestjs/common';
export const User = createParamDecorator(
(data: unknown, ctx: ExecutionContext) => {
const request = ctx.switchToHttp().getRequest();
return request.user;
},
);
()
async findOne(() user: UserEntity) {
console.log(user);
}
websocket与socket.io
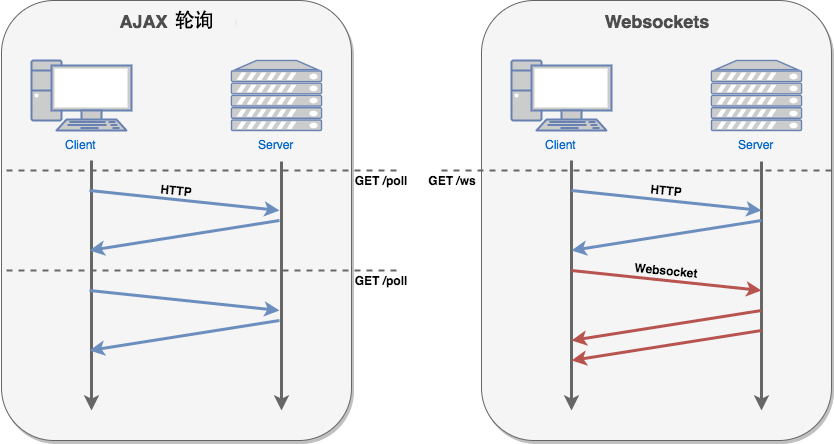
WebSocket 使得客户端和服务器之间的数据交换变得更加简单,允许服务端主动向客户端推送数据。
在 WebSocket API 中,浏览器和服务器只需要完成一次握手,两者之间就直接可以创建持久性的连接,并进行双向数据传输。
在 WebSocket API 中,浏览器和服务器只需要做一个握手的动作,然后,浏览器和服务器之间就形成了一条快速通道。两者之间就直接可以数据互相传送。
现在,很多网站为了实现推送技术,所用的技术都是 Ajax 轮询。轮询是在特定的的时间间隔(如每1秒),由浏览器对服务器发出HTTP请求,然后由服务器返回最新的数据给客户端的浏览器。这种传统的模式带来很明显的缺点,即浏览器需要不断的向服务器发出请求,然而HTTP请求可能包含较长的头部,其中真正有效的数据可能只是很小的一部分,显然这样会浪费很多的带宽等资源。
1 | var ws = new WebSocket("wss://echo.websocket.org"); |
上面是客户端的写法,服务端可以利用wswebsockets/ws: Simple to use, blazing fast and thoroughly tested WebSocket client and server for Node.js (github.com)或socket.io库socketio/socket.io: Realtime application framework (Node.JS server) (github.com).1
2
3
4
5
6
7
8
9
10
11
12
13
14
15
16
17
18
19
20
21// 导入WebSocket模块:
const WebSocket = require('ws');
// 引用Server类:
const WebSocketServer = WebSocket.Server;
// 实例化:
const wss = new WebSocketServer({
port: 3000
});
wss.on('connection', function (ws) {
console.log(`[SERVER] connection()`);
ws.on('message', function (message) {
console.log(`[SERVER] Received: ${message}`);
ws.send(`ECHO: ${message}`, (err) => {
if (err) {
console.log(`[SERVER] error: ${err}`);
}
});
})
});
客户端请求既可以在浏览器,也可以使用模块的客户端.1
2
3
4
5
6
7
8
9
10
11
12let ws = new WebSocket('ws://localhost:3000/test');
// 打开WebSocket连接后立刻发送一条消息:
ws.on('open', function () {
console.log(`[CLIENT] open()`);
ws.send('Hello!');
});
// 响应收到的消息:
ws.on('message', function (message) {
console.log(`[CLIENT] Received: ${message}`);
}
WebSocket协议本身不要求同源策略(Same-origin Policy),也就是某个地址为
http://a.com的网页可以通过WebSocket连接到ws://b.com。但是,浏览器会发送Origin的HTTP头给服务器,服务器可以根据Origin拒绝这个WebSocket请求。所以,是否要求同源要看服务器端如何检查。
1 | // 服务端 |
1 | // 客户端 |
1 | // 获取某个namespace(跟某个路由类似)下连接的客户端的数量 |
1 | const socket = io(); // or io("/"), the main namespace |
socket.io中server,socket都是重要概念,而且socket.io库本身与websocket并不相容.
尽管 Socket.IO 在可能的情况下确实使用 WebSocket 进行传输,但它会在每个数据包中添加额外的元数据。这就是为什么 WebSocket 客户端无法成功连接到 Socket.IO 服务器,而 Socket.IO 客户端也无法连接到纯 WebSocket 服务器。
server可以对应多个namespace和client,掌管多个sockets.
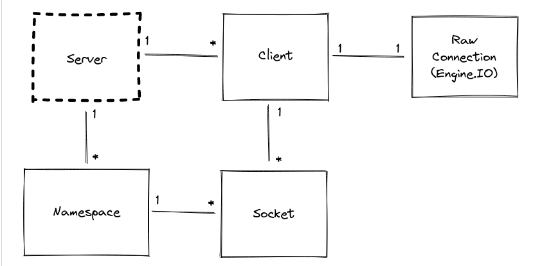
io.of与`io.in分别表示在某个namespace下和某个room或者id的socket
获取连接的客户端的数目1
2
3const count = io.engine.clientsCount;
// may or may not be similar to the count of Socket instances in the main namespace, depending on your usage
const count2 = io.of("/").sockets.size;
此外server可以管理rooms,后者相当于隔离.比如下面代码是拉进房间与拉出房间1
2
3
4
5
6
7
8
9
10
11// make all Socket instances join the "room1" room
io.socketsJoin("room1");
// make all Socket instances in the "room1" room join the "room2" and "room3" rooms
io.in("room1").socketsJoin(["room2", "room3"]);
// make all Socket instances in the "room1" room of the "admin" namespace join the "room2" room
io.of("/admin").in("room1").socketsJoin("room2");
// this also works with a single socket ID
io.in(theSocketId).socketsJoin("room1");1
2
3
4
5
6
7
8
9
10
11// make all Socket instances leave the "room1" room
io.socketsLeave("room1");
// make all Socket instances in the "room1" room leave the "room2" and "room3" rooms
io.in("room1").socketsLeave(["room2", "room3"]);
// make all Socket instances in the "room1" room of the "admin" namespace leave the "room2" room
io.of("/admin").in("room1").socketsLeave("room2");
// this also works with a single socket ID
io.in(theSocketId).socketsLeave("room1");
下面是关闭socket连接以及获取对应的socket.1
2
3
4
5
6
7
8
9
10
11
12
13
14
15
16
17
18
19
20
21
22
23// make all Socket instances disconnect
io.disconnectSockets();
// make all Socket instances in the "room1" room disconnect (and discard the low-level connection)
io.in("room1").disconnectSockets(true);
// make all Socket instances in the "room1" room of the "admin" namespace disconnect
io.of("/admin").in("room1").disconnectSockets();
// this also works with a single socket ID
io.of("/admin").in(theSocketId).disconnectSockets();
// return all Socket instances of the main namespace
const sockets = await io.fetchSockets();
// return all Socket instances in the "room1" room of the main namespace
const sockets = await io.in("room1").fetchSockets();
// return all Socket instances in the "room1" room of the "admin" namespace
const sockets = await io.of("/admin").in("room1").fetchSockets();
// this also works with a single socket ID
const sockets = await io.in(theSocketId).fetchSockets();
serverSideEmit允许向集群中的其他 Socket.IO 服务器发出事件(多server中)(需要配置adapter)
socket可以emit,join,leave以及disconnet等操作,属性包括id,handshake(包含头,客户端地址等重要信息),rooms以及包含的数据. 它是与客户端交互的基本类。它继承了 Node.js EventEmitter 的所有方法,如 emit、on、once 或 removeListener。1
2
3
4
5
6
7
8
9
10
11
12
13
14
15
16
17
18
19
20
21
22
23
24{
headers: /* the headers of the initial request */
query: /* the query params of the initial request */
auth: /* the authentication payload */
time: /* the date of creation (as string) */
issued: /* the date of creation (unix timestamp) */
url: /* the request URL string */
address: /* the ip of the client */
xdomain: /* whether the connection is cross-domain */
secure: /* whether the connection is secure */
}
io.on("connection", (socket) => {
console.log(socket.rooms); // Set { <socket.id> }
socket.join("room1");
console.log(socket.rooms); // Set { <socket.id>, "room1" }
});
// server A
io.on("connection", (socket) => {
socket.data.username = "alice";
});
// server B
const sockets = await io.fetchSockets();
console.log(sockets[0].data.username); // "alice"
客户端使用对应的库`socket.io-client1
2
3
4
5
6
7
8
9
10
11
12
13
14
15const socket = io("http://localhost:3000");
socket.on("connect", () => {
console.log("Connected to server");
});
socket.on("message", (data) => {
console.log("Received message:", data);
});
function sendMessage() {
const input = document.getElementById("message-input");
const message = input.value;
socket.emit("message", message);
input.value = "";
}
后话
此外还有Hapi.js,Adonis.js,Egg.js等等,不过基本逻辑都一样了.让我推荐的话,还是express,大型的上nest.js. 还要说一句,js的后端框架中文文档质量还有待提升,其实包括英文文档看起来还是有点老旧.
Python的Web术语里面还是讲视图views,模型models,urls这种的(受Django,Flask的影响?),而Node这边后端框架还是在说路由这种.