最近在准备实习,找一些烂大街经典项目练练手.
苍穹外卖
一个项目通常包含公共类(常量,工具以及异常)部分以及实体类部分

此外还有service,controller,mapper(repository)层以及一些配置类,拦截器等
Jwt登录验证
- 用户登录请求
客户端(通常是浏览器或App)发送包含用户名和密码的登录请求到后端。
- 服务端验证身份
后端接收请求,验证用户名和密码是否正确:
- 正确:生成 JWT,返回给客户端
- 错误:返回认证失败响应
- 服务端生成 JWT
服务端使用 密钥 对 payload 进行签名,生成一个完整的 token:1
2
3bashCopyEditeyJhbGciOiJIUzI1NiIsInR5cCI6IkpXVCJ9. # Header
eyJ1c2VySWQiOjEyMywidXNlcm5hbWUiOiJ0b20iLCJleHAiOjE3MTM1NjgwMDB9. # Payload
SflKxwRJSMeKKF2QT4fwpMeJf36POk6yJV_adQssw5c # Signature
服务端此后 不再保存用户状态,所有认证信息都由 token 自带。
- 客户端保存 JWT
客户端收到 token 后,通常将其存储在:
localStorage/sessionStorage- cookie(慎用,需设置
HttpOnly和Secure)
- 客户端携带 JWT 访问资源
客户端每次请求受保护的资源时,在请求头中携带 token:1
Authorization: Bearer <token>
- 服务端验证 JWT
- 服务端提取 token,验证签名是否合法、是否过期。
- 若合法,解析 payload,拿到
userId等信息,并执行业务逻辑。
🔐 JWT 的结构
JWT 是一个由三部分组成的字符串,用 . 分隔:
- Header(头部)
描述签名的算法及类型,通常是这样的:1
2
3
4jsonCopyEdit{
"alg": "HS256",
"typ": "JWT"
}
- Payload(有效载荷)
存放业务数据,不应包含敏感信息,因为它是明文的。常见字段:
| 字段 | 含义 |
|---|---|
sub | 主题(Subject) |
exp | 过期时间(Expiration Time) |
iat | 签发时间(Issued At) |
userId | 自定义字段,通常是用户唯一标识 |
roles | 自定义字段,表示用户权限角色 |
示例:1
2
3
4
5{
"userId": 123,
"username": "tom",
"exp": 1713568000
}
- Signature(签名)
由 header 和 payload 使用密钥 secret 签名生成,用于防篡改。1
2
3
4javaCopyEditHMACSHA256(
base64UrlEncode(header) + "." + base64UrlEncode(payload),
secret
)
🧾 JWT 优点
- 无需在服务端存储 Session,实现 无状态认证
- 可跨服务、跨域使用(适合微服务)
- 自带用户信息,减少查库压力
- 易扩展,可加入权限、组织、平台等字段
⚠️ 安全建议
- token 不要放敏感信息(明文可读)
- 设置合理的 过期时间
- 通过
HTTPS传输,防止中间人攻击 - 使用
HttpOnly + Secure的 cookie 保存(如 SSR)
接口文档
开放接口规范有Swagger(springfox)和OpenAPI(目前常用).
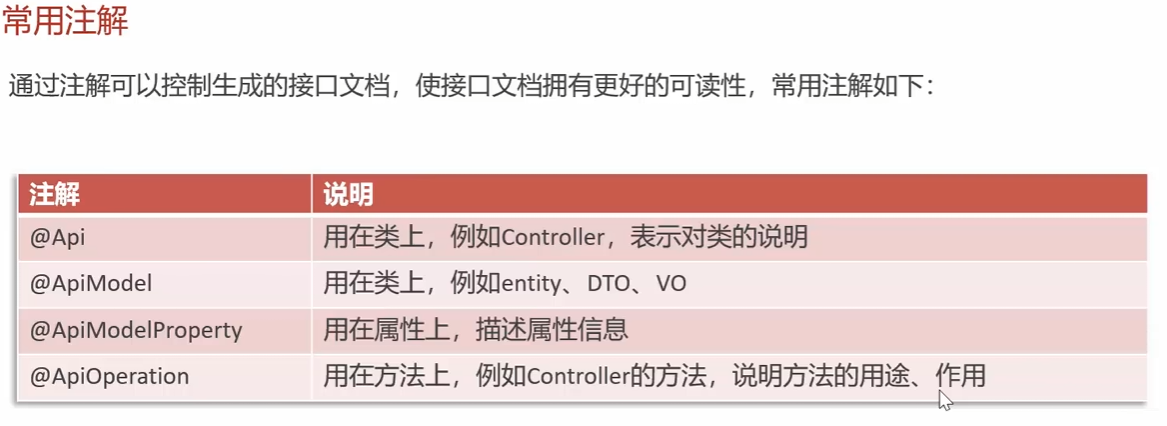
可以使用springdoc-openapi或Knife4j工具通过添加注解生成规范
springdoc/springdoc-openapi: Library for OpenAPI 3 with spring-boot
新增员工
增加mapper的插入语句增加员工信息,注意插入错误处理.
以及通过interceptor,threadlocal存储登录信息.
分页查询员工
利用mybatis的pagehelper插件,其通过拦截执行的查询语句修改其中的LIMIT返回结果.首先设置页大小和需要查询的页.
PageHelper.startPage(pageNum, pageSize)
用于设置当前页码和每页条数,必须在执行查询语句之前调用。1
2
3PageHelper.startPage(1, 10); // 第1页,每页10条
List<User> users = userMapper.selectAll();
PageInfo<User> pageInfo = new PageInfo<>(users);
PageHelper.offsetPage(offset, limit)
按偏移量方式分页,适合流式加载等场景。1
2PageHelper.offsetPage(20, 10); // 跳过前20条,查询10条
List<User> users = userMapper.selectAll();
然后在mapper中的sql语句中直接写查询条件,返回Page结果.
| 问题/注意点 | 说明 |
|---|---|
| startPage 必须紧跟查询语句 | 否则分页不起作用(建议不要有中间处理逻辑) |
| 不支持多线程共享分页上下文 | 每次分页只作用于当前线程 |
Page<T>:继承自 ArrayList<T>,直接包含结果数据 + 分页信息;
PageInfo<T>:是一个额外封装类,包含分页信息(适合返回给前端);
POJO中日期序列化

在 Spring Boot 项目中,如果你使用的是 Jackson(Spring Boot 默认的 JSON 序列化库),可以通过配置 ObjectMapper 或 application.yml 来自定义 LocalDateTime / LocalDate / LocalTime 的序列化格式。
✅ 方法一:在全局 ObjectMapper 中注册时间模块(推荐)1
2
3
4
5
6
7
8
9
10
11
12
13
14
15
16
17
18
19
20
21
22
23
24
25
26
27
28
29
30
31
32
33
public class JacksonConfig {
public ObjectMapper objectMapper() {
ObjectMapper mapper = new ObjectMapper();
JavaTimeModule javaTimeModule = new JavaTimeModule();
// LocalDateTime
javaTimeModule.addSerializer(LocalDateTime.class,
new LocalDateTimeSerializer(DateTimeFormatter.ofPattern("yyyy-MM-dd HH:mm:ss")));
javaTimeModule.addDeserializer(LocalDateTime.class,
new LocalDateTimeDeserializer(DateTimeFormatter.ofPattern("yyyy-MM-dd HH:mm:ss")));
// LocalDate
javaTimeModule.addSerializer(LocalDate.class,
new LocalDateSerializer(DateTimeFormatter.ofPattern("yyyy-MM-dd")));
javaTimeModule.addDeserializer(LocalDate.class,
new LocalDateDeserializer(DateTimeFormatter.ofPattern("yyyy-MM-dd")));
// LocalTime
javaTimeModule.addSerializer(LocalTime.class,
new LocalTimeSerializer(DateTimeFormatter.ofPattern("HH:mm:ss")));
javaTimeModule.addDeserializer(LocalTime.class,
new LocalTimeDeserializer(DateTimeFormatter.ofPattern("HH:mm:ss")));
mapper.registerModule(javaTimeModule);
mapper.disable(SerializationFeature.WRITE_DATES_AS_TIMESTAMPS); // 防止序列化为时间戳
return mapper;
}
}
✅ 方法二:使用 @JsonFormat 注解在字段上局部配置
适合只对个别字段格式化时使用:1
2
3
4
5
6
7
8
9
public class MyDto {
private LocalDateTime createdTime;
private LocalDate date;
}
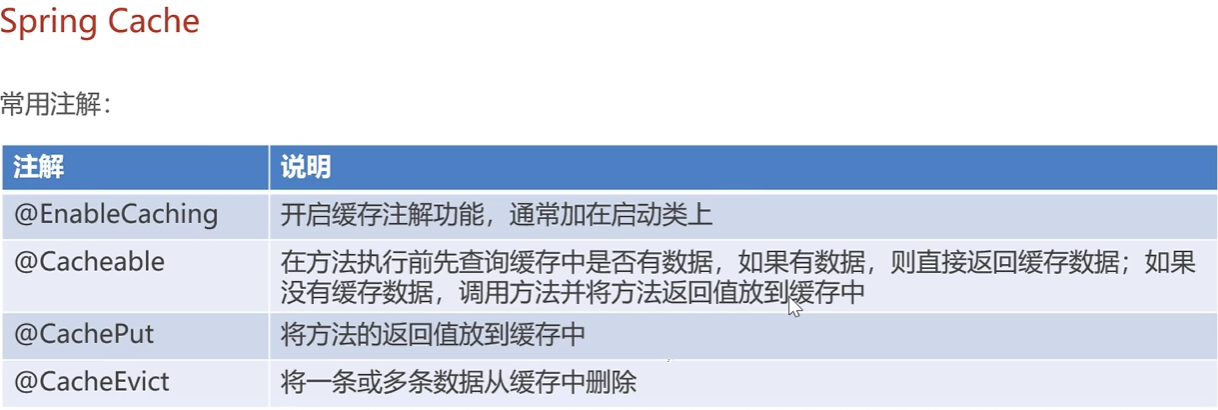
Spring Cache
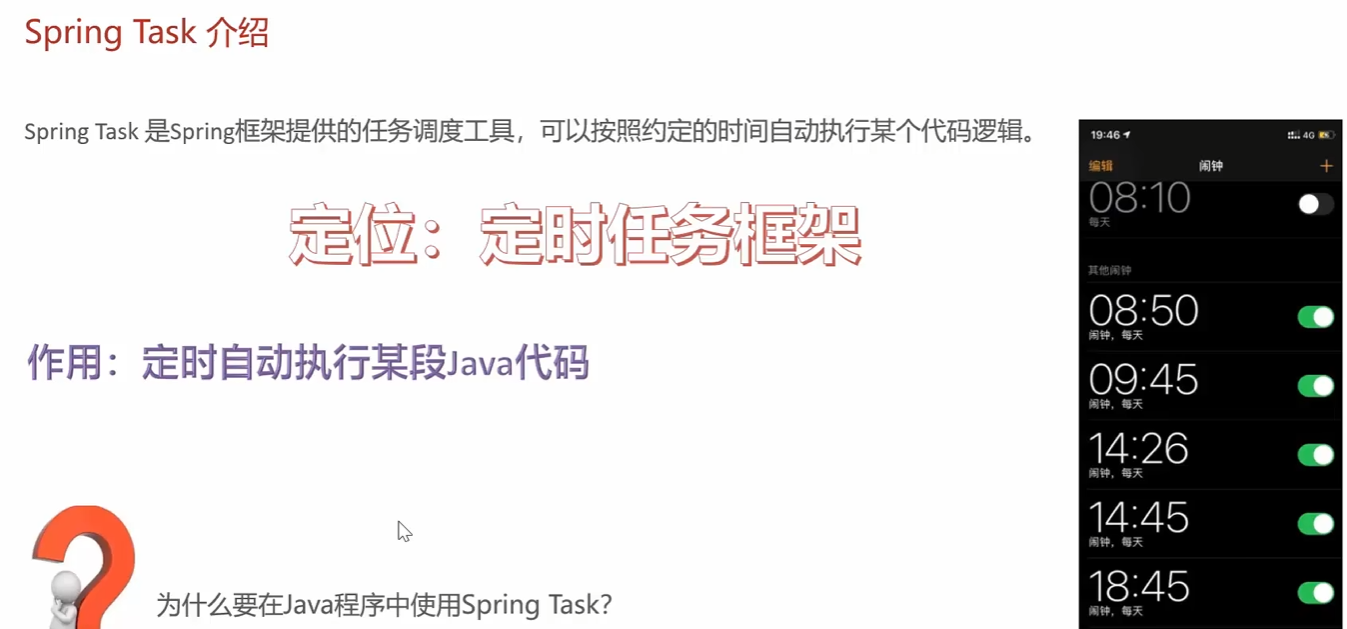
Spring Task
Websocket主动推送订单消息
1 | import org.springframework.context.annotation.Bean; |
ServerEndpointExporter 会自动扫描所有 @ServerEndpoint 注解的类。
注册到 Servlet 容器的 WebSocket 运行时(ServerContainer)1
2
3
4
5
6
7
8
9
10
11
12
13
14
15
16
17
18
19
20
21
22
23
24
25
26
27
28
29
30
31
32
33
34
35
36
37
38
39
40
41
42
43
44
45
46
47
48
49
50
51
52
53
54import javax.websocket.*;
import javax.websocket.server.ServerEndpoint;
import org.springframework.beans.factory.annotation.Autowired;
import org.springframework.stereotype.Component;
import java.io.IOException;
import java.util.concurrent.CopyOnWriteArraySet;
public class StudentWebSocketEndpoint {
// 存储所有连接的会话(线程安全)
private static final CopyOnWriteArraySet<Session> sessions = new CopyOnWriteArraySet<>();
private StudentService studentService;
public void onOpen(Session session) {
sessions.add(session);
try {
session.getBasicRemote().sendText("Connected to Student WebSocket");
} catch (IOException e) {
e.printStackTrace();
}
}
public void onMessage(String message, Session session) throws IOException {
// 收到客户端消息,广播给所有连接
for (Session s : sessions) {
s.getBasicRemote().sendText("Message: " + message);
}
}
public void onClose(Session session) {
sessions.remove(session);
}
public void onError(Session session, Throwable throwable) {
throwable.printStackTrace();
}
// 广播学生更新
public void broadcastStudentUpdate(String message) {
for (Session session : sessions) {
try {
session.getBasicRemote().sendText(message);
} catch (IOException e) {
e.printStackTrace();
}
}
}
}
Apache Echarts展示信息
Apache POI
黑马点评
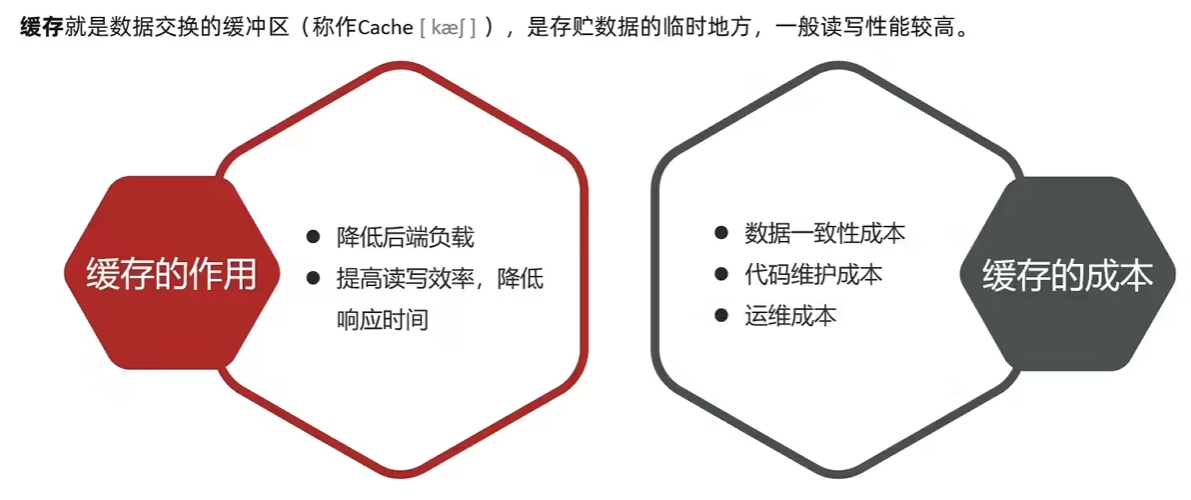
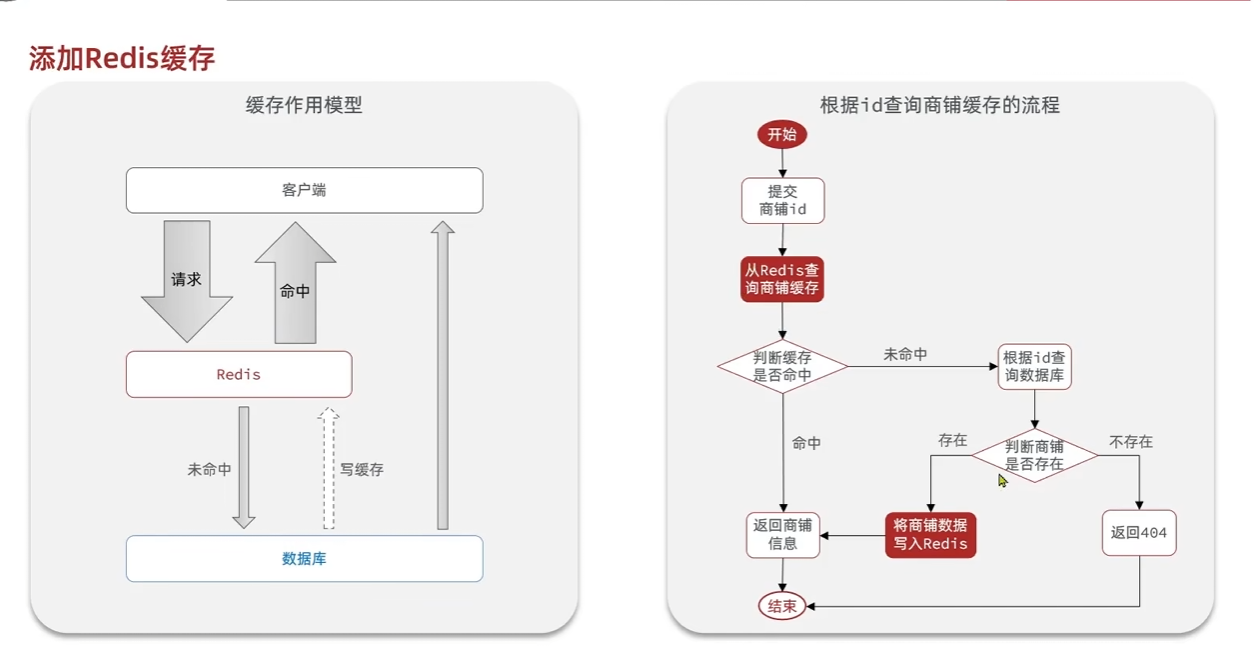
缓存作用: 降低后端负载,提升读写速度
开发成本和维护一致性问题
Redis学习
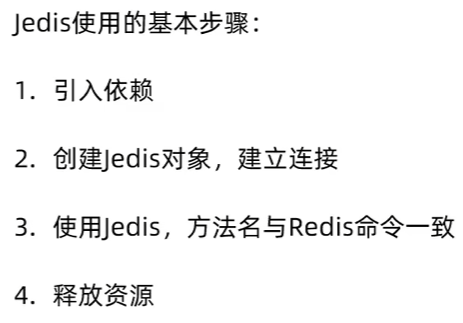
Jedis guide (Java) | Docs1
2
3
4
5<dependency>
<groupId>redis.clients</groupId>
<artifactId>jedis</artifactId>
<version>5.2.0</version>
</dependency>1
2
3
4
5
6
7
8
9
10
11
12
13
14
15
16
17
18
19
20
21
22
23
24
25
26
27
28
29
30
31
32
33
34
35
36
37
38public class JedisTest {
private Jedis jedis;
public void setUp() {
// 初始化 Jedis 连接
jedis = new Jedis("localhost", 6379); // 假设 Redis 服务运行在本地,默认端口为 6379
System.out.println("Connected to Redis");
// 清空 Redis 数据库,确保测试环境干净
jedis.flushAll();
}
// 在每个测试方法执行之后运行
public void tearDown() {
// 关闭 Jedis 连接
if (jedis != null) {
jedis.close();
System.out.println("Disconnected from Redis");
}
}
public void testString() {
String result = jedis.set("name","proanimer");
System.out.println("result = " + result);
String name = jedis.get("name");
System.out.println("name = " + name);
}
public void testHash() {
jedis.hset("user:1","name","proanimer");
jedis.hset("user:2", "age", "24");
}
}
1
2
3
4
5
6
7
8
9
10
11
12
13
14
15
16
17
18public class JedisConnectionFactory {
private static final JedisPool jedisPool;
static {
//配置连接池
JedisPoolConfig jedisPoolConfig = new JedisPoolConfig();
jedisPoolConfig.setMaxIdle(10);
jedisPoolConfig.setMaxTotal(10);
jedisPoolConfig.setMinIdle(0);
jedisPoolConfig.setMaxWait(Duration.of(10, ChronoUnit.SECONDS));
// 创建连接池
jedisPool = new JedisPool(jedisPoolConfig,"127.0.0.1",6379);
}
public static Jedis getJedis() {
return jedisPool.getResource();
}
}
Spring Data Redis
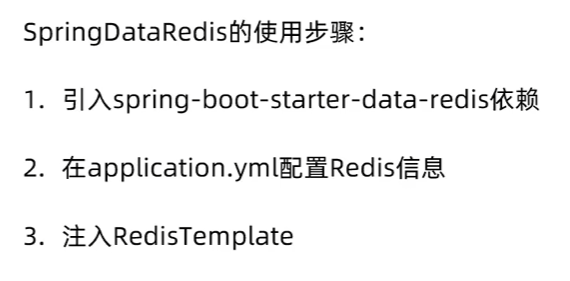
序列化器
在使用 Spring Data Redis 时,序列化器(Serializer)用于将 Java 对象转换为适合存储在 Redis 中的格式(如字节数组),并在从 Redis 读取数据时将其反序列化回 Java 对象。选择合适的序列化器对于确保数据正确性以及优化性能非常重要。默认序列化器是JDK序列化器.
JdkSerializationRedisSerializer
- 描述:这是默认的序列化器,使用 Java 的序列化机制来处理对象。
- 优点:支持任意类型的 Java 对象。
- 缺点:生成的数据较大,效率较低,并且只有在同一 JVM 环境下才能正确反序列化。
1 |
|
StringRedisSerializer
- 描述:专门用于字符串的序列化器,能够高效地处理字符串类型的数据。
- 优点:简单、快速,适用于大多数键值对场景。
- 缺点:仅限于字符串类型的数据。
1 |
|
GenericJackson2JsonRedisSerializer
- 描述:使用 Jackson 库将对象序列化为 JSON 格式。
- 优点:易于阅读和调试,支持复杂对象结构。
- 缺点:相对于其他二进制格式(如 Protocol Buffers),JSON 的体积更大,解析速度较慢。
1 |
|
Jackson2JsonRedisSerializer
- 描述:类似于
GenericJackson2JsonRedisSerializer,但它允许你指定序列化的具体类型。 - 优点:可以更精确地控制序列化过程。
- 缺点:需要提前知道序列化对象的确切类型。
1 |
|
OxmSerializer
- 描述:用于 XML 数据的序列化/反序列化。
- 优点:适用于需要以 XML 格式存储数据的场景。
- 缺点:XML 数据通常比 JSON 更大,处理速度也较慢。
1 |
|
- 自定义序列化器
根据业务需求,你也可以实现自己的序列化器,只需要实现 RedisSerializer<T> 接口即可。
示例代码:1
2
3
4
5
6
7
8
9
10
11
12
13
14
15
16
17
18
19
20
21
22
23public class CustomRedisSerializer implements RedisSerializer<MyCustomType> {
public byte[] serialize(MyCustomType t) throws SerializationException {
// 实现序列化逻辑
return new byte[0];
}
public MyCustomType deserialize(byte[] bytes) throws SerializationException {
// 实现反序列化逻辑
return null;
}
}
// 在配置中使用自定义序列化器
public RedisTemplate<String, MyCustomType> customRedisTemplate(RedisConnectionFactory factory) {
RedisTemplate<String, MyCustomType> template = new RedisTemplate<>();
template.setConnectionFactory(factory);
template.setValueSerializer(new CustomRedisSerializer());
return template;
}
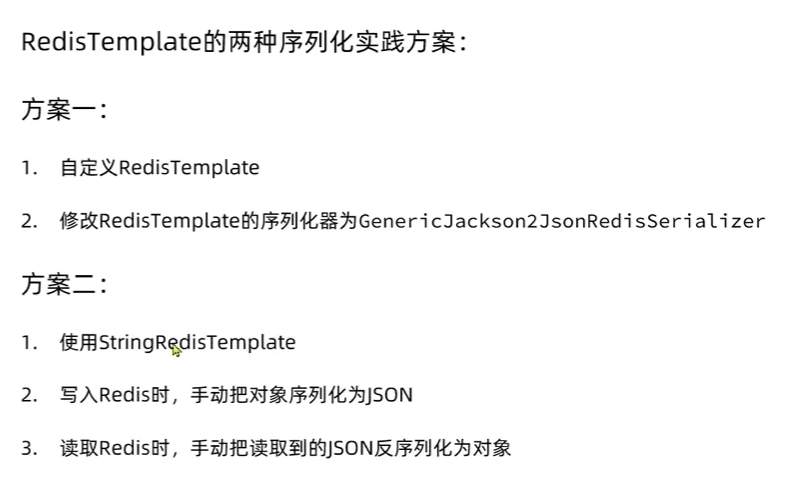
基于Session的登陆
1
2
3
4
5
6
7
8
9
10
11
12
13
14
15
16
17
18
19
20
21
22
23
24
25
26
27
28
29
30
31
32
33
34
35
36
37
38
39
40
41
42
43
44
45
46
47
48
49
50
51
52
53
public Result sendCode(String phone, HttpSession session) {
// 1.校验
/* String phoneRegex = "^1[3-9]\\d{9}$";
if (!phone.matches(phoneRegex)) {
return Result.fail("手机号格式错误");
}*/
boolean phoneInvalid = RegexUtils.isPhoneInvalid(phone);
// 2.如果不符合
if (phoneInvalid) {
return Result.fail("手机号格式错误");
}
// 3.符合,生成验证码
String code = RandomUtil.randomNumbers(6);
// 4.保存验证码到session
session.setAttribute("code", code);
// 5.发送验证码
log.debug(StrUtil.format("发送验证码成功,验证码:{}", code));
// 返回ok
return Result.ok();
}
public Result login(LoginFormDTO loginForm, HttpSession session) {
// 1.校验手机号和验证码
String phone = loginForm.getPhone();
boolean phoneInvalid = RegexUtils.isPhoneInvalid(phone);
if (phoneInvalid) {
return Result.fail("手机号格式错误");
}
String code = loginForm.getCode();
String codeInSession = (String) session.getAttribute("code");
if (!code.equals(codeInSession)) {
return Result.fail("验证码错误");
}
// 2.查询用户
User user = query().eq("phone", phone).one();
if (user == null) {
// 不存在 创建用户
user = createUserWithPhone(phone);
}
// 3.保存用户信息到session
session.setAttribute("user", BeanUtil.copyProperties(user, UserDTO.class));
return Result.ok();
}
private User createUserWithPhone(String phone) {
User user = new User();
user.setPhone(phone);
user.setNickName(USER_NICK_NAME_PREFIX + RandomUtil.randomNumbers(8));
save(user);
return user;
}
注册登录问题,可以使用拦截器方便注册登陆以及校验权限, 从基于session到基于redis
基于session的登陆, 验证码存在session中,在拦截器中获取session或者请求头中的信息,
可以使用ThreadLocal,在拦截器方法中存储用户信息避免其他线程访问. 登陆成功将发送生成的token给客户端,并且存在服务端session中.
每次访问,在进行权限校验中,根据token在session得到用户信息,如果有就通过权限校验.
通过重写WebMvcConfigure类添加拦截器与路径,重写Interceptor类
WebMvcConfigure类可以用于添加拦截器与静态资源处理以及CORS等等.
Interceptor类允许你在请求被 Controller 处理之前、Controller 处理之后但在视图渲染之前、以及整个请求处理完成之后进行拦截和处理。它提供了一种灵活的方式来对请求进行预处理和后处理,而无需修改 Controller 或业务逻辑代码。
HandlerInterceptor的主要作用是实现 AOP(面向切面编程)的理念,对 Web 请求处理流程进行横向切割,用于实现一些通用的功能,例如:
- 权限校验/身份认证: 在请求到达 Controller 之前,检查用户是否已登录或是否有权限访问某个资源。
- 日志记录: 记录请求的进入、退出时间,以及请求参数、响应状态等信息。
- 性能监控: 计算请求的处理时间,进行性能分析。
- 数据预处理: 在 Controller 处理之前对请求参数进行一些统一的格式化或校验。
- 跨域处理: 添加或修改响应头,处理 CORS 相关的逻辑。
- 国际化: 根据用户请求的语言设置,切换对应的语言环境。
- 会话管理: 检查会话状态,或进行会话续期。
1 | public class RefreshTokenInterceptor implements HandlerInterceptor { |
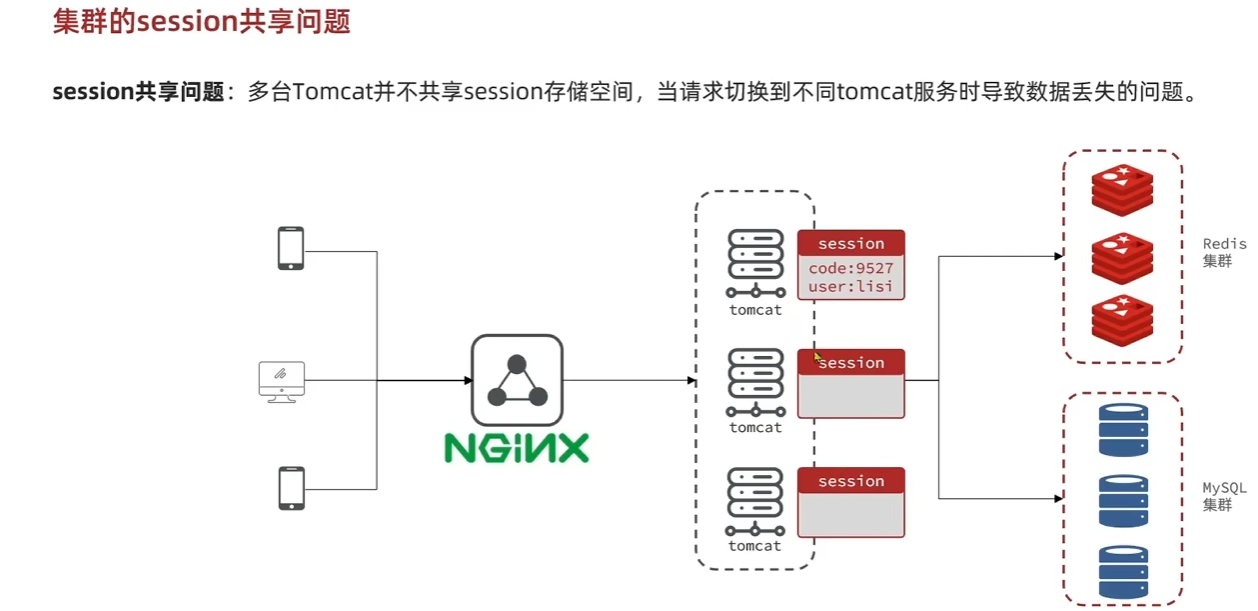
集群的session共享问题
基于Redis的短信登陆
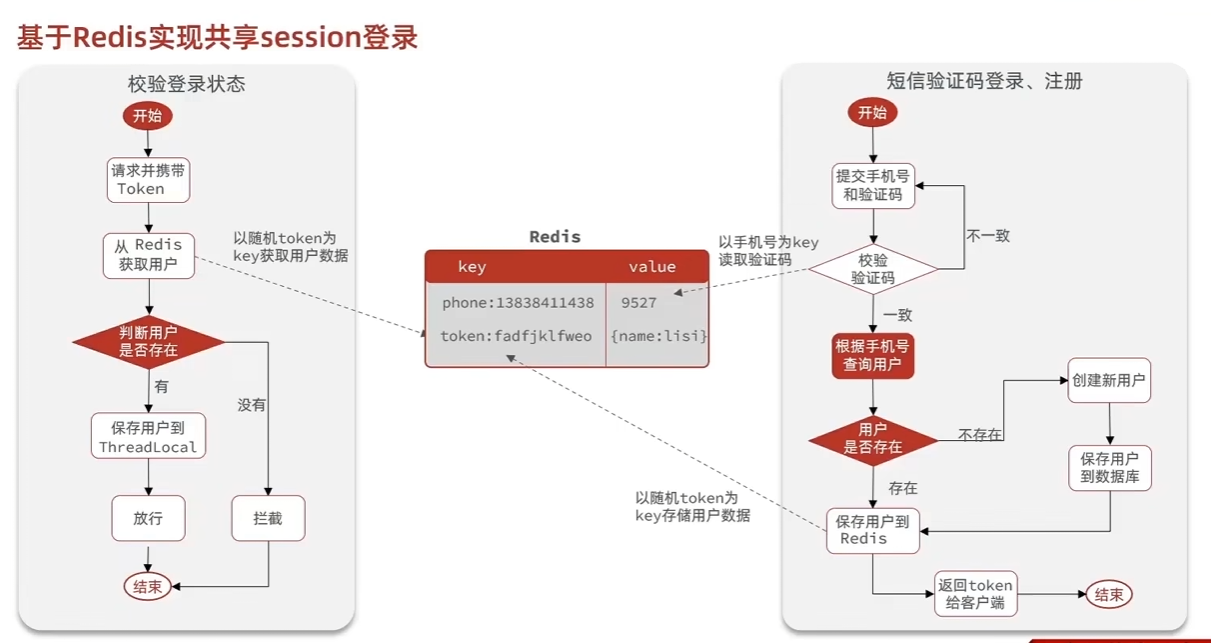
基于session的问题 多台tomcat不共享session
使用基于redis的登陆注册
当登陆时,如果使用账号+手机验证码形式,当前端发送验证码请求,将手机号码和生成的手机验证码存在对应的缓存中,然后登陆时校验。成功就返回一个token,然后将token存在缓存中.可以使用user_id作key.
在使用session登陆时,存储信息直接利用了servlet,tomcat提供的session机制,服务器会创建对应会话的session并返回JSESSIONID给客户端,客户端会主动携带该id,服务器直接访问对应的session对象及其包含属性即可.
而使用redis登陆,确定缓存的值对象类型
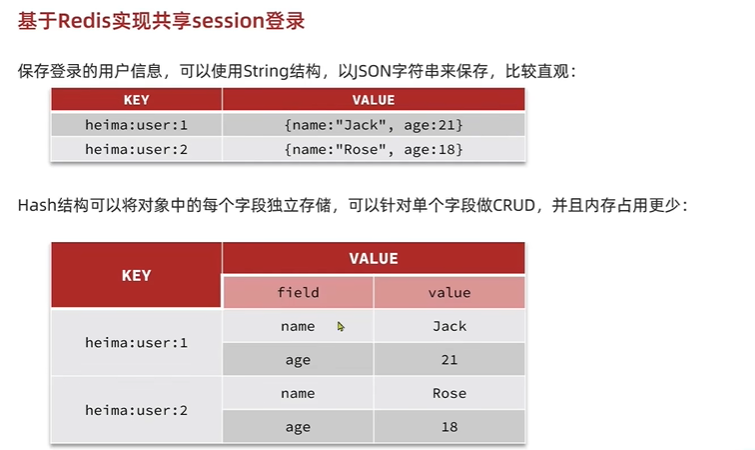
当进入用户权限网页时,读取httpservletRequest中的参数,从请求中获取token,在缓存中查找,找到就满足. 客户端将token放在sessionStorage中进行保存,请求时放在header中的authorization头中,服务端在对应请求头中拿到token.
优化拦截器
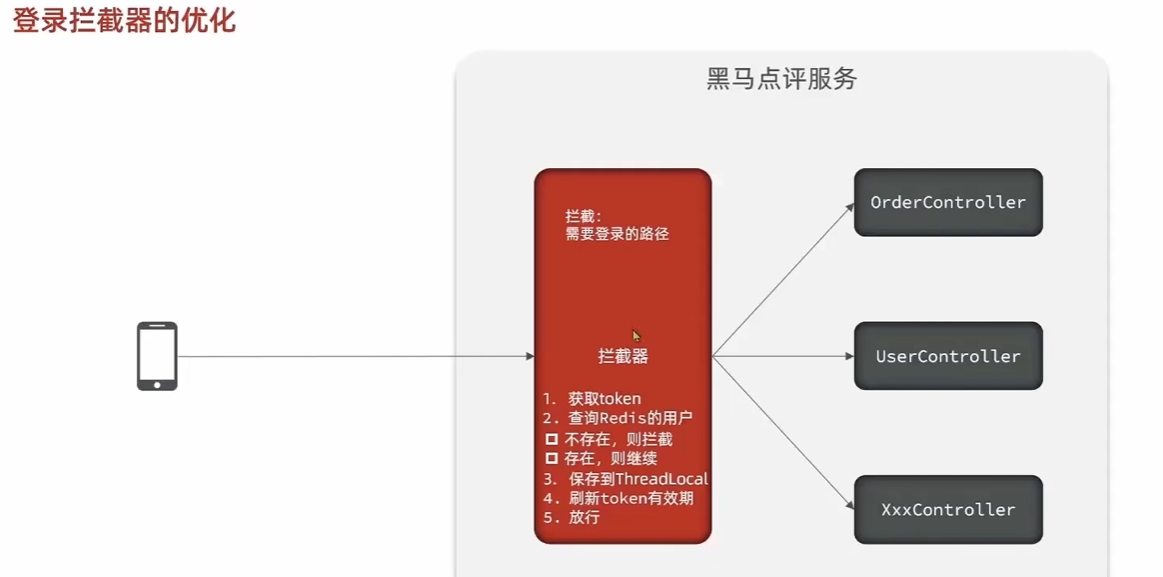
原本的拦截器只拦截需要权限的controller,但是如果已经有cookie的用户只访问不需要权限的controller就不会更新redis. 也就是说已登陆用户访问不需要权限的网页不会更新缓存,导致一段时间后失效.
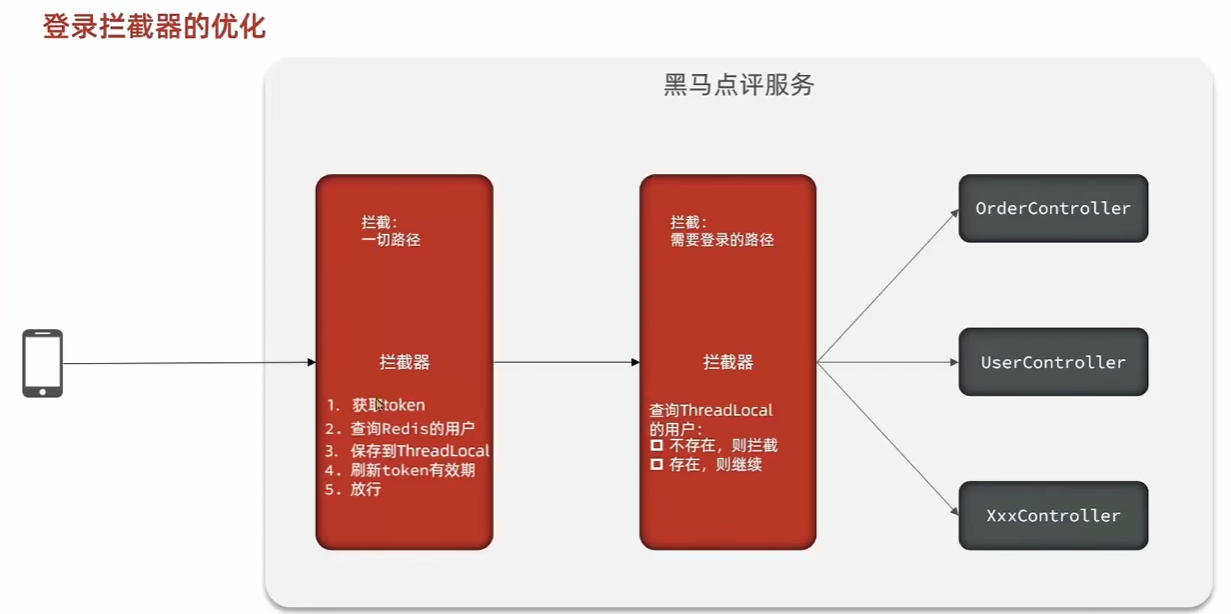
因此添加全局拦截器,访问所有页面,如果是已登陆用户,更新缓存中TTL,否则什么也不做,直接放行,对于需要权限的拦截器进行检测.
登陆以及权限校验关键问题
基于session或者基于redis缓存
session存在tomcat集群不共享的问题,当请求切换到不同tomcat服务时导致数据丢失
拦截器配置 通过interceptor或者自己通过AOP实现校验
通过拦截器,在请求或者session中拿到校验信息
可以使用ThreadLocal在拦截器中直接在session或者redis中获得信息
此外还有基于JWT的无状态认证机制,服务器本身不存储session.
在登陆成功后,客户端每次携带jwt,JWT本身存储了用户的一些关键信息,具体来说,JWT包含头部,负载,签名.
头部包含算法类型,负载包括注册声明、公共声明以及私有声明. 签名是通过密钥加密后的头部和负载加密.
Payload 部分是 Base64url 编码的,不是加密的。这意味着任何人都可以解码 Payload 并读取其中的内容。因此,绝不能在 Payload 中存放敏感信息
1 | { |
最终,这三部分用点连接起来,就构成了完整的 JWT 字符串,例如: eyJhbGciOiJIUzI1NiIsInR5cCI6IkpXVCJ9.eyJzdWIiOiIxMjM0NTY3ODkwIiwibmFtZSI6IkpvaG4gRG9lIiwiaWF0IjoxNTE2MjM5MDIyfQ.SflKxwRJSMeKKF2QT4fwpMeJf36POk6yJV_adQssw5c
商户查询缓存
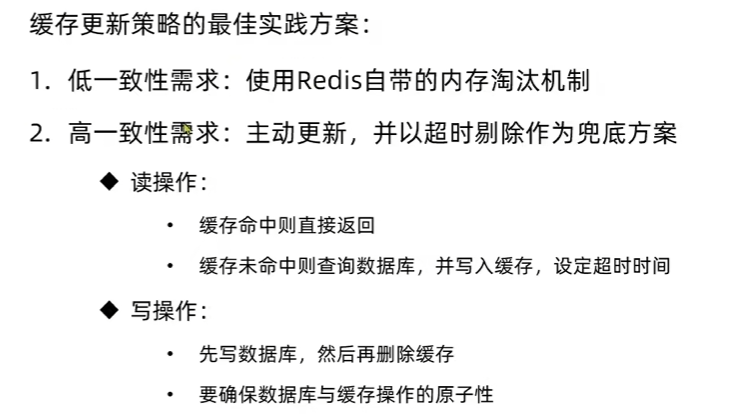
缓存更新策略


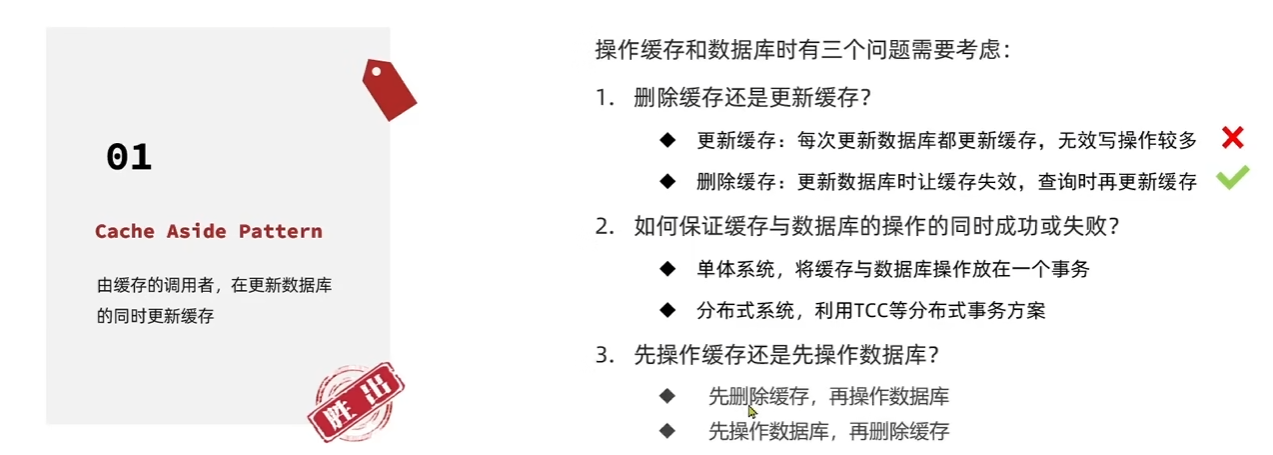
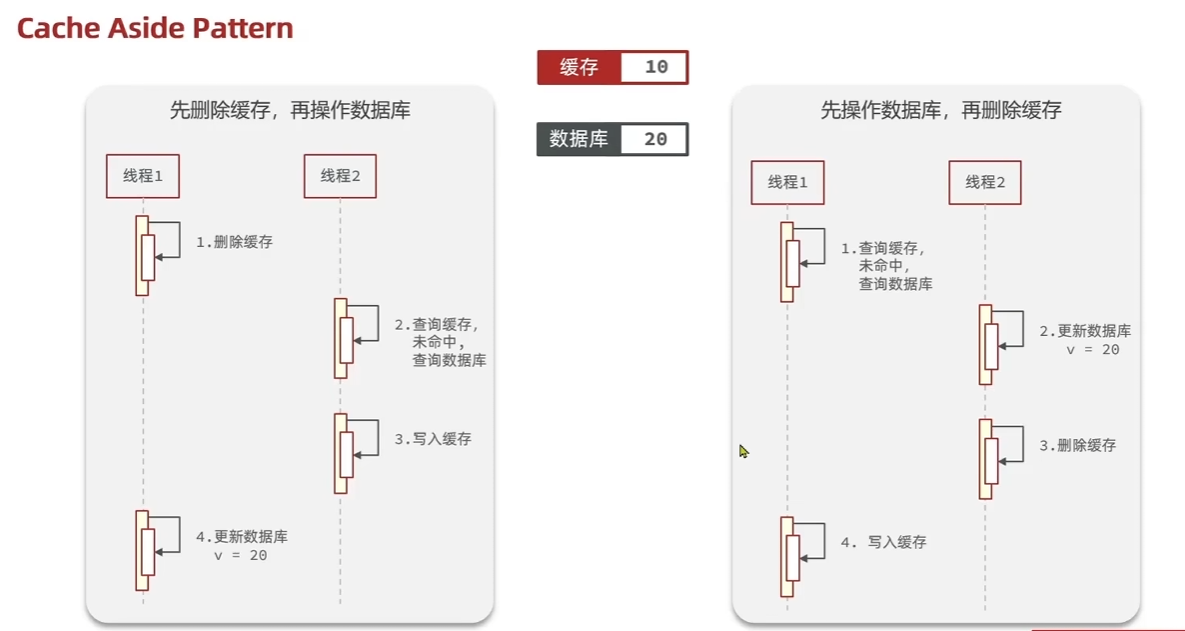
| 策略 | 读操作 | 写操作 | 优点 | 缺点 | 适用场景 |
|---|---|---|---|---|---|
| Cache Aside | 先查缓存,再查数据库 | 更新数据库后删除缓存 | 简单、灵活、一致性较好 | 存在短暂不一致、未命中时性能较差 | 数据读多写少、一致性要求不高 |
| Read/Write Through | 缓存负责未命中处理 | 缓存负责同步到数据库 | 透明性好、一致性好 | 复杂性高、可能成为性能瓶颈 | 数据一致性要求高 |
| Write Behind Caching | 先查缓存,再查数据库 | 异步批量写回数据库 | 写性能高、吞吐量大 | 数据丢失风险、一致性差 | 数据写多读少、一致性要求低 |
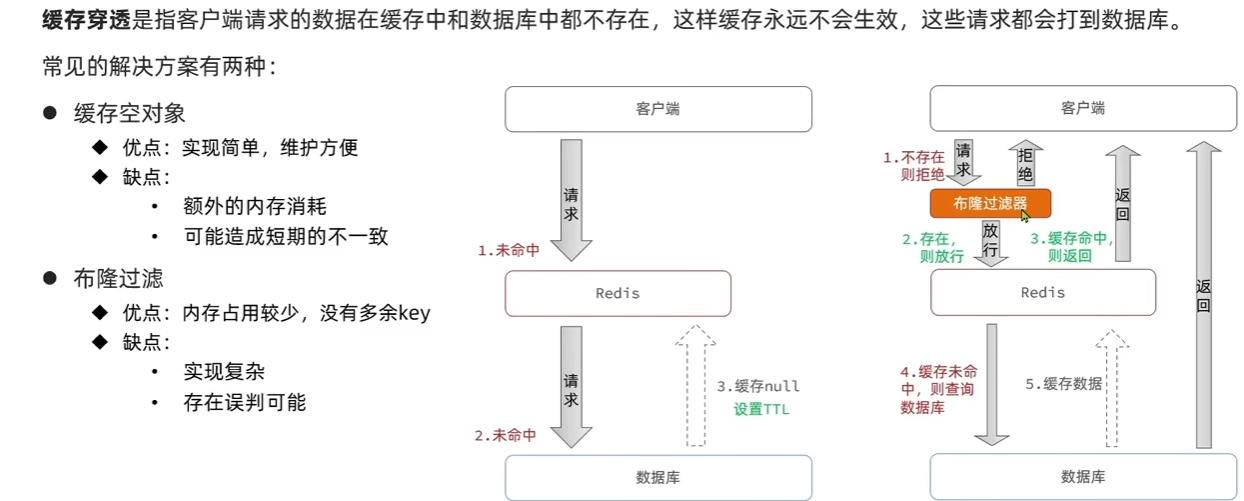
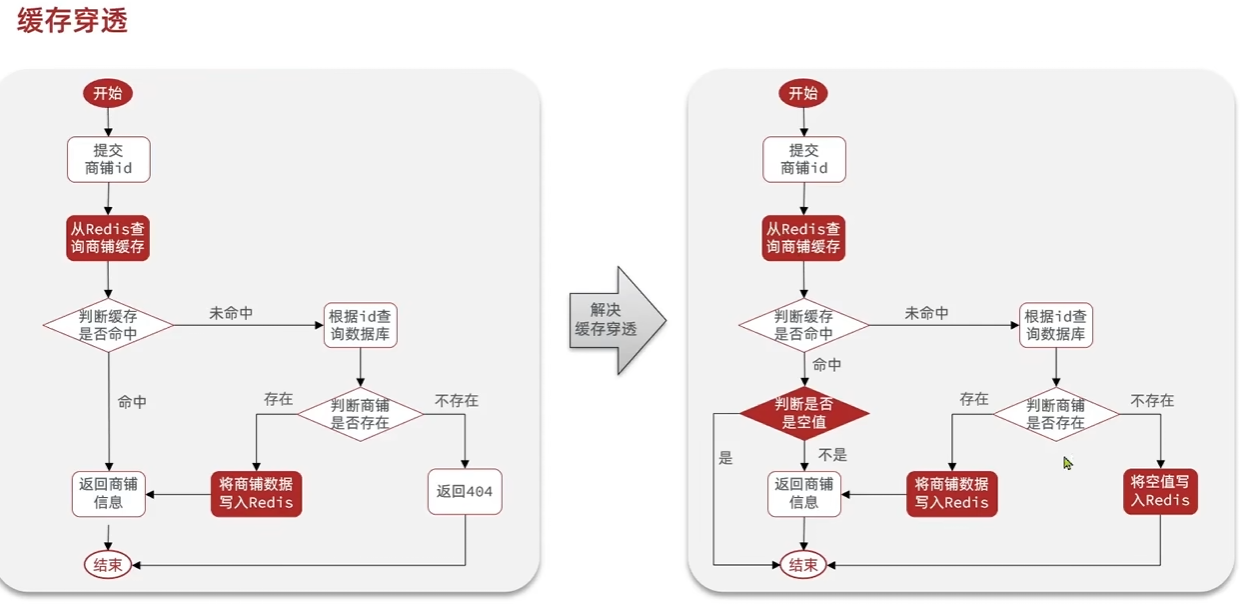
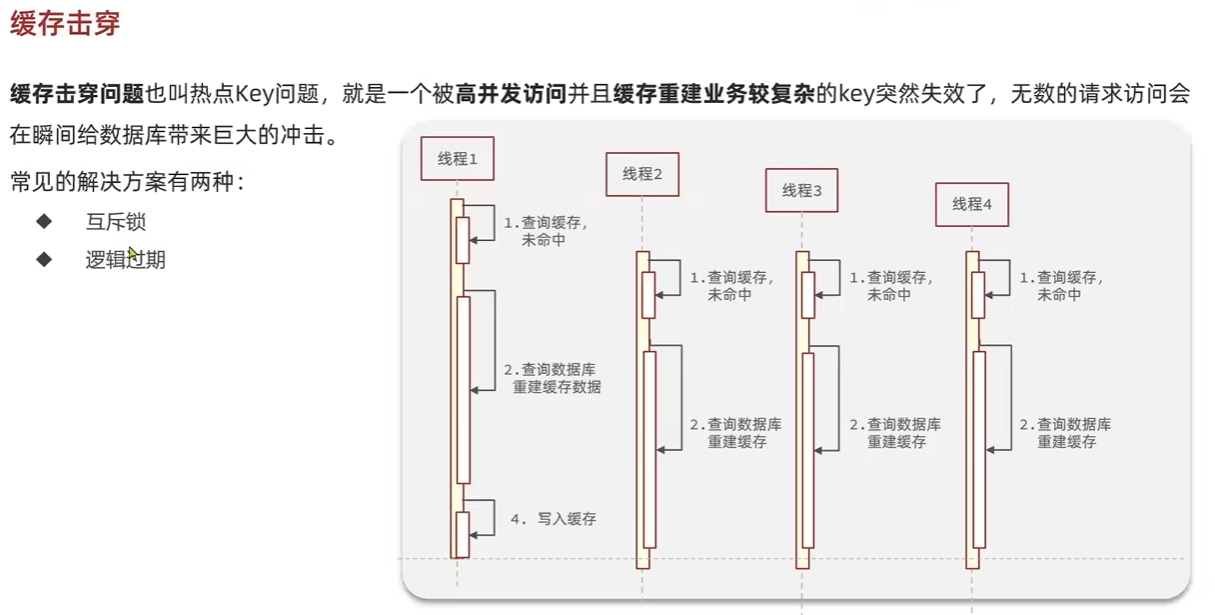
| 名称 | 触发场景 | 结果 | 常见解决方案 |
|---|---|---|---|
| 缓存穿透 | 请求的数据本就不存在(DB 也无) | 每次请求都打到数据库 | 缓存空值、布隆过滤器 |
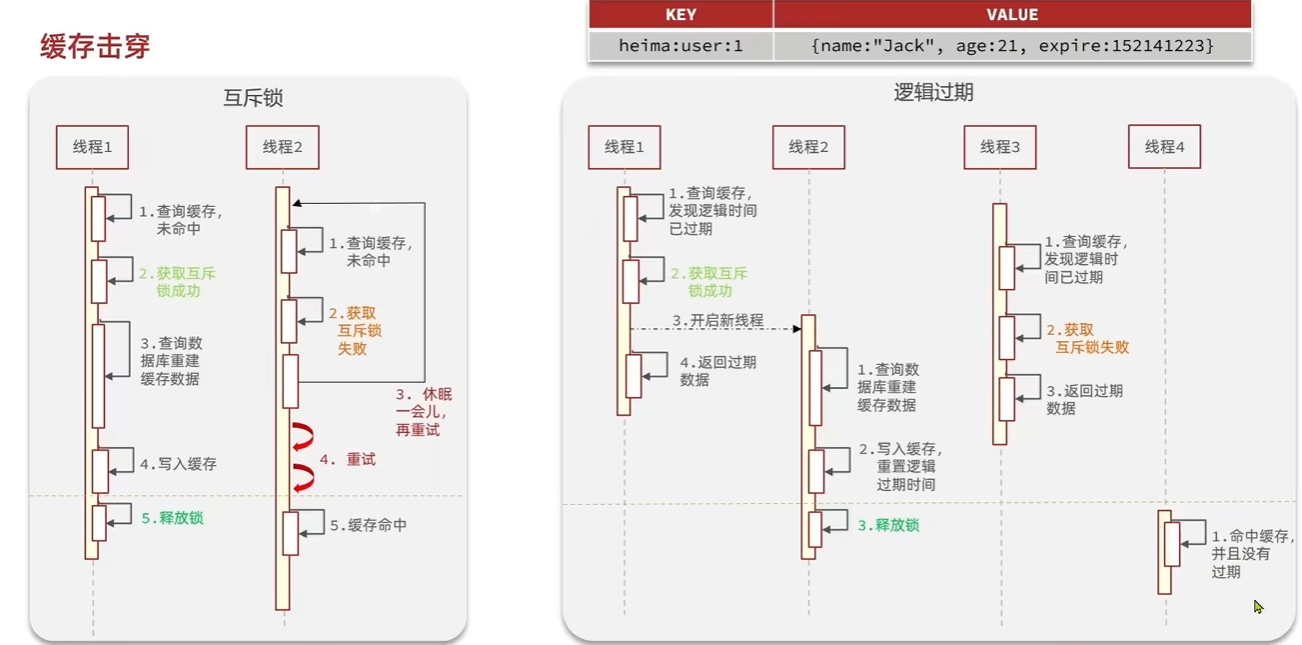
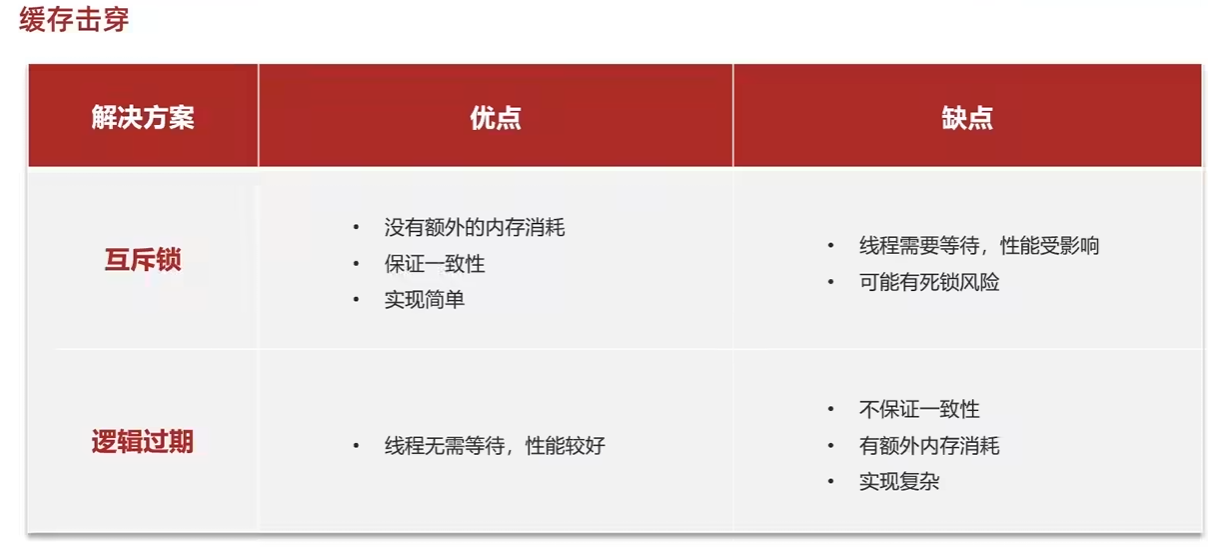
| 缓存击穿 | 某个热点 key 恰好过期了 | 大量请求同时访问 DB,瞬时压力大 | 加互斥锁、热点预热 |
| 缓存雪崩 | 大量 key 在同一时间过期 | 缓存失效,数据库压力激增 | 加随机过期时间、限流、降级 |
布隆过滤器是基于一个 bit 数组 + 多个 哈希函数:
- 初始创建一个很大的 bit 数组(如 1 亿位,全是 0)。
- 插入元素时,用多个哈希函数对元素哈希,得到多个下标位置,把这些位置设为 1。
- 查询时,对待查元素用相同的哈希函数求下标:
- 若所有对应 bit 位都是 1 → 可能存在
- 有任意一个 bit 是 0 → 一定不存在

优惠券秒杀
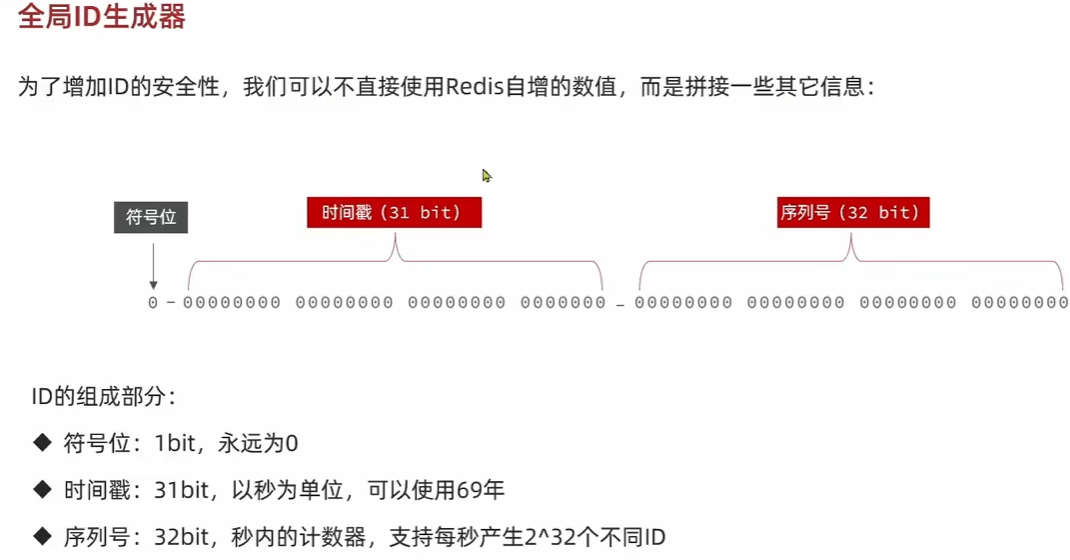
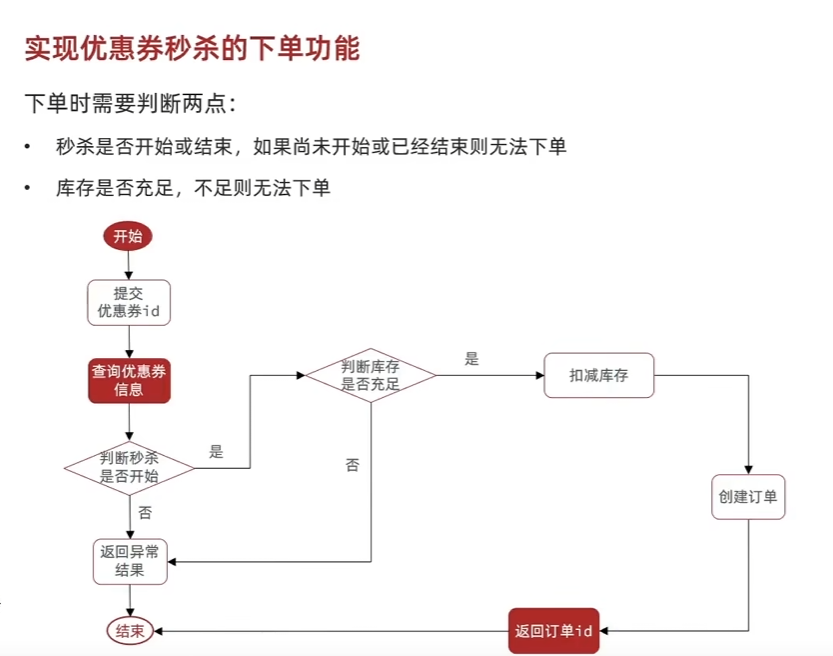
全局ID生成器,在分布式系统下用来生成全局唯一ID的工具.
满足:唯一性,高可用,高性能,递增性,安全性.

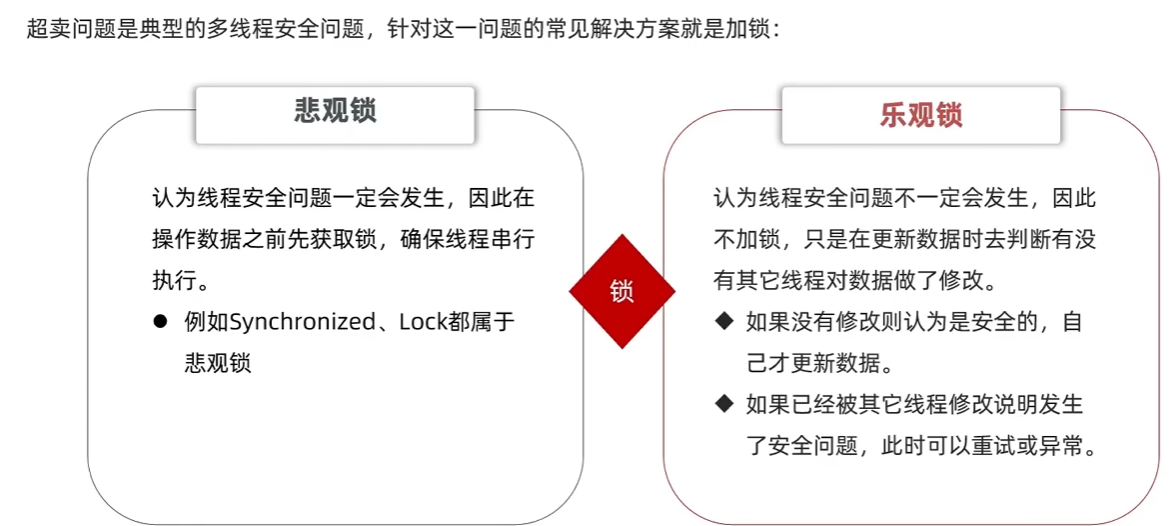
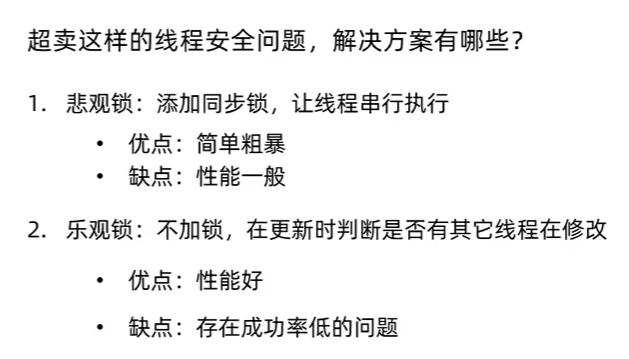
悲观锁 乐观锁
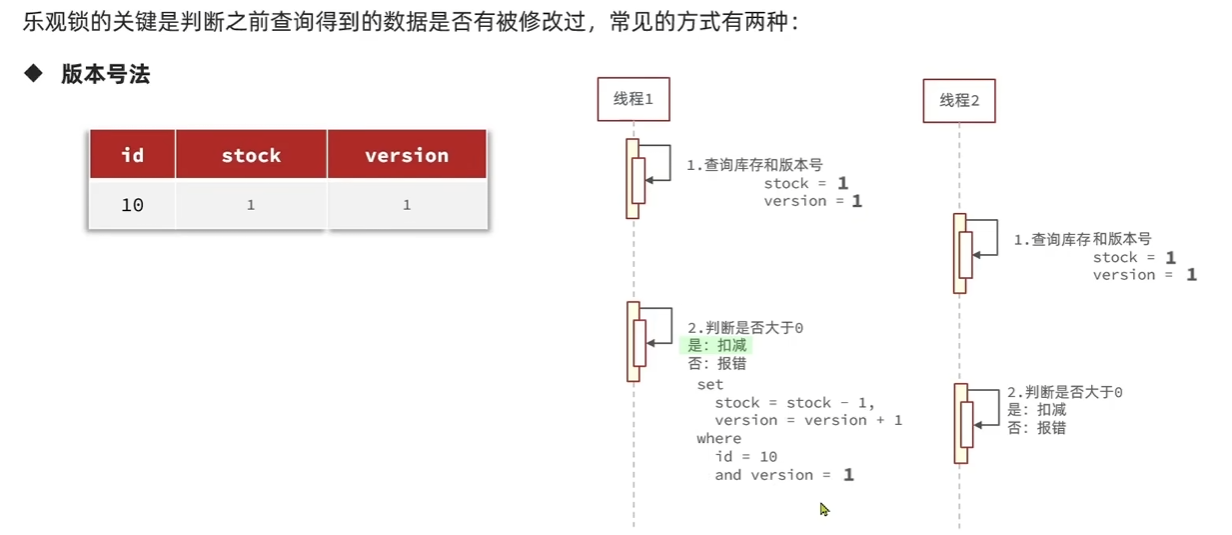
乐观锁的关键是判断之前查询得到的数据是否被修改过.常见方式:
- 版本号法
给数据添加版本号,每次更新的时候查询数据对应的版本,如果版本号跟之前的不同则表明更新过了.
- CAS法
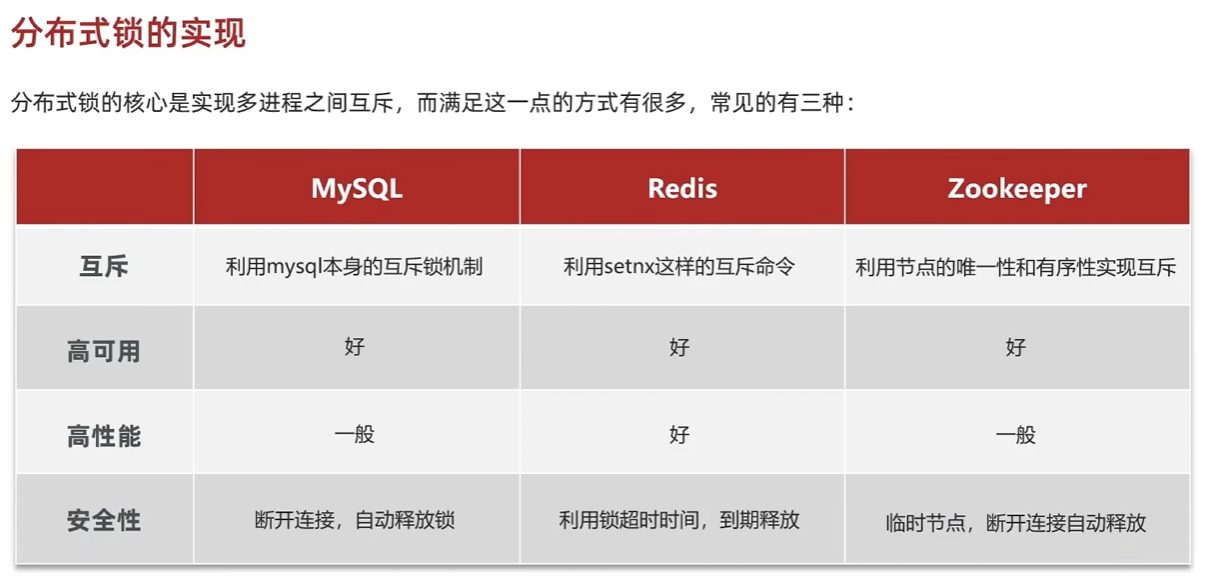
一人一单,使用悲观锁,加锁. 但在分布式系统下,多个实例下进程不相干,无法进行线程同步,需要实现分布式锁.
分布式锁:满足分布式系统或集群模式下多进程可见并且互斥的锁
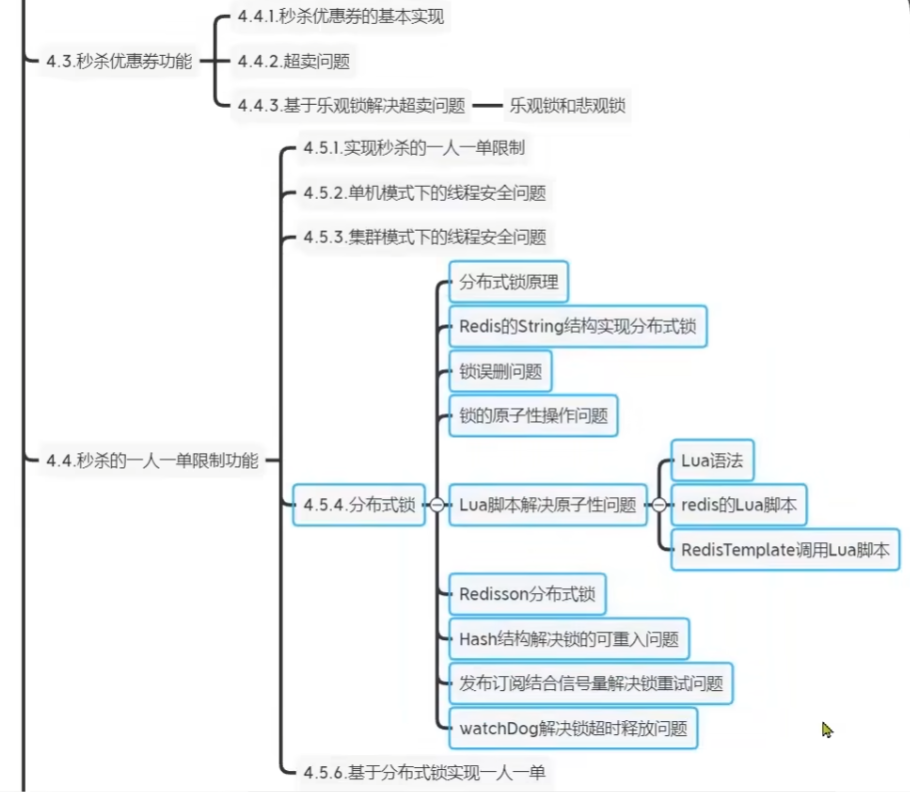
基于Redis的分布式锁
使用setnx

注意如果出现业务耗时超过key的ttl,导致其他线程拿到锁,在删除锁时检查value是否一致。
redis lua脚本


Redisson可重入锁
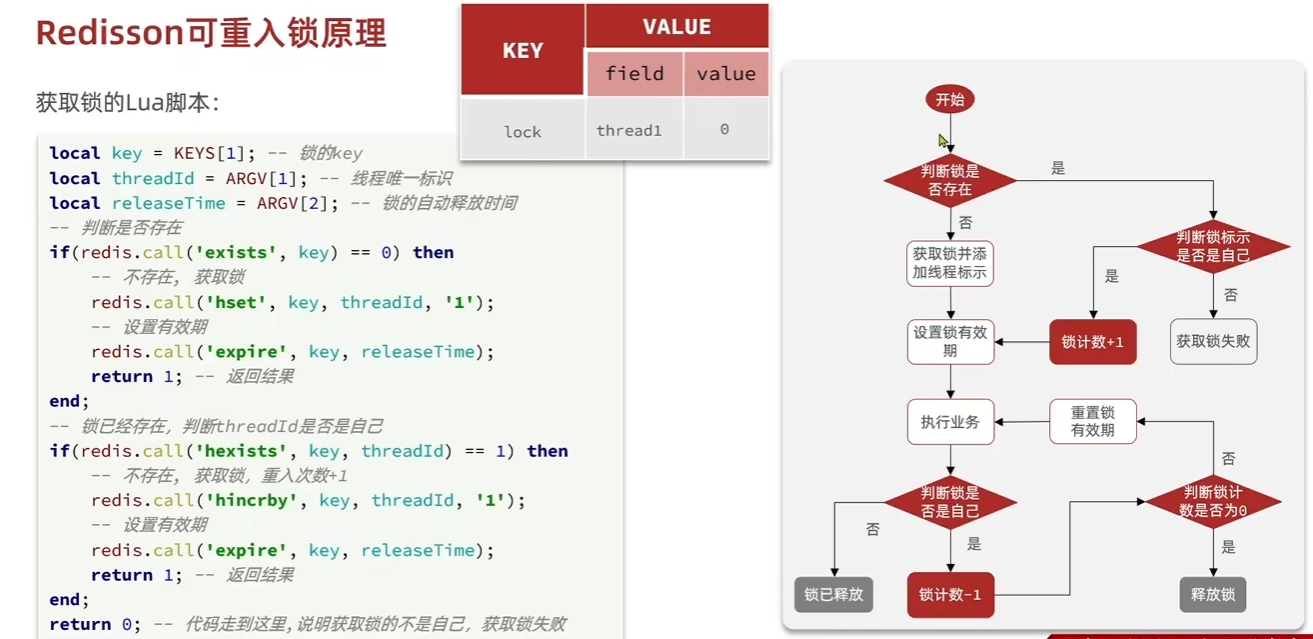
可重试/更新超时时间
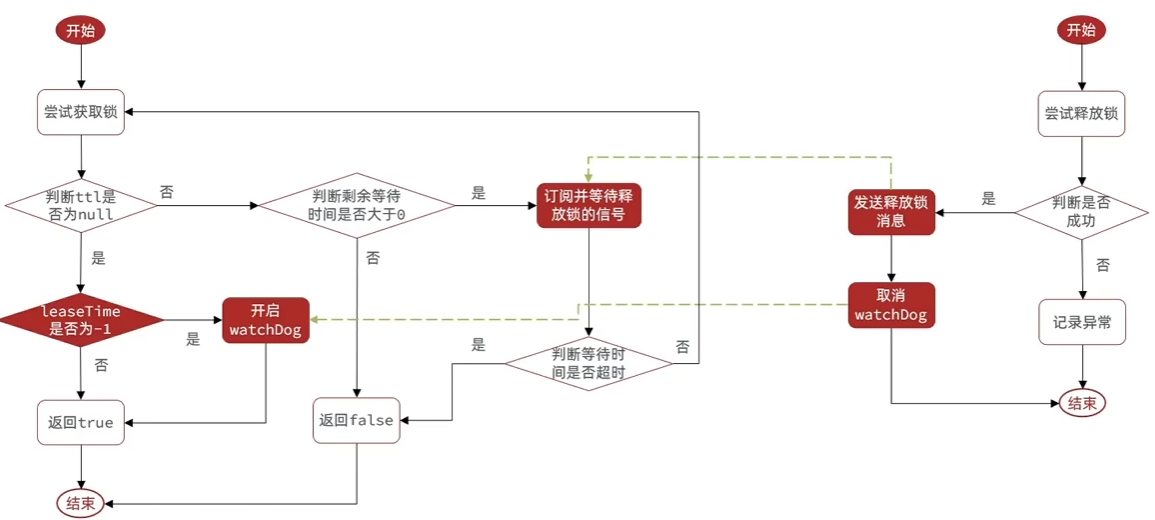
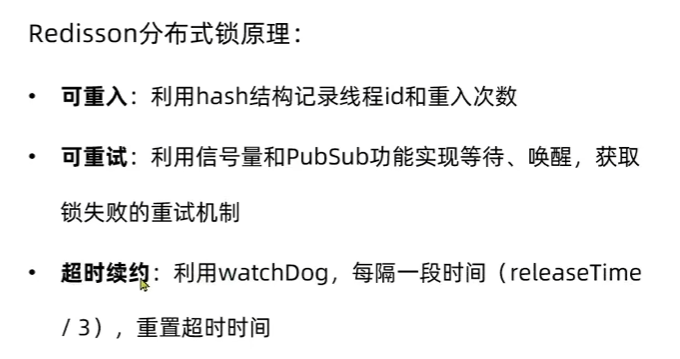
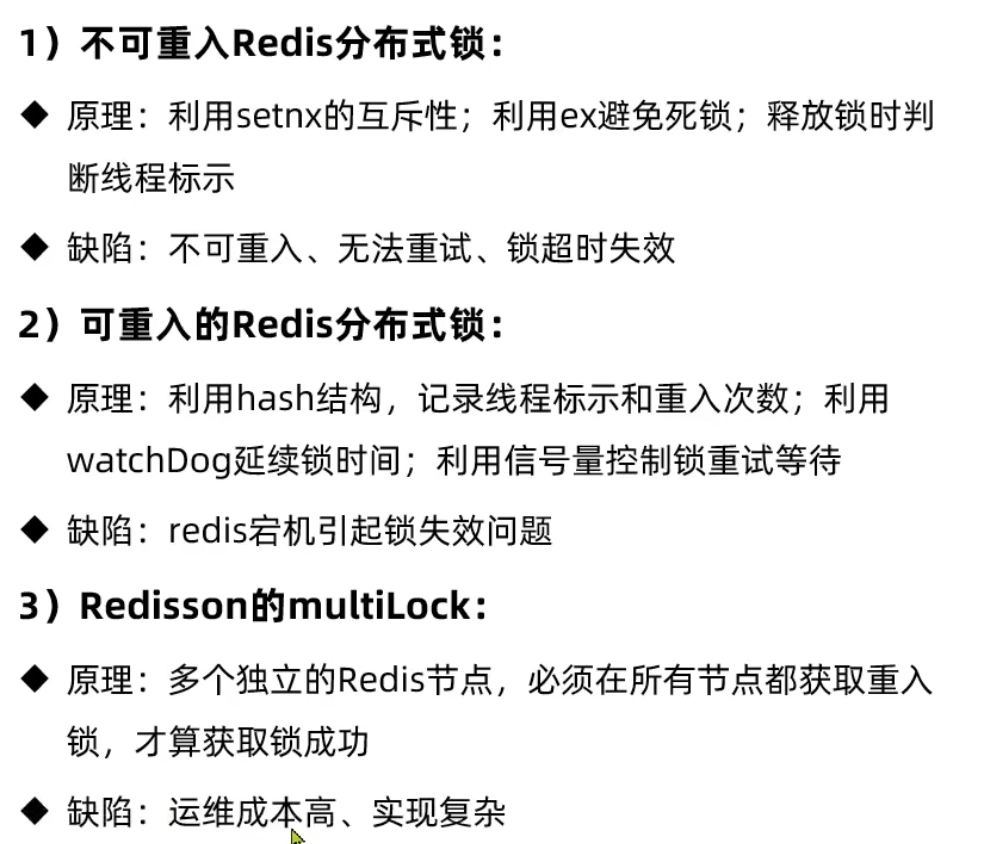
所以利用redis缓存作分布式锁的需要核心解决的可重入和超时重试机制.
主从一致性问题
一、单机多实例(适合开发和测试环境)
配置不同的实例端口,多个配置文件启动多个实例.
二、多机集群,在每台服务器上创建一个 Redis 配置文件(如 redis-cluster.conf),并添加以下内容:1
2
3
4
5port 6379
cluster-enabled yes
cluster-config-file nodes.conf
cluster-node-timeout 5000
appendonly yes
cluster-enabled yes:启用集群模式。cluster-config-file nodes.conf:指定集群节点配置文件。cluster-node-timeout 5000:设置节点超时时间(毫秒)
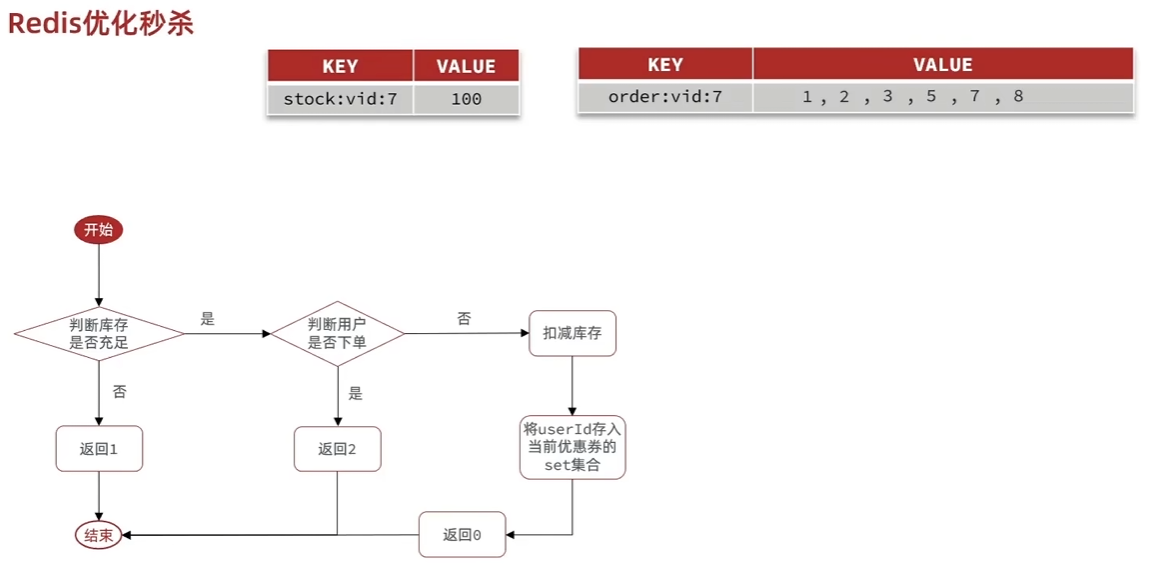
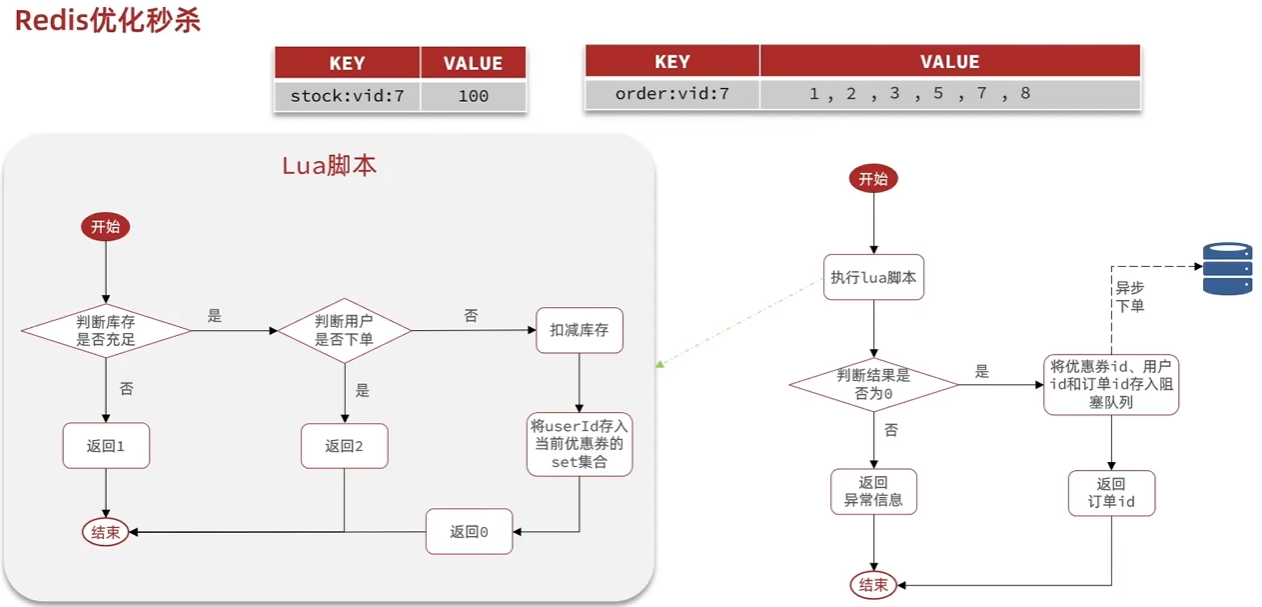
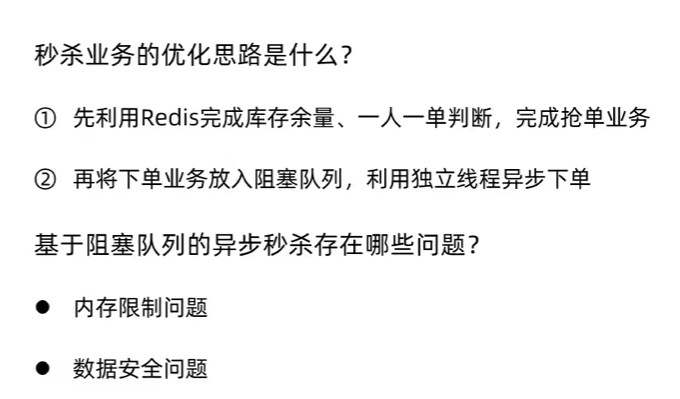
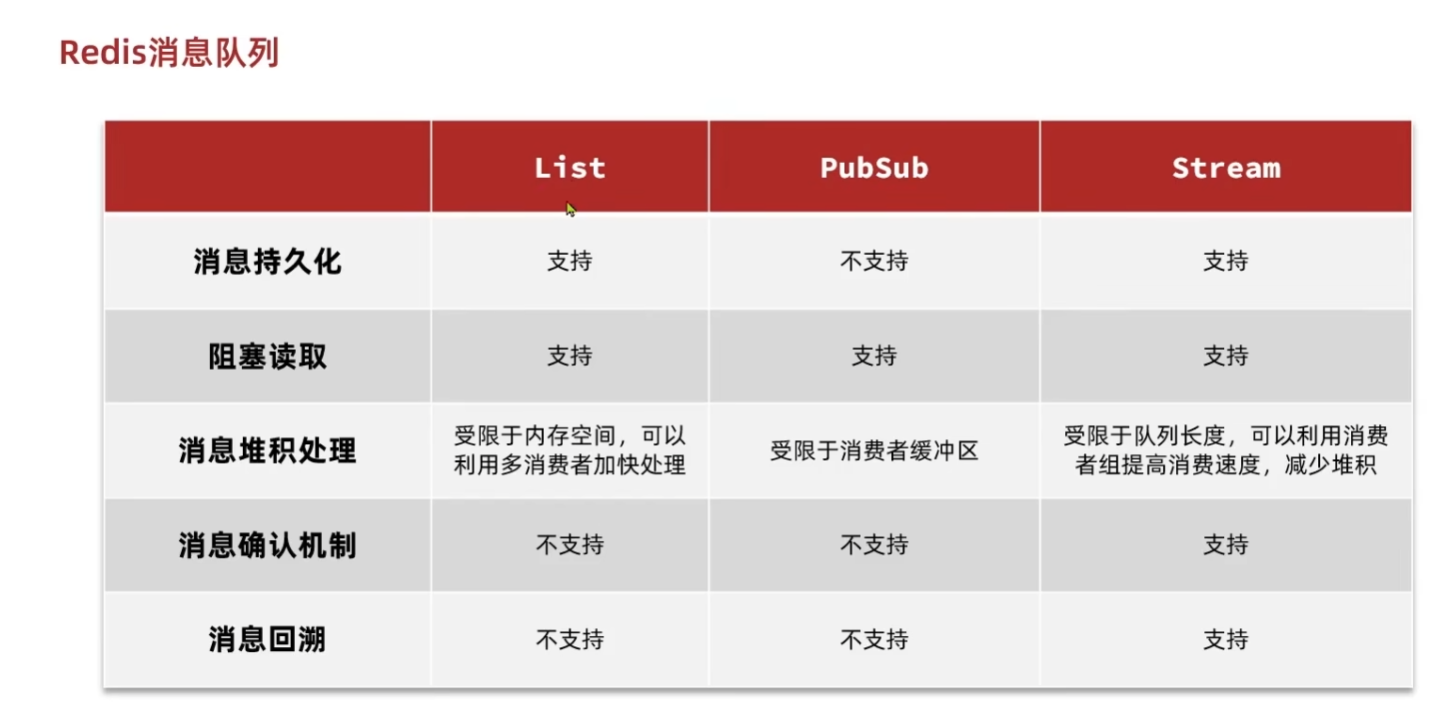
Redis消息队列
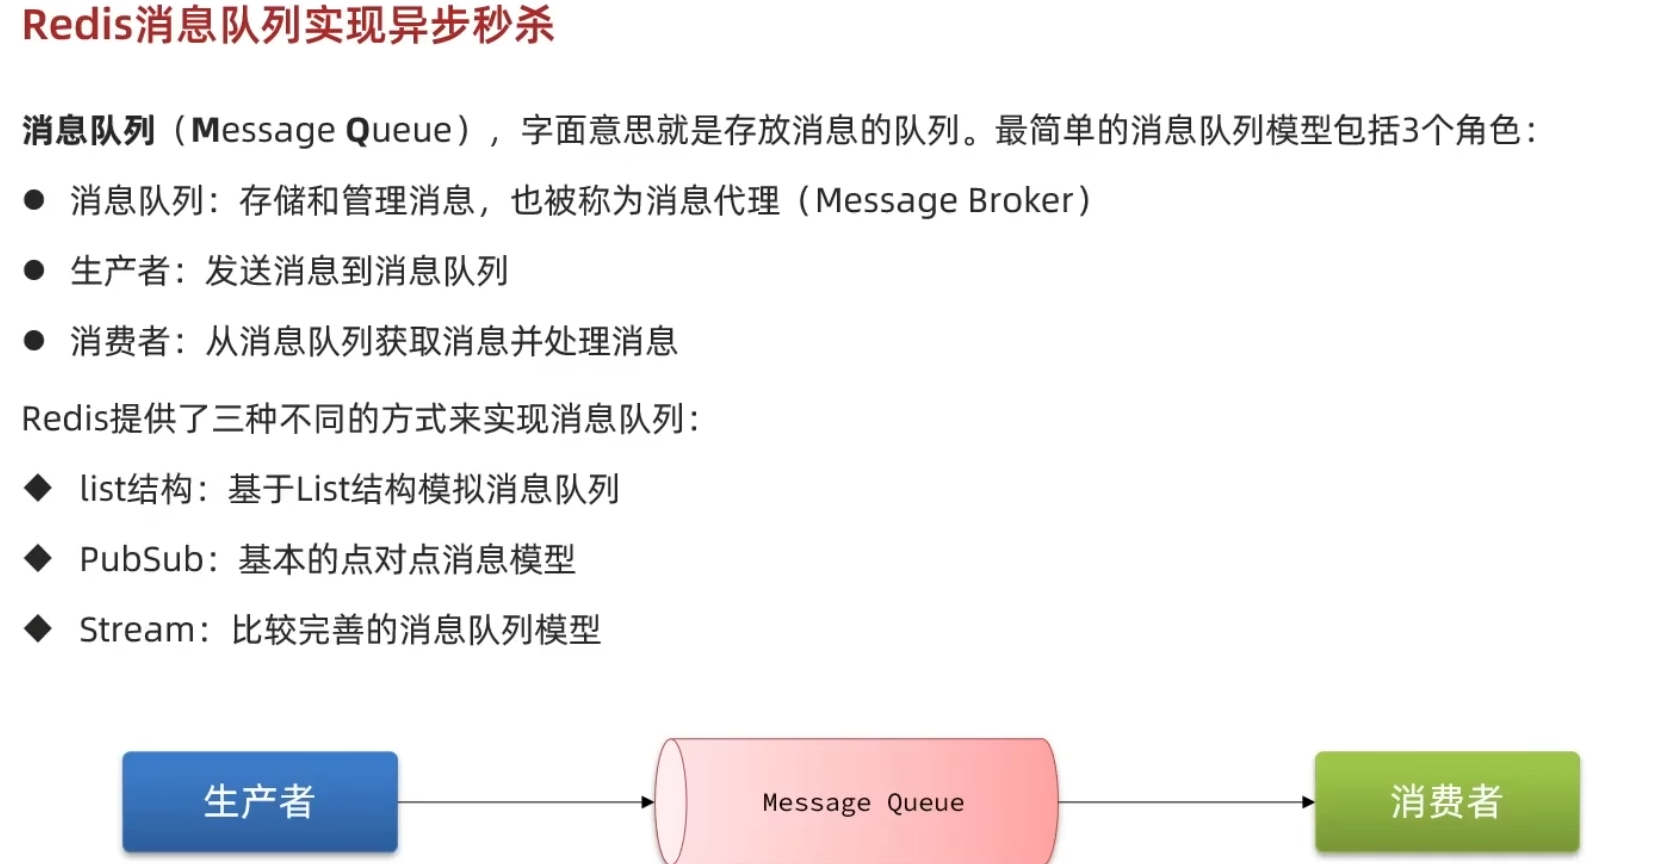
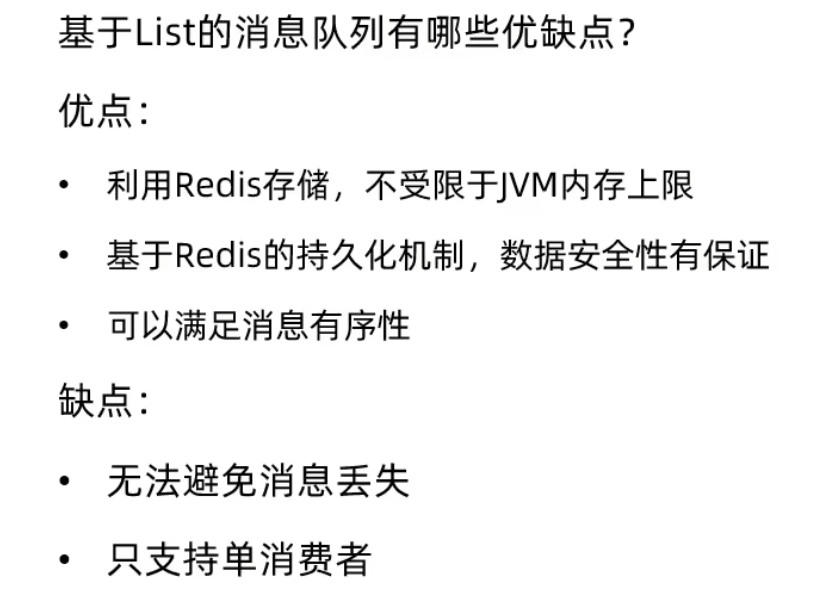
基于list数据结构
Redis列表是简单的字符串列表,按照插入顺序排序。你可以添加一个元素到列表的头部(左边)或者尾部(右边)一个列表最多可以包含 2^32^ -1个元素。主要利用BRPOP移除列表元素,如果列表没有元素会阻塞列表直到等待超时或发现可弹出元素为止. 同时通过LPUSH添加值.
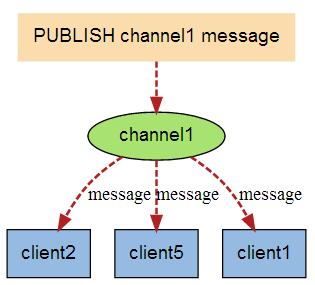
pubsub 点对点消息消息模型
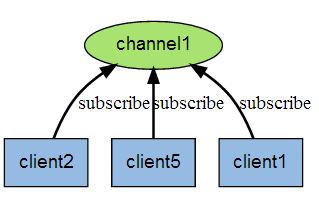
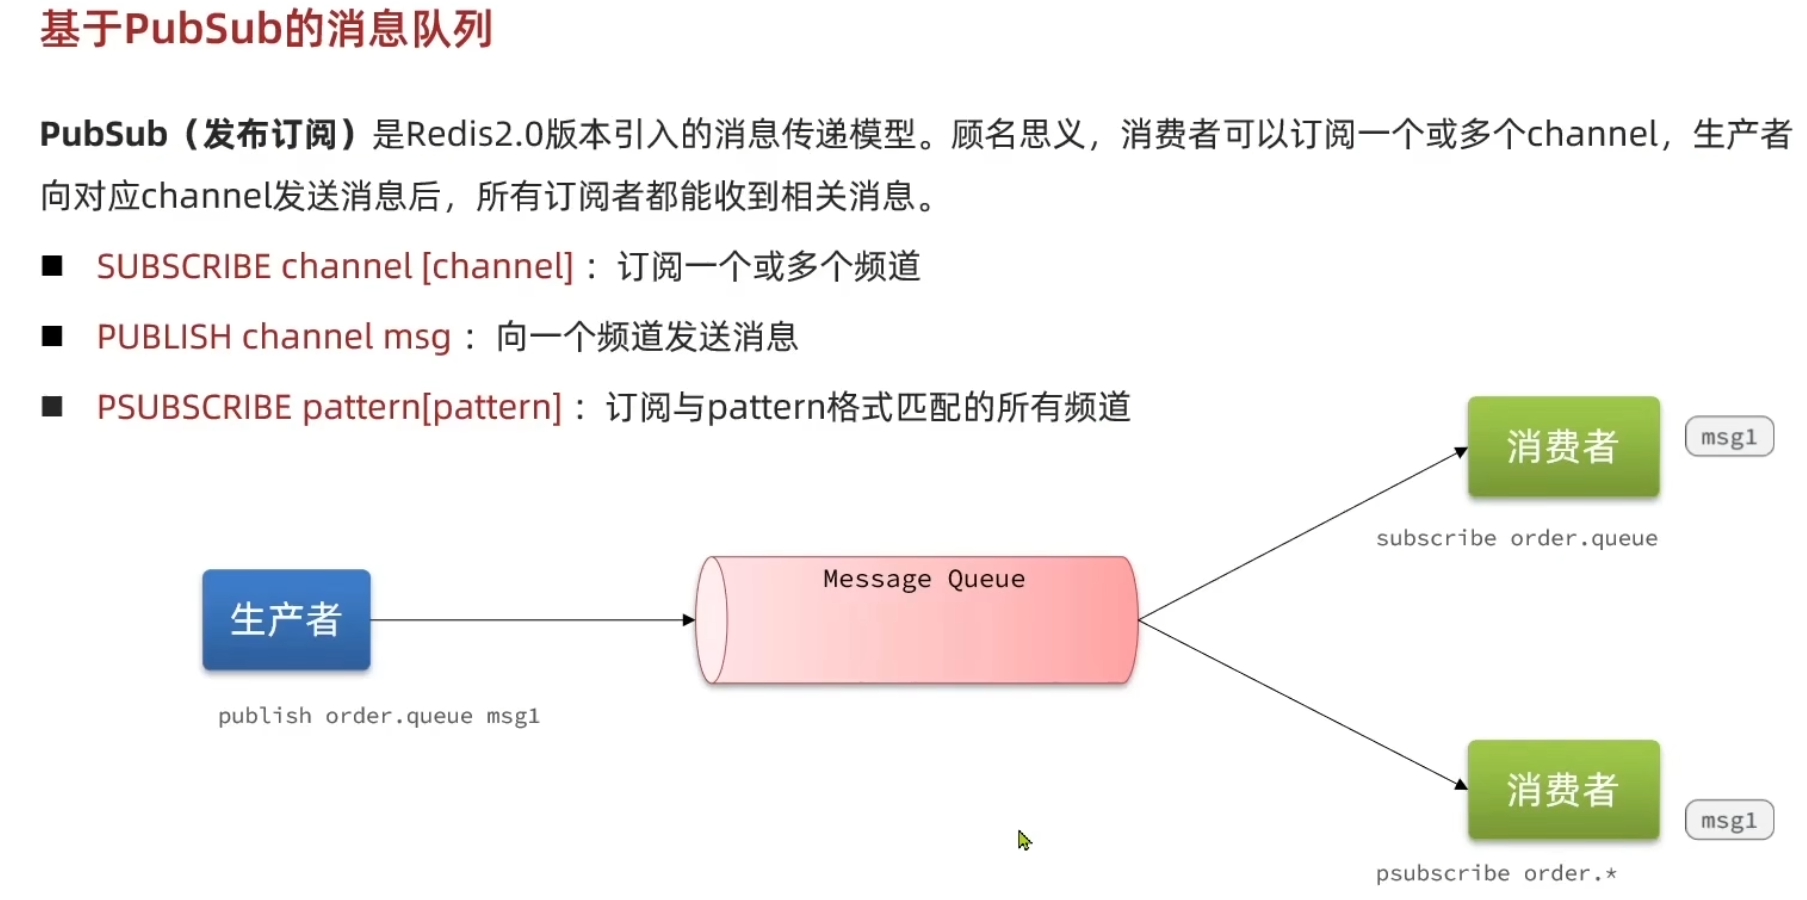
Redis 发布订阅 (pub/sub) 是一种消息通信模式:发送者 (pub) 发送消息,订阅者 (sub) 接收消息。
Redis 客户端可以订阅任意数量的频道。
Stream
Redis Stream 是 Redis 5.0 版本新增加的数据结构。
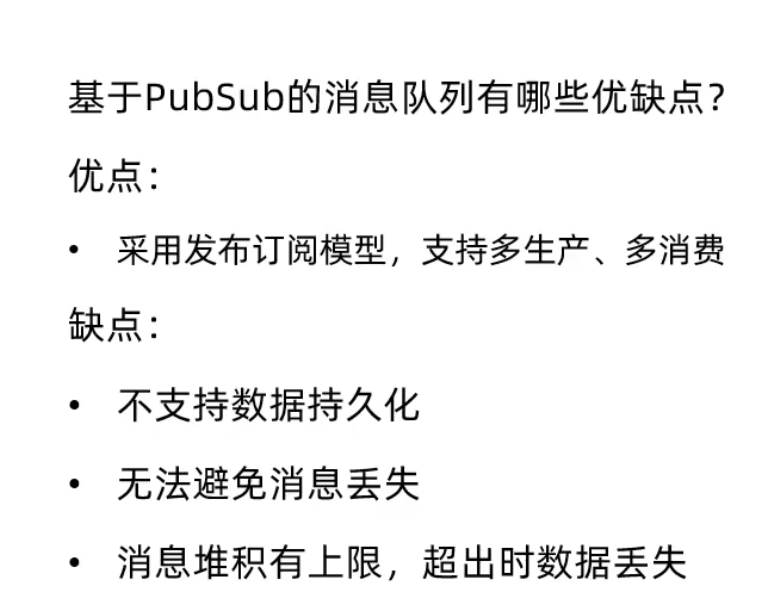
Redis Stream 主要用于消息队列(MQ,Message Queue),Redis 本身是有一个 Redis 发布订阅 (pub/sub) 来实现消息队列的功能,但它有个缺点就是消息无法持久化,如果出现网络断开、Redis 宕机等,消息就会被丢弃。
简单来说发布订阅 (pub/sub) 可以分发消息,但无法记录历史消息。
而 Redis Stream 提供了消息的持久化和主备复制功能,可以让任何客户端访问任何时刻的数据,并且能记住每一个客户端的访问位置,还能保证消息不丢失。
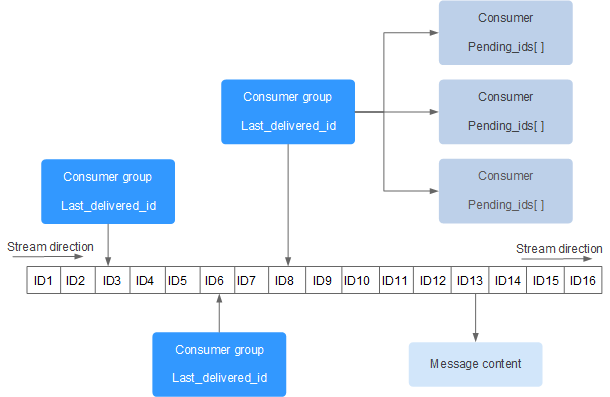
- Stream: 在 Redis 中,一个 Stream 就是一个追加日志类型的键值对集合。
- Entry: 每个流中的元素称为 Entry 或者 Message,由唯一标识符(ID)和数据字段组成。
- Consumer Group: 允许不同的消费者组从同一个流中读取消息,每个组可以独立地跟踪自己已经消费的消息位置。
- ID: 每条消息都有一个唯一的 ID,格式为
<timestamp>-<sequence>,其中时间戳是消息添加时的时间,序列号用于区分同一毫秒内添加的消息。
基于Stream的消息队列-消费者组
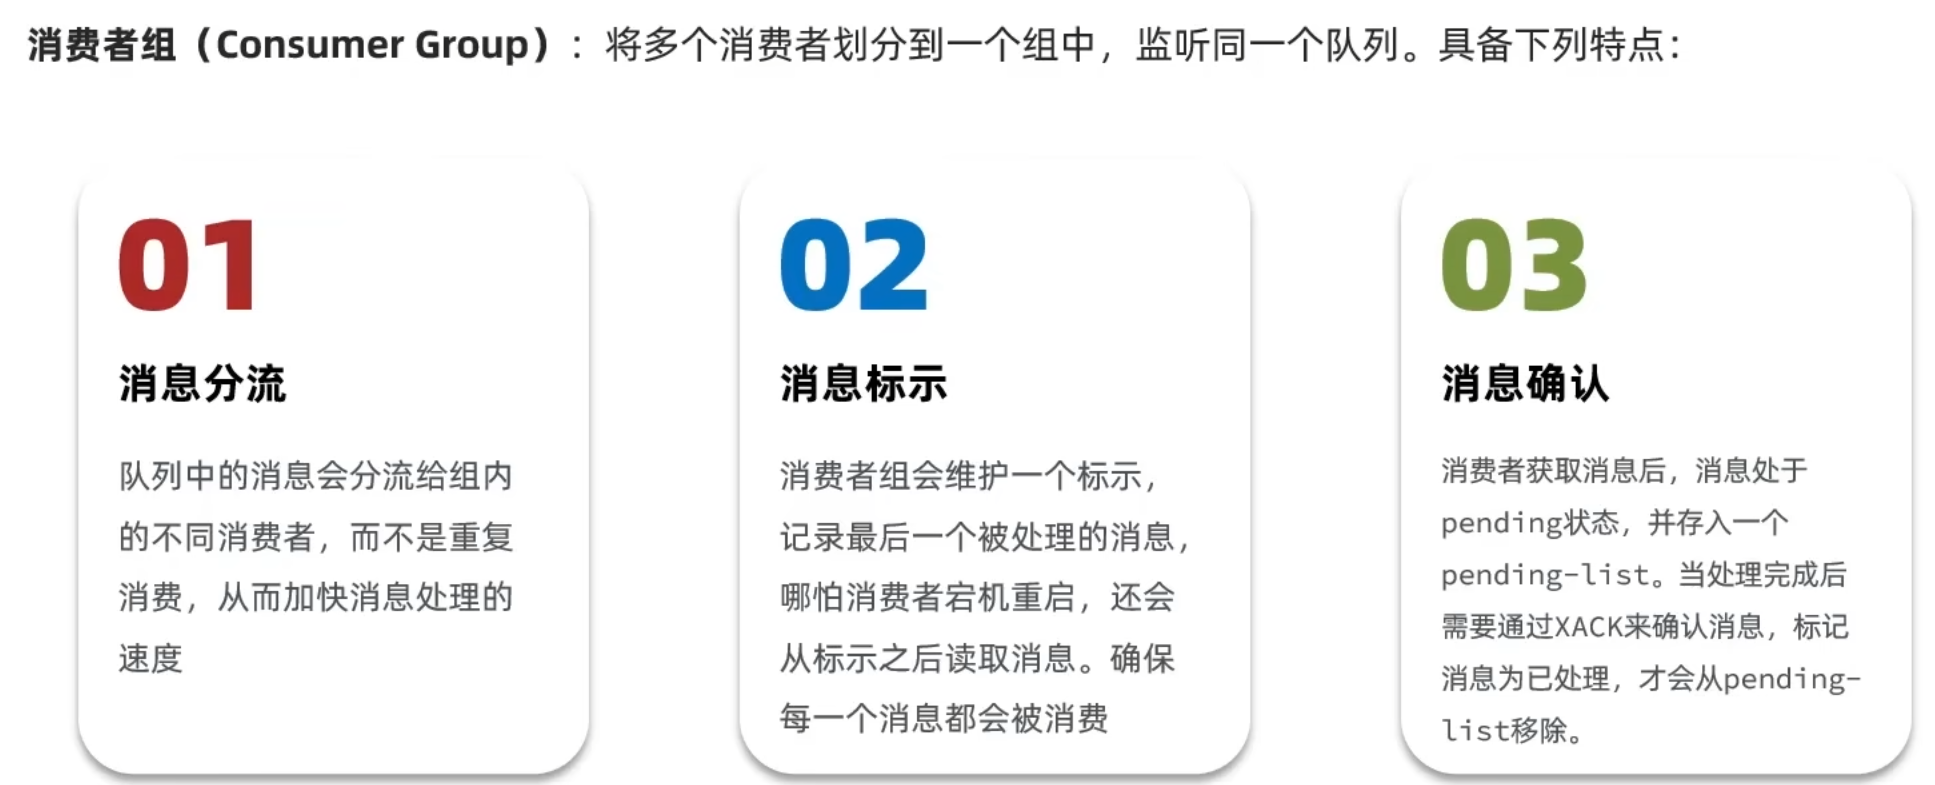
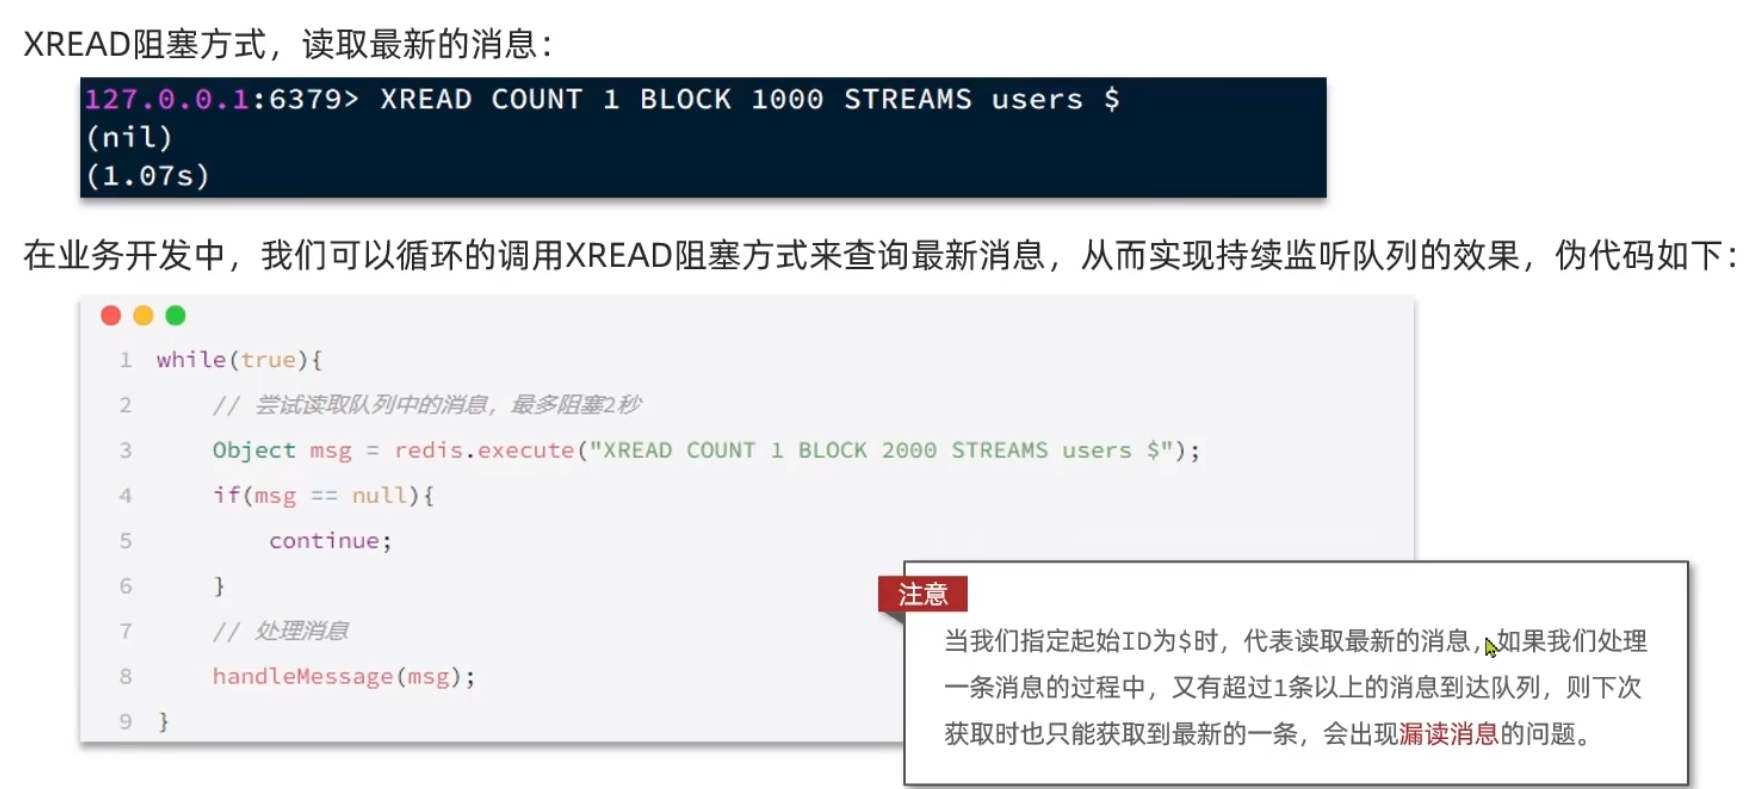
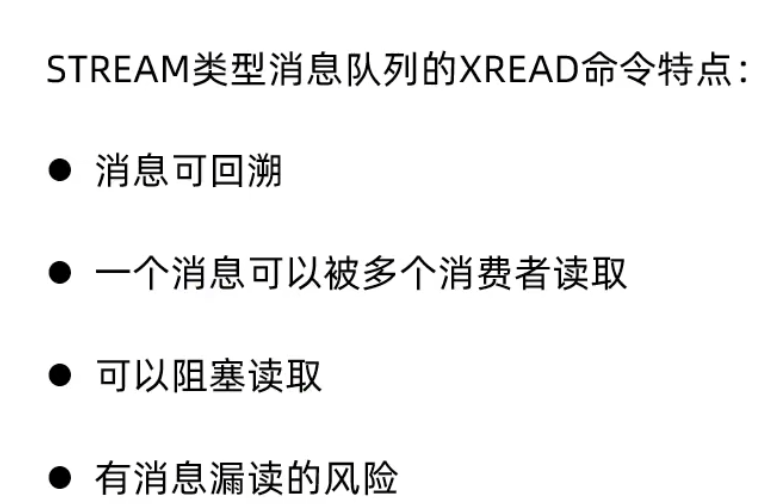
给消费者分类,消息漏读,消息确认避免消息丢失.
| 命令 | 作用 |
|---|---|
XADD | 添加消息到 Stream |
XRANGE / XREVRANGE | 范围读取消息(正/反向) |
XREAD | 阻塞或非阻塞读取消息 |
XGROUP CREATE | 创建消费者组 |
XREADGROUP | 按消费者组读取消息 |
XACK | 确认消息已处理 |
XPENDING | 查看待处理(未 ack)消息 |
XDEL | 删除指定消息 |
XTRIM | 裁剪旧消息,控制 Stream 大小 |
XLEN | 获取 Stream 长度 |
XINFO | 获取 Stream / Consumer 详细信息 |
创建组
1 | XGROUP CREATE mystream mygroup $ MKSTREAM |
创建名为
mygroup的消费者组,$从最新消息开始消费,MKSTREAM可自动创建 Stream。
读取消息
1 | XREADGROUP GROUP mygroup consumer1 COUNT 2 STREAMS mystream > |
>表示读取尚未分配的消息(新消息)。
消息确认
1 | XACK mystream mygroup 1686900000000-0 |
查看未确认消息
1 | XPENDING mystream mygroup |
| 命令 | 说明 |
|---|---|
XINFO STREAM mystream | 查看 stream 本体信息 |
XINFO GROUPS mystream | 查看所有消费者组信息 |
XINFO CONSUMERS mystream mygroup | 查看某个消费者组中各个消费者状态 |
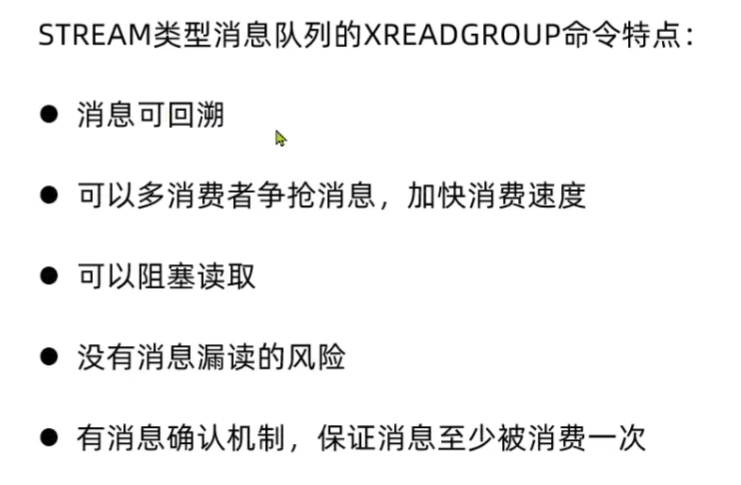
消费者组中的多消费者争抢消息体现在
在 Redis Stream 中使用 消费者组(Consumer Group) 时,有个关键的机制是:
➤ 同一个消费者组内,一个消息只会被分配给一个消费者处理。
这意味着:
如果消费者 A 已经读取并 ack(确认)了一条消息,那么:
- 同组内的消费者 B 是 无法再读取这条消息 的。
- 除非你专门指定消息 ID 重新读取(例如用
XREADGROUP+ 指定 ID)。
如果你希望 消费者 B 能“读到之前被其他消费者已处理的消息”,你必须显式指定 ID,并该消息未被 ack或使用
XPENDING查找。✅如何让消费者读取“历史消息”?
场景 1:消息还未被 ack(pending)
可以通过
XPENDING+XCLAIM把消息“抢过来”:1
2
3
4
5
6
7
8
9
10
11javaCopyEditPendingMessages pending = stringRedisTemplate.opsForStream()
.pending("mystream", "mygroup", Range.unbounded(), 10);
for (PendingMessage message : pending) {
// 把未 ack 的消息交给当前消费者
List<MapRecord<String, Object, Object>> records = stringRedisTemplate.opsForStream().claim(
Consumer.from("mygroup", "consumer2"),
Duration.ofSeconds(5),
message.getId()
);
}场景 2:消息已被 ack,想重复读取
Redis 默认设计下是不会让你“重复消费”被 ack 的消息的,但你可以手动读取它(不是 group 模式):
1
2
3// 不使用消费者组,直接用 XREAD + ID
List<MapRecord<String, Object, Object>> records = stringRedisTemplate.opsForStream()
.read(StreamOffset.fromStart("mystream")); // 或者用具体 ID也可以用
XRANGE来精确读取:1
2
3// 获取某条历史消息
stringRedisTemplate.opsForStream()
.range("mystream", Range.closed("1682390889639-0", "1682390889639-0"));| 场景 | 是否能重新读取 |
| —————————————————- | ——————————————— |
| 消费者组内,消息已被 ack | ❌(除非用非 group 方式手动读) |
| 消费者组内,消息未被 ack(pending) | ✅(可以用 XCLAIM 抢回来) |
| 想让多个消费者都能读一条消息 | ❌(组内不支持;需非 group 读) |
多级缓存
传统缓存的问题
传统缓存策略是请求先到达web容器,比如Tomcat,先查询Redis,如果未命中则查询数据库
- 请求先经过Tomcat处理,Tomcat性能成为系统瓶颈
- Redis缓存失效时,数据库产生冲击
多级缓存利用请求处理的每个环节,分别添加缓存,减轻tomcat压力,提升性能.
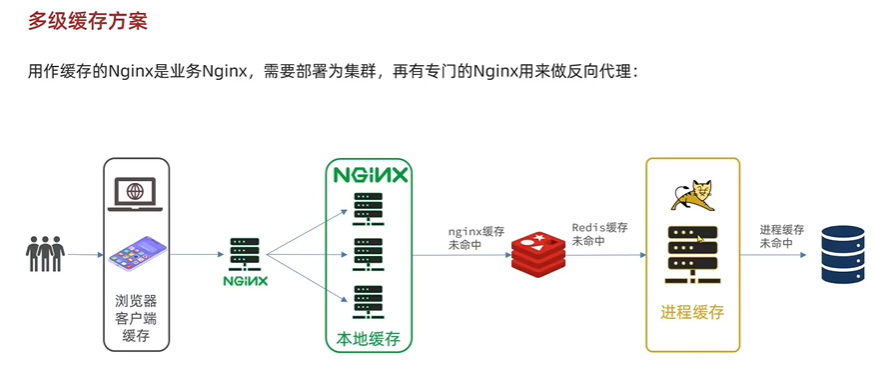
JVM进程缓存 Nginx缓存 缓存同步策略
Caffine进程缓存
达人探店
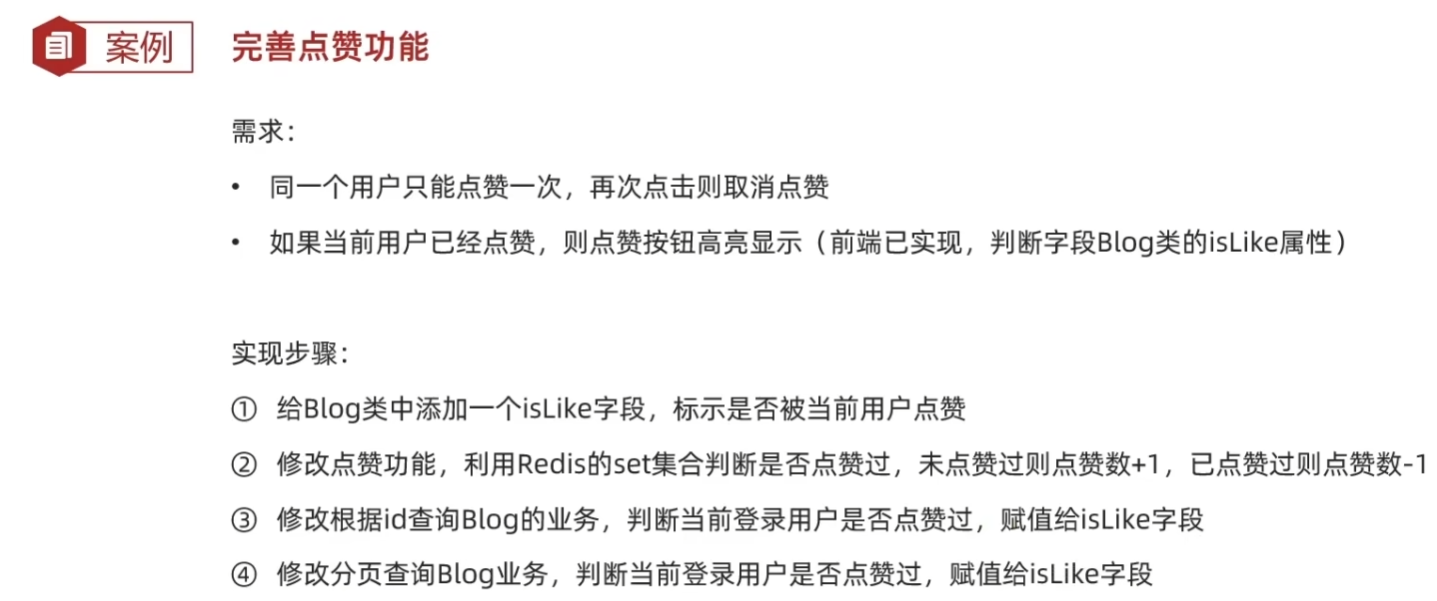
点赞功能
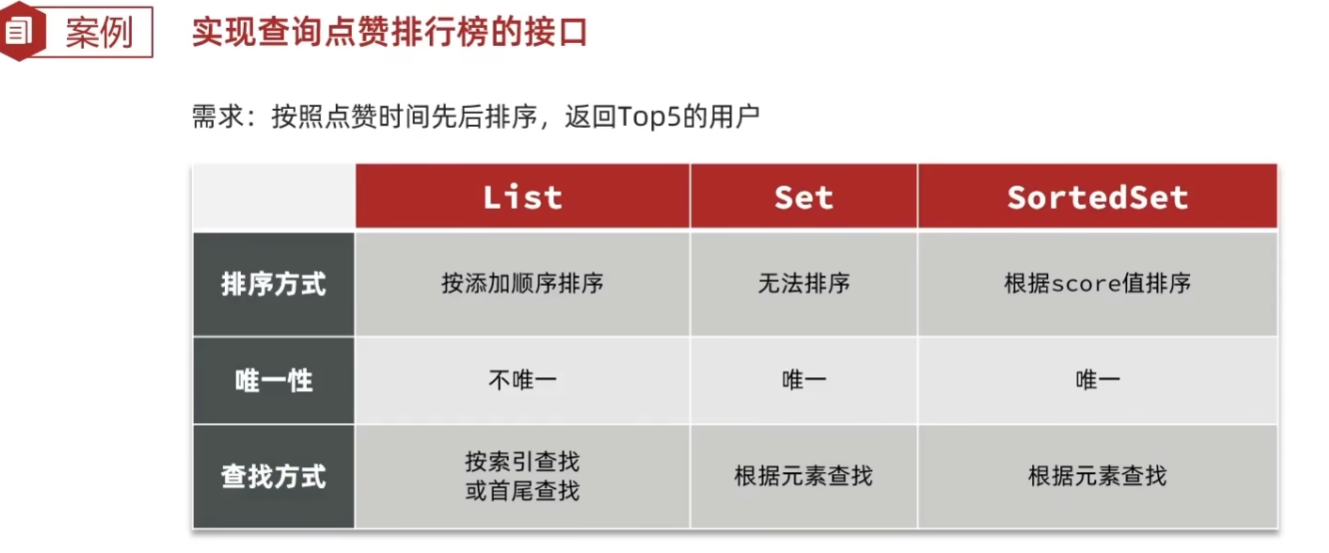
点赞排行榜
好友关注
写两个接口,一个查看是否关注,另一个进行关注或取关.
关注的数据表设计为user_id和follower_id. 为一个关注记录
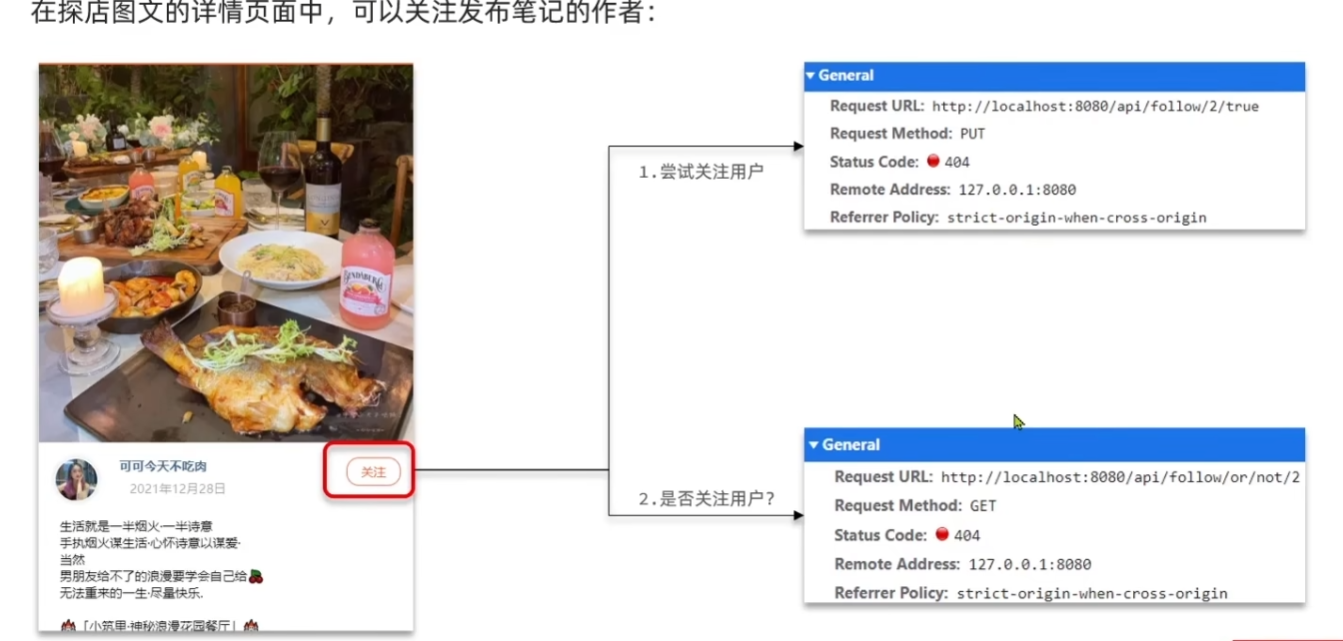
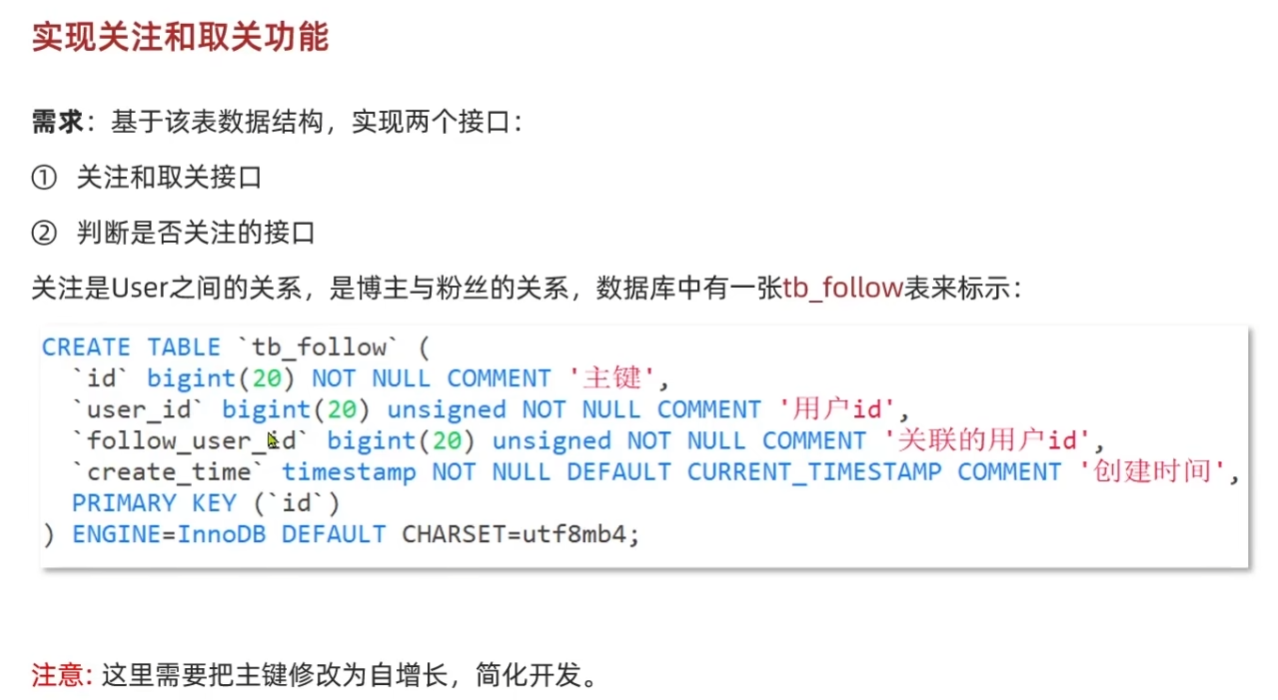
共同关注
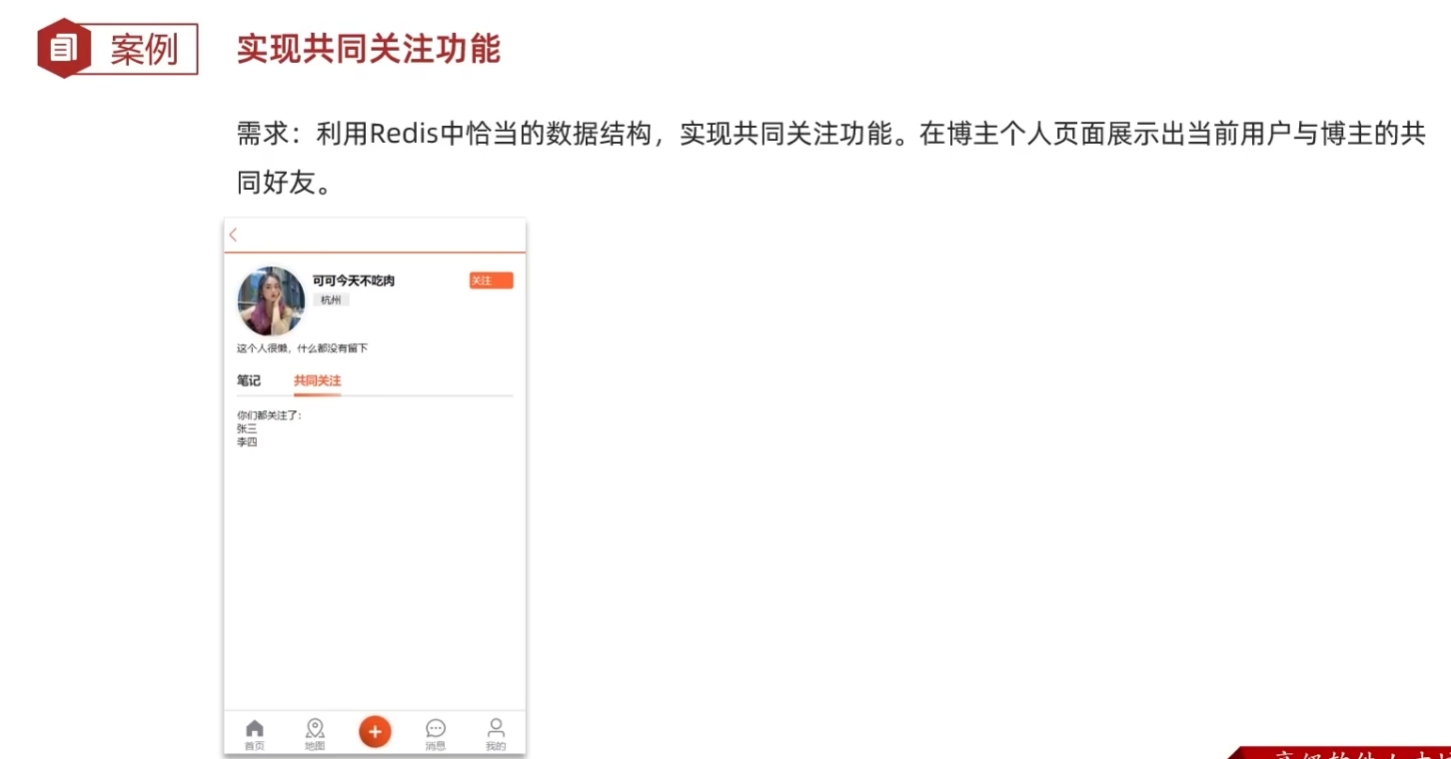
在新增关注时添加缓存,同时利用redis中的set交集操作在缓存中得到共同关注
关注推送
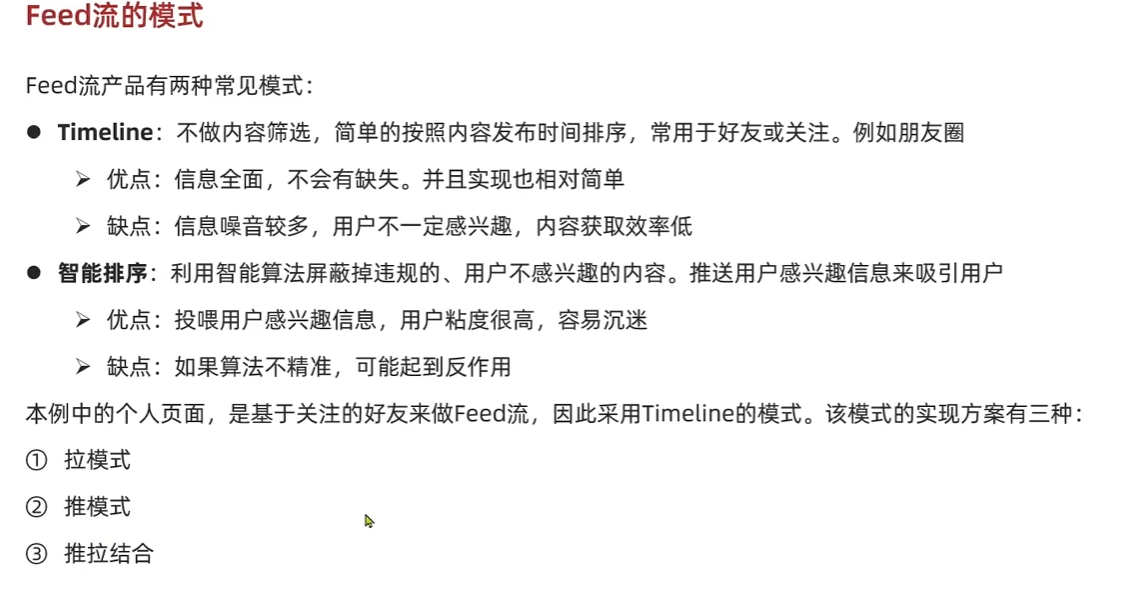
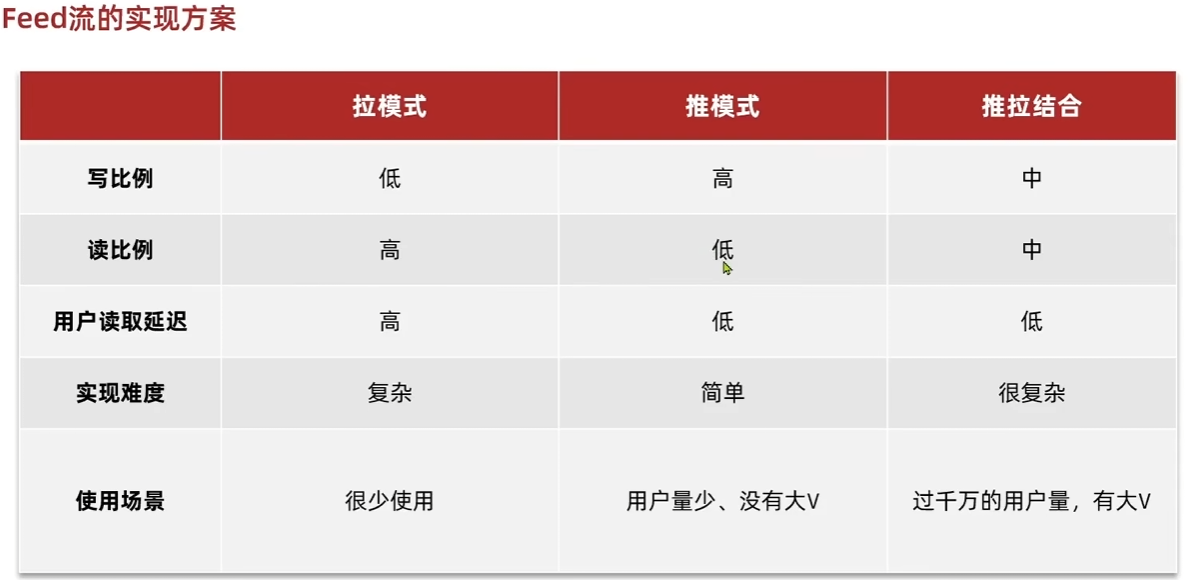
通过推模式,通过分页滚动读取关注用户发布的博客数据. 用户发布博客时将博客id加入关注自己的粉丝的收件箱, 使用sorted set,以时间戳为score(即推模式)
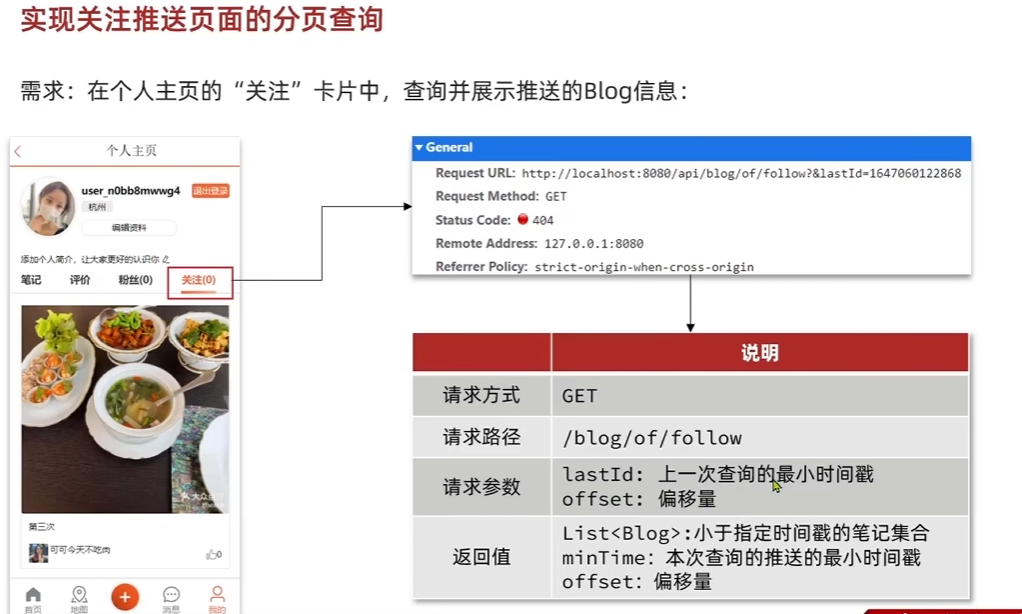
关键是利用最新的时间戳去拿最新的博客id,同时利用偏移量滤去相同的时间戳(默认不会重复). 如果考虑发布时间重复,也可以在存储score时在时间戳基础上加一个随机值避免score重复.
附近商户
Redis GEO 主要用于存储地理位置信息,并对存储的信息进行操作,该功能在 Redis 3.2 版本新增。
Redis GEO 操作方法有:
- geoadd:添加地理位置的坐标。
- geopos:获取地理位置的坐标。
- geodist:计算两个位置之间的距离。
- georadius:根据用户给定的经纬度坐标来获取指定范围内的地理位置集合。
- georadiusbymember:根据储存在位置集合里面的某个地点获取指定范围内的地理位置集合。
- geohash:返回一个或多个位置对象的 geohash 值。
geoadd 用于存储指定的地理空间位置,可以将一个或多个经度(longitude)、纬度(latitude)、位置名称(member)添加到指定的 key 中。
geoadd 语法格式如下:1
GEOADD key longitude latitude member [longitude latitude member ...]
- m :米,默认单位。
- km :千米。
- mi :英里。
- ft :英尺。
- WITHDIST: 在返回位置元素的同时, 将位置元素与中心之间的距离也一并返回。
- WITHCOORD: 将位置元素的经度和纬度也一并返回。
- WITHHASH: 以 52 位有符号整数的形式, 返回位置元素经过原始 geohash 编码的有序集合分值。 这个选项主要用于底层应用或者调试, 实际中的作用并不大。
- COUNT 限定返回的记录数。
- ASC: 查找结果根据距离从近到远排序。
- DESC: 查找结果根据从远到近排序。
用户签到
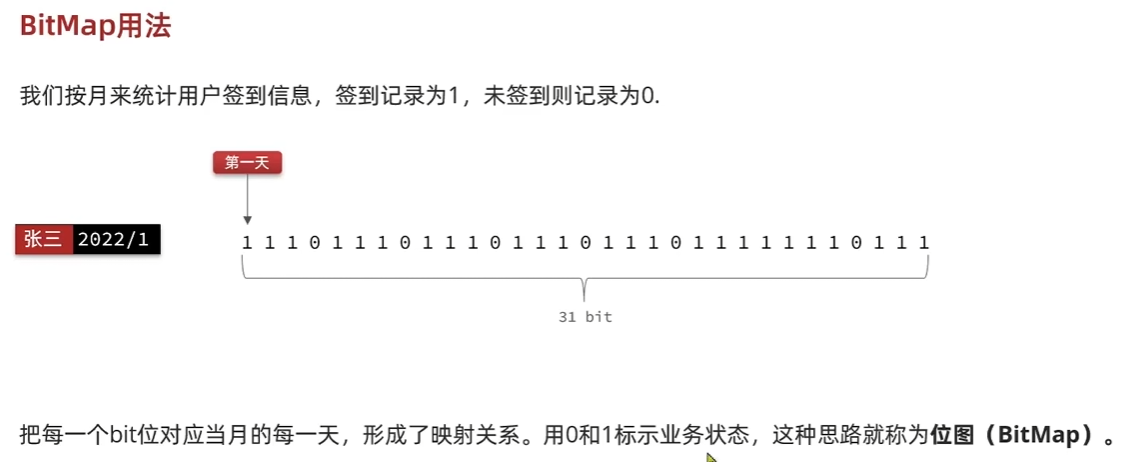
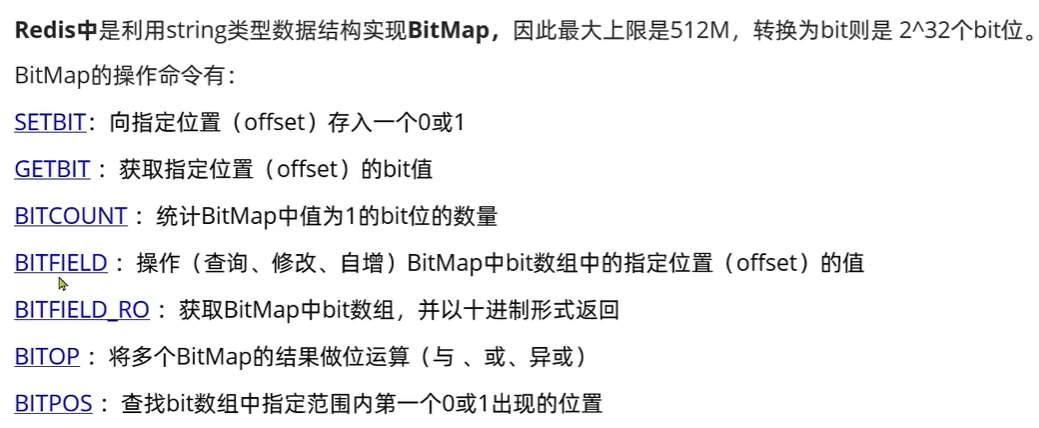
1
2
3
4
5
6
7
8
9
10LocalDateTime now = LocalDateTime.now();
int dayOfYear = now.getDayOfYear();
int year = now.getYear();
String key = SIGN_KEY + UserHolder.getUser().getId()+ ":" + year;
Boolean signSuccess = stringRedisTemplate.opsForValue().setBit(key, dayOfYear-1, true);
if (BooleanUtil.isTrue(signSuccess)) {
return Result.ok();
}else{
return Result.fail("签到失败");
}
签到统计
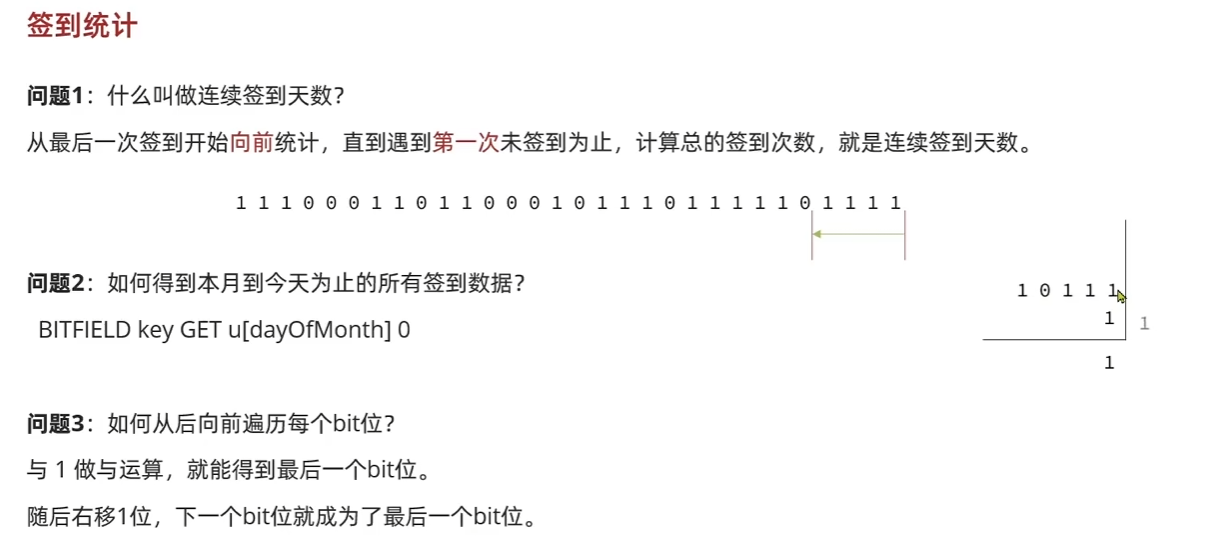
使用bitfield查询一个范围内的二进制返回十进制数据.
UV统计 HyperLogLog
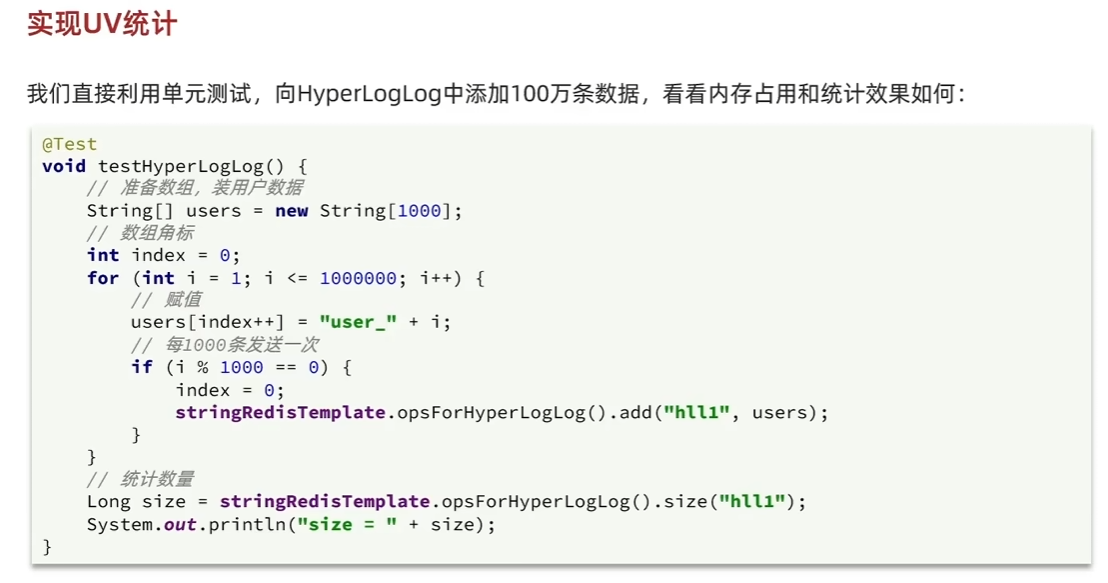
Redis HyperLogLog 是用来做基数统计的算法,HyperLogLog 的优点是,在输入元素的数量或者体积非常非常大时,计算基数所需的空间总是固定 的、并且是很小的。
在 Redis 里面,每个 HyperLogLog 键只需要花费 12 KB 内存,就可以计算接近 2^64 个不同元素的基 数。这和计算基数时,元素越多耗费内存就越多的集合形成鲜明对比。
但是,因为 HyperLogLog 只会根据输入元素来计算基数,而不会储存输入元素本身,所以 HyperLogLog 不能像集合那样,返回输入的各个元素。

EasyChat
登录注册
登陆
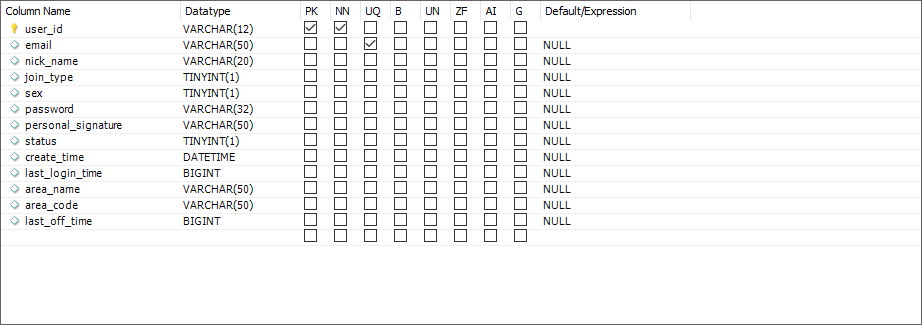
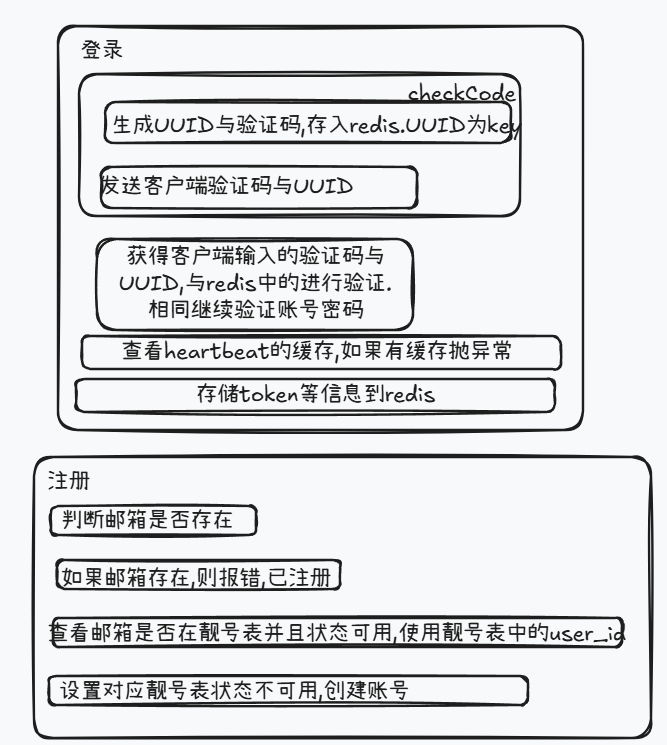
登陆时检查心跳缓存避免别处登陆,完成后保存用户信息缓存,并查询联系人存在缓存中.
注册
注册完成后,主要是创建了机器人账号并加入了会话1
2
3
4
5
6
7
8
9
10
11
12
13
14
15
16
17
18
19
20
21
22
23
24
25
26
27
28
29
30
31
32
33
34
35
36
37
38
39
40
41
42
43
44Date curDate = new Date();
SysSettingDto sysSettingDto = redisComponet.getSysSetting();
String contactId = sysSettingDto.getRobotUid();
String contactName = sysSettingDto.getRobotNickName();
String senMessage = sysSettingDto.getRobotWelcome();
senMessage = StringTools.cleanHtmlTag(senMessage);
//增加机器人好友
UserContact userContact = new UserContact();
userContact.setUserId(userId);
userContact.setContactId(contactId);
userContact.setContactType(UserContactTypeEnum.USER.getType());
userContact.setCreateTime(curDate);
userContact.setStatus(UserContactStatusEnum.FRIEND.getStatus());
userContact.setLastUpdateTime(curDate);
userContactMapper.insert(userContact);
//增加会话信息
String sessionId = StringTools.getChatSessionId4User(new String[]{userId, contactId});
ChatSession chatSession = new ChatSession();
chatSession.setLastMessage(senMessage);
chatSession.setSessionId(sessionId);
chatSession.setLastReceiveTime(curDate.getTime());
this.chatSessionMapper.insert(chatSession);
ChatSessionUser applySessionUser = new ChatSessionUser();
applySessionUser.setUserId(userId);
applySessionUser.setContactId(contactId);
applySessionUser.setContactName(contactName);
applySessionUser.setSessionId(sessionId);
this.chatSessionUserMapper.insertOrUpdate(applySessionUser);
//增加聊天消息
ChatMessage chatMessage = new ChatMessage();
chatMessage.setSessionId(sessionId);
chatMessage.setMessageType(MessageTypeEnum.CHAT.getType());
chatMessage.setMessageContent(senMessage);
chatMessage.setSendUserId(contactId);
chatMessage.setSendUserNickName(contactName);
chatMessage.setSendTime(curDate.getTime());
chatMessage.setContactId(userId);
chatMessage.setContactType(UserContactTypeEnum.USER.getType());
chatMessage.setStatus(MessageStatusEnum.SENDED.getStatus());
chatMessageMapper.insert(chatMessage);
保存用户信息
更新用户信息,controller参数设置为userInfo,然后将其中的不能修改的信息设置为null.
如果更改了昵称,更新缓存中的用户信息,键为token.
除了更新userinfo表,如果昵称不一样还要更新chat_session_user表,根据contact1
2
3
4
5
6
7
8
9
10
11
12
13
14
15
16
17
18
19
20
21
22
23
24//更新相关表冗余的字段
String contactNameUpdate = null;
if (!dbInfo.getNickName().equals(userInfo.getNickName())) {
contactNameUpdate = userInfo.getNickName();
}
if (contactNameUpdate == null) {
return;
}
//更新token中的昵称
TokenUserInfoDto tokenUserInfoDto = redisComponet.getTokenUserInfoDtoByUserId(userInfo.getUserId());
tokenUserInfoDto.setNickName(contactNameUpdate);
redisComponet.saveTokenUserInfoDto(tokenUserInfoDto);
chatSessionUserService.updateRedundanceInfo(contactNameUpdate, userInfo.getUserId());
if (StringTools.isEmpty(contactName)) {
return;
}
ChatSessionUser updateInfo = new ChatSessionUser();
updateInfo.setContactName(contactName);
// 更新chat_session_user中的contact_name
ChatSessionUserQuery chatSessionUserQuery = new ChatSessionUserQuery();
chatSessionUserQuery.setContactId(contactId);
this.chatSessionUserMapper.updateByParam(updateInfo, chatSessionUserQuery);
然后针对联系人,发送名称更新的ws消息.1
2
3
4
5
6
7
8
9
10
11
12
13
14
15UserContactQuery userContactQuery = new UserContactQuery();
userContactQuery.setContactType(UserContactTypeEnum.USER.getType());
userContactQuery.setContactId(contactId);
userContactQuery.setStatus(UserContactStatusEnum.FRIEND.getStatus());
List<UserContact> userContactList = userContactMapper.selectList(userContactQuery);
for (UserContact userContact : userContactList) {
MessageSendDto messageSendDto = new MessageSendDto();
messageSendDto.setContactType(contactTypeEnum.getType());
messageSendDto.setContactId(userContact.getUserId());
messageSendDto.setExtendData(contactName);
messageSendDto.setMessageType(MessageTypeEnum.CONTACT_NAME_UPDATE.getType());
messageSendDto.setSendUserId(contactId);
messageSendDto.setSendUserNickName(contactName);
messageHandler.sendMessage(messageSendDto);
}
如果上传的头像文件不为空,则下载到服务器对应路径. BASE_FOLDER+FILE+AVATAR+user_id.jpg1
2
3
4
5
6
7
8
9
10if (avatarFile != null) {
String baseFolder = appConfig.getProjectFolder() + Constants.FILE_FOLDER_FILE;
File targetFileFolder = new File(baseFolder + Constants.FILE_FOLDER_AVATAR_NAME);
if (!targetFileFolder.exists()) {
targetFileFolder.mkdirs();
}
String filePath = targetFileFolder.getPath() + "/" + userInfo.getUserId() + Constants.IMAGE_SUFFIX;
avatarFile.transferTo(new File(filePath));
avatarCover.transferTo(new File(filePath + Constants.COVER_IMAGE_SUFFIX));
}
获取用户信息
直接查询即可1
2
3
4
5TokenUserInfoDto tokenUserInfoDto = getTokenUserInfo(request);
UserInfo userInfo = userInfoService.getUserInfoByUserId(tokenUserInfoDto.getUserId());
UserInfoVO userInfoVO = CopyTools.copy(userInfo, UserInfoVO.class);
userInfoVO.setAdmin(tokenUserInfoDto.getAdmin());
return getSuccessResponseVO(userInfoVO);
更新密码
退出
群组管理


查看自己群聊
查询user_contact表,群组owner是自己,创建时间降序,群组状态正常.1
2
3
4
5
6
7 TokenUserInfoDto tokenUserInfoDto = getTokenUserInfo(request);
GroupInfoQuery infoQuery = new GroupInfoQuery();
infoQuery.setGroupOwnerId(tokenUserInfoDto.getUserId());
infoQuery.setOrderBy("create_time desc");
infoQuery.setStatus(GroupStatusEnum.NORMAL.getStatus());
List<GroupInfo> groupInfoList = this.groupInfoService.findListByParam(infoQuery);
return getSuccessResponseVO(groupInfoList);
查看群聊信息
根据groupId,首先看群聊是否存在,以及自己是否在群聊中,查询user_contact表(设置联系状态是好友),如果在群聊中才能继续查看. 查询groupInfo表1
2
3
4
5
6
7
8
9
10TokenUserInfoDto tokenUserInfoDto = getTokenUserInfo(request);
UserContact userContact = this.userContactService.getUserContactByUserIdAndContactId(tokenUserInfoDto.getUserId(), groupId);
if (userContact == null || !UserContactStatusEnum.FRIEND.getStatus().equals(userContact.getStatus())) {
throw new BusinessException("你不在群聊或者群聊不存在或已经解散");
}
GroupInfo groupInfo = this.groupInfoService.getGroupInfoByGroupId(groupId);
if (groupInfo == null || !GroupStatusEnum.NORMAL.getStatus().equals(groupInfo.getStatus())) {
throw new BusinessException("群聊不存在或已经解散");
}
return groupInfo;
同时查询user_contact表查询群成员个数一起返回1
2
3userContactQuery.setContactId(groupId);
Integer memberCount = this.userContactService.findCountByParam(userContactQuery);
groupInfo.setMemberCount(memberCount);
上面是查看群聊信息,但不包含群聊中成员,还有一个接口可以查询群成员,也就是在user_contact表中查看contact_id是群id,状态是联系人的1
2
3
4
5
6
7
8
9
10
11GroupInfo groupInfo = getGroupDetailCommon(request, groupId);
UserContactQuery userContactQuery = new UserContactQuery();
userContactQuery.setContactId(groupId);
userContactQuery.setQueryUserInfo(true);
userContactQuery.setOrderBy("create_time asc");
userContactQuery.setStatus(UserContactStatusEnum.FRIEND.getStatus());
List<UserContact> userContactList = this.userContactService.findListByParam(userContactQuery);
GroupInfoVO groupInfoVo = new GroupInfoVO();
groupInfoVo.setGroupInfo(groupInfo);
groupInfoVo.setUserContactList(userContactList);
return getSuccessResponseVO(groupInfoVo);
创建/更新群聊
创建与更新群聊接口类似,传入groupId,如果为空则创建群聊.
一个用户创建群聊个数有限,所以先进行查询看是否满足条件.
满足之后,插入群聊信息,user_contact联系信息,用户联系人缓存更新,channelContextUtils加入群组channelGroup,插入chat_session_user表,插入session_user表,插入chat_message表,最后发送messageSendDto.
如果是更新群聊,则更新群组信息,更新user_contact表与chat_session_user表(主要更新群聊名称)
更新chat_session_user中contact_name.1
2
3
4
5
6ChatSessionUser updateInfo = new ChatSessionUser();
updateInfo.setContactName(contactName);
ChatSessionUserQuery chatSessionUserQuery = new ChatSessionUserQuery();
chatSessionUserQuery.setContactId(contactId);
this.chatSessionUserMapper.updateByParam(updateInfo, chatSessionUserQuery);
然后发送ws消息通知群聊成员更改了群名称.1
2
3
4
5
6MessageSendDto messageSendDto = new MessageSendDto();
messageSendDto.setContactType(UserContactTypeEnum.getByPrefix(contactId).getType());
messageSendDto.setContactId(contactId);
messageSendDto.setExtendData(contactName);
messageSendDto.setMessageType(MessageTypeEnum.CONTACT_NAME_UPDATE.getType());
messageHandler.sendMessage(messageSendDto);
用户更改昵称其实类似,也需要向他的联系人通知
如果上传了群聊头像文件,则存储到一个文件路径, basePath+FILE_FOLDER_FILE+FILE_FOLDER_AVATAR_NAME+群聊id1
2
3
4
5
6
7
8
9
10
11
12
13String baseFolder = appConfig.getProjectFolder() + Constants.FILE_FOLDER_FILE;
File targetFileFolder = new File(baseFolder + Constants.FILE_FOLDER_AVATAR_NAME);
if (!targetFileFolder.exists()) {
targetFileFolder.mkdirs();
}
String filePath = targetFileFolder.getPath() + "/" + groupInfo.getGroupId() + Constants.IMAGE_SUFFIX;
try {
avatarFile.transferTo(new File(filePath));
avatarCover.transferTo(new File(filePath + Constants.COVER_IMAGE_SUFFIX));
} catch (IOException e) {
logger.error("头像上传失败", e);
throw new BusinessException("头像上传失败");
}
解散群聊
更新group_info状态群聊被解散,更新联系人user_contact状态为删除(contact_id为群id),删除对应缓存1
2
3
4
5
6
7
8
9
10
11
12
13
14
15
16
17
18// 更新群解散状态
GroupInfo updateInfo = new GroupInfo();
updateInfo.setStatus(GroupStatusEnum.DISSOLUTION.getStatus());
this.groupInfoMapper.updateByGroupId(updateInfo, groupId);
// 更新user_contact状态 删除
UserContactQuery userContactQuery = new UserContactQuery();
userContactQuery.setContactId(groupId);
userContactQuery.setContactType(UserContactTypeEnum.GROUP.getType());
UserContact updateUserContact = new UserContact();
updateUserContact.setStatus(UserContactStatusEnum.DEL.getStatus());
userContactMapper.updateByParam(updateUserContact, userContactQuery);
// 删除对应联系人缓存
List<UserContact> userContactList = this.userContactMapper.selectList(userContactQuery);
for (UserContact userContact : userContactList) {
redisComponet.removeUserContact(userContact.getUserId(), userContact.getContactId());
}
除此之外,更新chat_session表群解散消息和时间,插入chat_message表更新群解散消息,GROUP_CONTEXT_MAP删除群组channelGroup1
2
3
4
5
6
7
8
9
10
11
12
13
14
15
16
17
18String sessionId = StringTools.getChatSessionId4Group(groupId);
Date curTime = new Date();
String messageContent = MessageTypeEnum.DISSOLUTION_GROUP.getInitMessage();
//更新会话消息
ChatSession chatSession = new ChatSession();
chatSession.setLastMessage(messageContent);
chatSession.setLastReceiveTime(curTime.getTime());
chatSessionMapper.updateBySessionId(chatSession, sessionId);
//记录消息消息表
ChatMessage chatMessage = new ChatMessage();
chatMessage.setSessionId(sessionId);
chatMessage.setSendTime(curTime.getTime());
chatMessage.setContactType(UserContactTypeEnum.GROUP.getType());
chatMessage.setStatus(MessageStatusEnum.SENDED.getStatus());
chatMessage.setMessageType(MessageTypeEnum.DISSOLUTION_GROUP.getType());
chatMessage.setContactId(groupId);
chatMessage.setMessageContent(messageContent);
chatMessageMapper.insert(chatMessage);
还需要给发送群成员ws消息,告知群组解散.1
2
3
4
5
6
7
8
9
10
11
12
13
14 //发送解散群消息
MessageSendDto messageSendDto = CopyTools.copy(chatMessage, MessageSendDto.class);
messageHandler.sendMessage(messageSendDto);
// 在channelContextUtils.java中 给群聊channelGroup发送消息,这个group中的所有channel,也就是群成员都会接收到这个群解散消息
ChannelGroup group = GROUP_CONTEXT_MAP.get(messageSendDto.getContactId());
if (group == null) {
return;
}
group.writeAndFlush(new TextWebSocketFrame(JSON.toJSONString(messageSendDto)));
// 然后移除GROUP_CONTEXT_MAP中的channelGroup并关闭group
if (MessageTypeEnum.DISSOLUTION_GROUP == messageTypeEnum) {
GROUP_CONTEXT_MAP.remove(messageSendDto.getContactId());
group.close();
}
退出群聊
除了检查传递过来的groupId是否合法之外(群存在且未解散,创建者不能退出群聊),查询user_contact,更新状态为删除(代码中直接删除了行记录)1
2
3
4
5
6
7
8
9
10
11
12GroupInfo groupInfo = groupInfoMapper.selectByGroupId(groupId);
if (groupInfo == null) {
throw new BusinessException(ResponseCodeEnum.CODE_600);
}
//创建者不能退出群聊,只能解散群
if (userId.equals(groupInfo.getGroupOwnerId())) {
throw new BusinessException(ResponseCodeEnum.CODE_600);
}
Integer count = userContactMapper.deleteByUserIdAndContactId(userId, groupId);
if (count == 0) {
throw new BusinessException(ResponseCodeEnum.CODE_600);
}
插入chat_session_user表退群消息以及chat_message消息,更新联系人缓存1
2
3
4
5
6
7
8
9
10
11
12
13
14
15
16
17
18
19
20UserInfo userInfo = userInfoMapper.selectByUserId(userId);
String sessionId = StringTools.getChatSessionId4Group(groupId);
Date curTime = new Date();
String messageContent = String.format(messageTypeEnum.getInitMessage(), userInfo.getNickName());
//更新会话消息
ChatSession chatSession = new ChatSession();
chatSession.setLastMessage(messageContent);
chatSession.setLastReceiveTime(curTime.getTime());
chatSessionMapper.updateBySessionId(chatSession, sessionId);
//记录消息消息表
ChatMessage chatMessage = new ChatMessage();
chatMessage.setSessionId(sessionId);
chatMessage.setSendTime(curTime.getTime());
chatMessage.setContactType(UserContactTypeEnum.GROUP.getType());
chatMessage.setStatus(MessageStatusEnum.SENDED.getStatus());
chatMessage.setMessageType(messageTypeEnum.getType());
chatMessage.setContactId(groupId);
chatMessage.setMessageContent(messageContent);
chatMessageMapper.insert(chatMessage);
然后就是使用messageHandler发送消息,有人退群了发送给群组channelGroup,也就是所有群成员1
2
3
4
5
6
7
8
9UserContactQuery userContactQuery = new UserContactQuery();
userContactQuery.setContactId(groupId);
userContactQuery.setStatus(UserContactStatusEnum.FRIEND.getStatus());
Integer memberCount = this.userContactMapper.selectCount(userContactQuery); // 发送了群成员个数
MessageSendDto messageSendDto = CopyTools.copy(chatMessage, MessageSendDto.class);
messageSendDto.setExtendData(userId); // 发送了退群人
messageSendDto.setMemberCount(memberCount);
messageHandler.sendMessage(messageSendDto);
删除或者添加群成员
还是类似的流程,先判断成员id和群组id本身是不是在user_contact成员状态,如果是才能进行下一步. 删除和添加类似,如果是删除成员,操作类似成员退出群成员,但message类型是REMOVE_GROUP(12, “%s被管理员移出了群聊”, “被管理员移出了群聊”).而不是LEAVE_GROUP,user_contact,chat_session,chat_message表更新(代码中user_contact记录被删除),消息也会发送给群组,会在处理时删除缓存,以及移除组中的channel.1
2
3
4
5
6
7
8
9
10
11
12
13group.writeAndFlush(new TextWebSocketFrame(JSON.toJSONString(messageSendDto)));
//移除群聊
MessageTypeEnum messageTypeEnum = MessageTypeEnum.getByType(messageSendDto.getMessageType());
if (MessageTypeEnum.LEAVE_GROUP == messageTypeEnum || MessageTypeEnum.REMOVE_GROUP == messageTypeEnum) {
String userId = (String) messageSendDto.getExtendData();
redisComponet.removeUserContact(userId, messageSendDto.getContactId());
Channel channel = USER_CONTEXT_MAP.get(userId);
if (channel == null) {
return;
}
group.remove(channel);
}
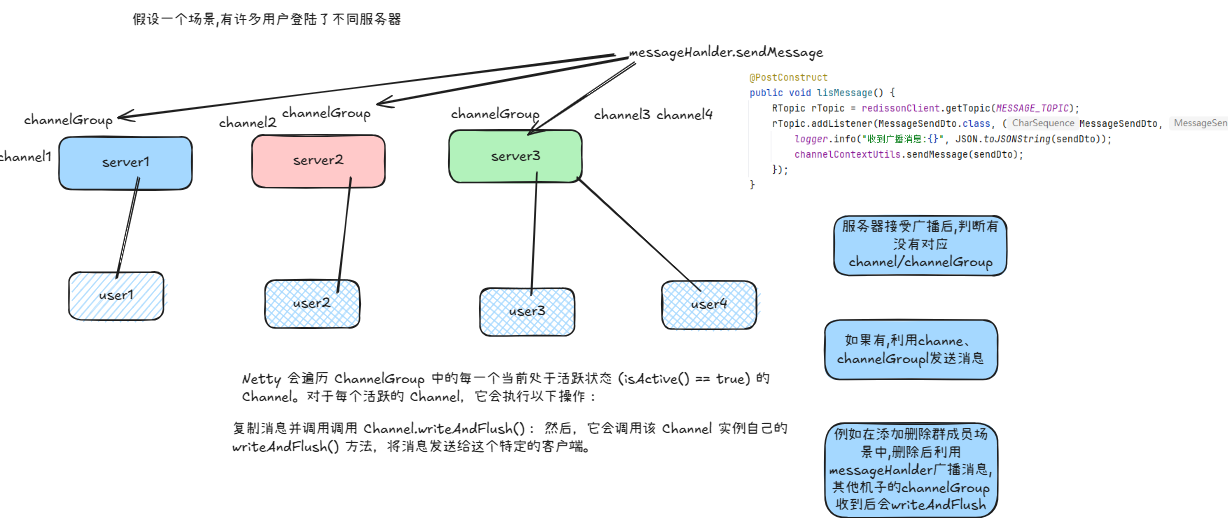
如果是添加群成员,类似addContact,applyuserId是contactId,联系人是群组id. 具体流程类似,更新/插入user_contact状态,更新缓存,更新chat_session表,添加群组channel,更新chat_message,最后发送消息(主要目的是当前机子可能没有该群组的channel,通过redisson发布订阅,其他机子取出CONTEXT_MAP中的channel,不为空就发送消息).
假设一个场景,有许多用户登陆了不同服务器
加入群聊
类似添加好友addContact
联系人管理

搜索用户
需要使用user_info表根据传过来的用户id查询,如果是用户,还需要查询昵称、性别等信息.
如果是群聊,还会返回群名称. 同时查询user_contact表设置联系状态.
申请添加联系人
添加联系人时,首先判断一些信息,比如contact_id是否合法(存在),是否被拉黑等.
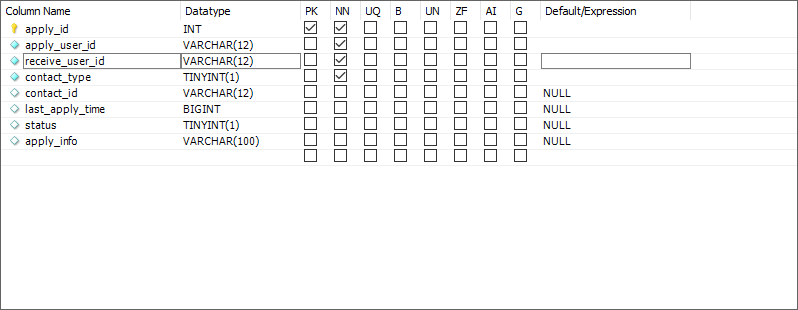
user_contact_apply表包含apply_id为主键,意味着可以同一用户可以申请多次添加联系人
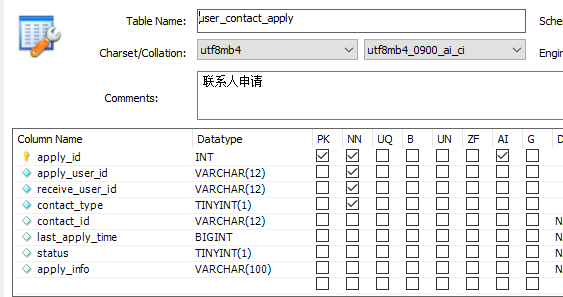
省去对参数的校验,首先查询user_contact表状态是否被拉黑了,被拉黑就无法申请了.
当满足这些条件,然后判断是否需要申请还是直接就能添加.
直接添加联系人
如果能直接添加,就进行添加好友操作(如果是群聊需要判断是否超出人数)
能想到的操作就是,插入user_contact表,如果是好友,就需要互相添加.,如果是群组,直接插入一条即可(user_id,group_id)
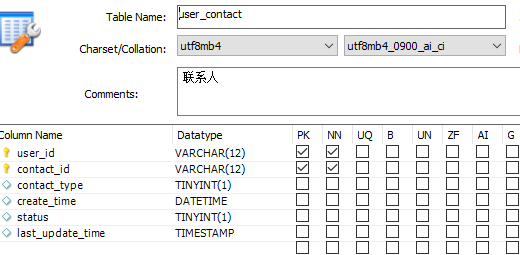
也就是user_id分别为申请人和接收人,然后更新联系人缓存.1
2
3
4
5
6
7
8
9
10
11
12
13
14
15
16
17
18
19
20
21
22
23
24
25
26
27
28
29
30List<UserContact> contactList = new ArrayList<>();
//申请人添加对方
UserContact userContact = new UserContact();
userContact.setUserId(applyUserId);
userContact.setContactId(contactId);
userContact.setContactType(contactType);
userContact.setCreateTime(curDate);
userContact.setLastUpdateTime(curDate);
userContact.setStatus(UserContactStatusEnum.FRIEND.getStatus());
contactList.add(userContact);
//如果是申请好友 接收人添加申请人 群组不用添加对方为好友
if (UserContactTypeEnum.USER.getType().equals(contactType)) {
userContact = new UserContact();
userContact.setUserId(receiveUserId);
userContact.setContactId(applyUserId);
userContact.setContactType(contactType);
userContact.setCreateTime(curDate);
userContact.setLastUpdateTime(curDate);
userContact.setStatus(UserContactStatusEnum.FRIEND.getStatus());
contactList.add(userContact);
}
//批量加入
userContactMapper.insertOrUpdateBatch(contactList);
//如果是好友申请,接收人也添加申请人为联系人
if (UserContactTypeEnum.USER.getType().equals(contactType)) {
redisComponet.addUserContact(receiveUserId, applyUserId);
}
//审核通过,将申请人的联系人添加上 我 或 群组
redisComponet.addUserContact(applyUserId, contactId);
在创建好友联系后,就是创建会话以及消息信息了,具体操作也是表插入/更新操作.
具体来说,对于用户会话表,包括(user_id,contact_id,)session_id,contact_name

插入这个数据不难,但需要考虑可能之前这两人就是好友但进行过删好友操作,这条记录不会删除,所以就进行更新. 注意这个表也是(user_id,contact_id)联合主键,如果是好友,也需要插入相互的两条用户会话.1
2
3
4
5
6
7
8
9
10
11
12
13
14
15
16
17//查询接收人信息
UserInfo contactUser = this.userInfoMapper.selectByUserId(contactId);
applySessionUser.setContactName(contactUser.getNickName());
chatSessionUserList.add(applySessionUser);
//接受人session
ChatSessionUser contactSessionUser = new ChatSessionUser();
contactSessionUser.setUserId(contactId);
contactSessionUser.setContactId(applyUserId);
contactSessionUser.setSessionId(sessionId);
contactSessionUser.setLastReceiveTime(curDate.getTime());
contactSessionUser.setLastMessage(applyInfo);
//查询申请人信息
UserInfo applyUserInfo = this.userInfoMapper.selectByUserId(applyUserId);
contactSessionUser.setContactName(applyUserInfo.getNickName());
chatSessionUserList.add(contactSessionUser);
this.chatSessionUserMapper.insertOrUpdateBatch(chatSessionUserList);
对于会话记录,只需要插入/更新一条,核心是更新最新消息和接收时间. (sql使用INSERT INTO xxx on duplicate key update xx)插入或者更新冗余键.向表中插入新行时,如果遇到与现有行的 PRIMARY KEY(主键) 或 UNIQUE KEY(唯一键) 冲突的情况,则执行 UPDATE 操作

1
2
3
4
5
6//创建会话
ChatSession chatSession = new ChatSession();
chatSession.setSessionId(sessionId);
chatSession.setLastReceiveTime(curDate.getTime());
chatSession.setLastMessage(applyInfo);
this.chatSessionMapper.insertOrUpdate(chatSession);
主要更新最新消息和时间.
最后更新消息内容,插入消息表,消息表主键message_id,记录了消息的发送者和接收者,session_id,消息类型,文件类型等.只需要插入一条即可,不需要互相插入.

1
2
3
4
5
6
7
8
9
10
11
12//记录消息消息表
ChatMessage chatMessage = new ChatMessage();
chatMessage.setSessionId(sessionId);
chatMessage.setMessageType(MessageTypeEnum.ADD_FRIEND.getType());
chatMessage.setMessageContent(applyInfo);
chatMessage.setSendUserId(applyUserId);
chatMessage.setSendUserNickName(applyUserInfo.getNickName());
chatMessage.setSendTime(curDate.getTime());
chatMessage.setContactId(contactId);
chatMessage.setContactType(UserContactTypeEnum.USER.getType());
chatMessage.setStatus(MessageStatusEnum.SENDED.getStatus());
chatMessageMapper.insert(chatMessage);
最后利用messageSendDto发送给用户以及接收者(因为成功加了好友).
注意设置的消息类型有多种,比如添加好友成功ADD_FRIEND(1, "", "添加好友打招呼消息"),群组创建成功等消息类型,以及文件上传,强制下线,退出群聊等等消息都会通过ws发给用户并记录在chatMessage的类型中.1
2
3
4
5
6
7
8
9
10
11
12
13
14INIT(0, "", "连接WS获取信息"),
ADD_FRIEND(1, "", "添加好友打招呼消息"),
CHAT(2, "", "普通聊天消息"),
GROUP_CREATE(3, "群组已经创建好,可以和好友一起畅聊了", "群创建成功"),
CONTACT_APPLY(4, "", "好友申请"),
MEDIA_CHAT(5, "", "媒体文件"),
FILE_UPLOAD(6, "", "文件上传完成"),
FORCE_OFF_LINE(7, "", "强制下线"),
DISSOLUTION_GROUP(8, "群聊已解散", "解散群聊"),
ADD_GROUP(9, "%s加入了群组", "加入群聊"),
CONTACT_NAME_UPDATE(10, "", "更新群昵称"),
LEAVE_GROUP(11, "%s退出了群聊", "退出群聊"),
REMOVE_GROUP(12, "%s被管理员移出了群聊", "被管理员移出了群聊"),
ADD_FRIEND_SELF(13, "", "添加好友打招呼消息发送给自己");1
2
3
4
5
6
7
8
9
10
11
12
13MessageSendDto messageSendDto = CopyTools.copy(chatMessage, MessageSendDto.class);
/**
* 发送给接受好友申请的人
*/
messageHandler.sendMessage(messageSendDto);
/**
* 发送给申请人 发送人就是接收人,联系人就是申请人
*/
messageSendDto.setMessageType(MessageTypeEnum.ADD_FRIEND_SELF.getType());
messageSendDto.setContactId(applyUserId);
messageSendDto.setExtendData(contactUser);
messageHandler.sendMessage(messageSendDto);
因为是好友添加成功所以需要向双方都发送ws消息,但接收者,消息类型和内容不太相同.
如果添加的是群组,同样的首先插入user_contact表,这时只需要插入一条记录即可.同时更新申请者联系人缓存.此外还要将这个用户channel加入群聊channelGroup中.1
2
3
4
5
6
7
8
9
10
11
12
13
14//加入群组
ChatSessionUser chatSessionUser = new ChatSessionUser();
chatSessionUser.setUserId(applyUserId);
chatSessionUser.setContactId(contactId);
GroupInfo groupInfo = this.groupInfoMapper.selectByGroupId(contactId);
chatSessionUser.setContactName(groupInfo.getGroupName());
chatSessionUser.setSessionId(sessionId);
this.chatSessionUserMapper.insertOrUpdate(chatSessionUser);
//将群组加入到用户的联系人列表
redisComponet.addUserContact(applyUserId, groupInfo.getGroupId());
channelContextUtils.addUser2Group(applyUserId, groupInfo.getGroupId());1
2
3
4
5
6
7
8
9
10
11
12
13
14
15public void addUser2Group(String userId, String groupId) {
Channel channel = USER_CONTEXT_MAP.get(userId);
add2Group(groupId, channel);
}
private void add2Group(String groupId, Channel context) {
ChannelGroup group = GROUP_CONTEXT_MAP.get(groupId);
if (group == null) {
group = new DefaultChannelGroup(GlobalEventExecutor.INSTANCE);
GROUP_CONTEXT_MAP.put(groupId, group);
}
if (context == null) {
return;
}
group.add(context);
}
然后插入/更新chat_session_user表(因为后续要添加会话消息),也只需要插入一条,而chat_session表插入/更新消息和接收时间,chat_session中的消息类型以及内容就是添加群消息.1
2
3
4
5
6
7
8
9
10UserInfo applyUserInfo = this.userInfoMapper.selectByUserId(applyUserId);
String sendMessage = String.format(MessageTypeEnum.ADD_GROUP.getInitMessage(), applyUserInfo.getNickName());
//增加session信息
ChatSession chatSession = new ChatSession();
chatSession.setSessionId(sessionId);
chatSession.setLastReceiveTime(curDate.getTime());
chatSession.setLastMessage(sendMessage);
this.chatSessionMapper.insertOrUpdate(chatSession);
最后还是需要使用messageHandler发送messagesendDto,发送给群的有人进入了群的消息.1
2
3
4
5
6
7
8
9
10
11//发送群消息
MessageSendDto messageSend = CopyTools.copy(chatMessage, MessageSendDto.class);
messageSend.setContactId(groupInfo.getGroupId());
//获取群人数量
UserContactQuery userContactQuery = new UserContactQuery();
userContactQuery.setContactId(contactId);
userContactQuery.setStatus(UserContactStatusEnum.FRIEND.getStatus());
Integer memberCount = this.userContactMapper.selectCount(userContactQuery);
messageSend.setMemberCount(memberCount);
messageSend.setContactName(groupInfo.getGroupName());
messageHandler.sendMessage(messageSend);
插入申请请求
请求的状态枚举如下:1
2
3
4INIT(0, "待处理"),
PASS(1, "已同意"),
REJECT(2, "已拒绝"),
BLACKLIST(3, "已拉黑");;
如果不能直接添加,就需要插入/更新user_contact_apply表.
如果不存在该记录(通过user_id,contact_id,receiver_id创建了唯一索引),则直接插入请求信息.
否则更新user_contact_apply状态为待处理(也就是说)并更新请求时间和请求信息.
此外,申请消息会通过ws发送给接收者(如果没有user_contact_apply记录或者其状态不为待处理)1
2
3
4
5
6
7
8
9if (dbApply == null || !UserContactApplyStatusEnum.INIT.getStatus().equals(dbApply.getStatus())) {
//如果是待处理状态就不发消息,避免重复发送
//发送ws消息
MessageSendDto messageSend = new MessageSendDto();
messageSend.setMessageType(MessageTypeEnum.CONTACT_APPLY.getType());
messageSend.setMessageContent(applyInfo);
messageSend.setContactId(receiveUserId);
messageHandler.sendMessage(messageSend);
}
messageSendDto成员如下,包括消息id,会话id,发送和接受这,消息内容,发送时间以及消息类型等等.1
2
3
4
5
6
7
8
9
10
11
12
13
14
15
16
17
18
19
20
21
22
23
24
25
26
27
28
29
30
31
32
33
34
35
36
37
38public class MessageSendDto<T> implements Serializable {
private static final long serialVersionUID = -1045752033171142417L;
//消息ID
private Long messageId;
//会话ID
private String sessionId;
//发送人
private String sendUserId;
//发送人昵称
private String sendUserNickName;
//联系人ID
private String contactId;
//联系人名称
private String contactName;
//消息内容
private String messageContent;
//最后的消息
private String lastMessage;
//消息类型
private Integer messageType;
//发送时间
private Long sendTime;
//联系人类型
private Integer contactType;
//扩展信息
private T extendData;
//消息状态 0:发送中 1:已发送 对于文件是异步上传用状态处理
private Integer status;
//文件信息
private Long fileSize;
private String fileName;
private Integer fileType;
//群员
private Integer memberCount;
}
查询申请请求
查询user_contact_apply表,receiver_id是自己id的记录,因为这个表包含联合主键(apply_user_id,contact_id,receiver_id). 按照last_apply_time降序,还可以返回联系人昵称.1
2
3
4
5
6
7
8
9
10
11
12
13
14
15
16
17
18
19
20
21
22
23<select id="selectList" resultMap="base_result_map">
SELECT
a.*
<if test="query.queryContactInfo">
,CASE
WHEN a.contact_type = 0 THEN u.nick_name
WHEN a.contact_type = 1 THEN g.group_name
END as contactName
</if>
FROM
user_contact_apply a
<if test="query.queryContactInfo">
LEFT JOIN user_info u ON u.user_id = a.apply_user_id and a.receive_user_id = #{query.receiveUserId}
LEFT JOIN group_info g ON g.group_id = a.contact_id and a.receive_user_id = #{query.receiveUserId}
</if>
<include refid="query_condition"/>
<if test="query.orderBy!=null">
order by ${query.orderBy}
</if>
<if test="query.simplePage!=null">
limit #{query.simplePage.start},#{query.simplePage.end}
</if>
</select>
处理申请请求
除了正常流程的参数检验和合法之外,更新user_contact_apply表状态,如果允许请求,执行上述添加联系人操作,如果拒绝,后端什么也不做,如果是拉黑,user_contact状态记录为第一次被拉黑,后续不再允许申请添加,然后插入/更新user_contact表
联系人详情,删除和拉黑联系人
加载联系人,也就是从user_contact表中查询,根据user_id和contact_id查询,如果是查询联系人,同时也会查询联系人名字、性别等信息,如果是群组,也会查询群昵称和群人数等. 此外,user_contact的状态必须是朋友,或者被删除,被拉黑. 也就是说如果被其删除,但没有删除联系人,也能加载它.
联系人详情有两个接口,一个获取任意用户的信息,通过contact_id获取用户信息,并返回联系状态.
如果是查询联系人详情,会设置查询状态,如果不是好友,被删除,被拉黑或者被首次拉黑,其余报异常. 因为如果被删除/拉黑依然能查看状态.
删除和拉黑好友时处理类似,首先修改user_contact状态,如果是删除,还需要增加被删除的一条(contact_id,user_id)记录,拉黑类似. 然后需要删除双方联系人缓存. 因为缓存中只保存好友关系的联系人,删除和被删除,拉黑和被拉黑都不存在,这个缓存内容是用来发送聊天消息的.
获取用户信息、修改密码与退出登录
后台管理
用户管理 靓号管理 群组管理
登陆时加载消息
离线消息处理
在登陆校验完成后,将联系人存入缓存,将token和用户信息存入缓存,并返回用户信息.
当客户端发送ws连接时,会携带token,服务端利用token获取用户信息,然后加载聊天消息.
具体来说,在缓存中获取联系人,将自己的channel加入群聊的channelGroup中(如果没有创建channelGroup放入GROUP_CONTEXT_MAP中)
然后将自己的channel放入USER_CONTEXT_MAP中,更新用户心跳缓存和最新登陆时间.1
2
3
4
5
6
7
8
9
10
11
12
13
14
15
16
17
18
19
20
21
22String channelId = channel.id().toString();
AttributeKey attributeKey = null;
if (!AttributeKey.exists(channelId)) {
attributeKey = AttributeKey.newInstance(channel.id().toString());
} else {
attributeKey = AttributeKey.valueOf(channel.id().toString());
}
channel.attr(attributeKey).set(userId);
List<String> contactList = redisComponet.getUserContactList(userId);
for (String groupId : contactList) {
if (groupId.startsWith(UserContactTypeEnum.GROUP.getPrefix())) {
add2Group(groupId, channel);
}
}
USER_CONTEXT_MAP.put(userId, channel);
redisComponet.saveUserHeartBeat(userId);
//更新用户最后连接时间
UserInfo updateInfo = new UserInfo();
updateInfo.setLastLoginTime(new Date());
userInfoMapper.updateByUserId(updateInfo, userId);
首先查询用户会话信息,也就是chat_session_user表,相同的聊天双方,sessionId相同,主键是user_id和contact_id联合主键,根据user_id查看用户会话可以获取有聊天会话的联系人信息,如果是群聊也会查询群聊人数,chat_session表主键是session_id.
在mapper中,查询用户会话信息就是获取chat_session_user聊天会话对方名称,id以及session会话最新的聊天信息,如果是群聊还要查群聊人数1
2
3
4
5
6
7
8
9/**
* 1、查询会话信息 查询用户所有会话,避免换设备会话不同步
*/
ChatSessionUserQuery sessionUserQuery = new ChatSessionUserQuery();
sessionUserQuery.setUserId(userId);
sessionUserQuery.setOrderBy("last_receive_time desc");
List<ChatSessionUser> chatSessionList = chatSessionUserMapper.selectList(sessionUserQuery);
WsInitData wsInitData = new WsInitData();
wsInitData.setChatSessionList(chatSessionList);1
2
3
4
5
6
7
8
9
10
11
12
13
14
15
16
17<select id="selectList" resultMap="base_result_map">
SELECT u.*,
c.last_message lastMessage,
c.last_receive_time lastReceiveTime,
case when SUBSTRING(contact_id, 1, 1) ='G'
THEN (select count(1) from user_contact uc where uc.contact_id = u.contact_id)
else 0
end memberCount
FROM chat_session_user u inner join chat_session c on c.session_id = u.session_id
<include refid="query_condition"/>
<if test="query.orderBy!=null">
order by ${query.orderBy}
</if>
<if test="query.simplePage!=null">
limit #{query.simplePage.start},#{query.simplePage.end}
</if>
</select>
然后需要给客户端发送离线时其他人的聊天消息(离线之前的消息通过客户端查数据库),
查询流程是: 首先查询联系人,如果是群聊,联系的id是群组id,同时加上自己的id作为contact_id,查询chatMessage消息.1
2
3
4
5
6
7
8
9
10
11
12
13
14
15
16
17/**
* 2、查询聊天消息
*/
//查询用户的联系人
UserContactQuery contactQuery = new UserContactQuery();
contactQuery.setContactType(UserContactTypeEnum.GROUP.getType());
contactQuery.setUserId(userId);
List<UserContact> groupContactList = userContactMapper.selectList(contactQuery);
List<String> groupIdList = groupContactList.stream().map(item -> item.getContactId()).collect(Collectors.toList());
//将自己也加进去
groupIdList.add(userId);
ChatMessageQuery messageQuery = new ChatMessageQuery();
messageQuery.setContactIdList(groupIdList);
messageQuery.setLastReceiveTime(lastOffTime);
List<ChatMessage> chatMessageList = chatMessageMapper.selectList(messageQuery);
wsInitData.setChatMessageList(chatMessageList);
最后查询好友申请数,也就是contact_apply中还未处理的消息1
2
3
4
5
6
7
8
9/**
* 3、查询好友申请
*/
UserContactApplyQuery applyQuery = new UserContactApplyQuery();
applyQuery.setReceiveUserId(userId);
applyQuery.setLastApplyTimestamp(sourceLastOffTime);
applyQuery.setStatus(UserContactApplyStatusEnum.INIT.getStatus());
Integer applyCount = userContactApplyMapper.selectCount(applyQuery);
wsInitData.setApplyCount(applyCount);
最后要将这些消息发送给用户1
2
3
4
5
6
7//发送消息
MessageSendDto messageSendDto = new MessageSendDto();
messageSendDto.setMessageType(MessageTypeEnum.INIT.getType()); // messageSendDto设置ws消息类型
messageSendDto.setContactId(userId);
messageSendDto.setExtendData(wsInitData);
sendMsg(messageSendDto, userId);
聊天
主要使用ws发送消息,但多机环境下向不同服务器发送ws消息不共享,使用Redisson基于rediss消息订阅发送消息,解决集群环境下发送消息(因为集群中的服务器都通过redission订阅了相同主题)
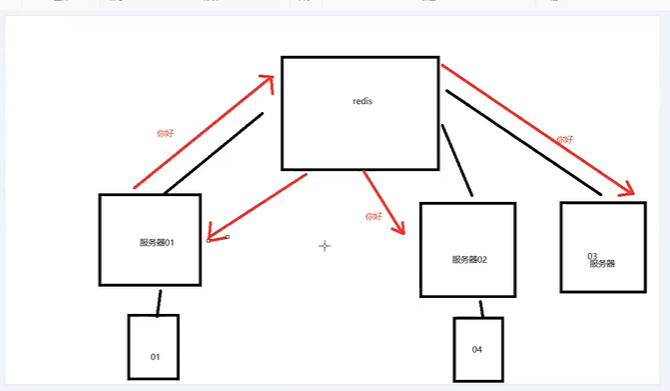
1
2
3
4
5
6
7
8
9
10
11
12
13
14
15
16
17
18
19
20
21
22
23
24
25
26
27
28
public class MessageHandler<T> {
private static final Logger logger = LoggerFactory.getLogger(MessageHandler.class);
private static final String MESSAGE_TOPIC = "message.topic";
private RedissonClient redissonClient;
private ChannelContextUtils channelContextUtils;
public void lisMessage() {
RTopic rTopic = redissonClient.getTopic(MESSAGE_TOPIC);
rTopic.addListener(MessageSendDto.class, (MessageSendDto, sendDto) -> {
logger.info("收到广播消息:{}", JSON.toJSONString(sendDto));
channelContextUtils.sendMessage(sendDto);
});
}
public void sendMessage(MessageSendDto sendDto) {
RTopic rTopic = redissonClient.getTopic(MESSAGE_TOPIC);
rTopic.publish(sendDto);
}
}
数据库设计上,使用chat_session,chat_session_user以及chat_message表
session表包括sessionId(与聊天双方相关)以及最新消息和接收时间

chat_session_user表包括sessionId(与聊天双方相关)以及最新消息和接收时间. 一个chat_session_user表对应一个session表,通过session_id查询最新的消息.

chat_message表包括具体消息,包括发送者和接收者,sessionId,messageId以及消息类型,文件类型,状态,发送者昵称,文件类型,文件名称等

发送消息
用户向联系人发送消息,主要就是插入chat_message表以及更新session表,messageHandler发送消息.
难点是处理文件上传和message发送状态. 首先判断不是机器人,如果不是,判断聊天contact_id是否合法.
接着判断消息类型和contact类型,如果是用户,就是用户之间聊天,生成sessionId方式不同,接着更新chat_session表,如果是group,消息类型不是创建群这种消息,就需要带着userId,表明谁发送的存储在chat_session表中.1
2
3
4
5
6
7
8
9
10
11
12
13
14
15
16
17
18
19
20
21
22
23if (UserContactTypeEnum.USER == contactTypeEnum) {
sessionId = StringTools.getChatSessionId4User(new String[]{sendUserId, contactId});
} else {
sessionId = StringTools.getChatSessionId4Group(contactId);
}
//更新会话消息
ChatSession chatSession = new ChatSession();
chatSession.setLastMessage(messageContent);
if (UserContactTypeEnum.GROUP == contactTypeEnum && !MessageTypeEnum.GROUP_CREATE.getType().equals(messageTypeEnum.getType())) {
chatSession.setLastMessage(tokenUserInfoDto.getNickName() + ":" + messageContent);
}
lastMessage = chatSession.getLastMessage();
//如果是媒体文件
chatSession.setLastReceiveTime(curTime);
chatSessionMapper.updateBySessionId(chatSession, sessionId);
//记录消息消息表
chatMessage.setSessionId(sessionId);
chatMessage.setSendUserId(sendUserId);
chatMessage.setSendUserNickName(tokenUserInfoDto.getNickName());
chatMessage.setSendTime(curTime);
chatMessage.setContactType(contactTypeEnum.getType());
chatMessage.setStatus(status);
chatMessageMapper.insert(chatMessage);
如果发送的是文件类型,由于需要上传,消息类型设置为正在发送,等文件上传完毕再更新.1
Integer status = MessageTypeEnum.MEDIA_CHAT == messageTypeEnum ? MessageStatusEnum.SENDING.getStatus() : MessageStatusEnum.SENDED.getStatus();
最后通过messageHandler发送消息
如果是机器人,机器人会直接发送消息过去,也就是再次调用saveMessage方法本身,再在方法中通过messageHandler发送回用户.
最后会将发送的消息再传到客户端,方便拿到消息id.
上传文件
controller参数包括messageId,检查发送者是否messageId对应消息的发送者.是上传文件,首先检查文件大小限制.然后直接上传即可(没有做秒传,分片续传等).
下载的路径遵循BASE_FOLDER+FILE+yyyyMM+messageid.suffix1
2
3
4
5
6
7
8
9
10
11
12
13
14
15
16
17
18
19String fileName = file.getOriginalFilename();
String fileExtName = StringTools.getFileSuffix(fileName);
String fileRealName = messageId + fileExtName;
String month = DateUtil.format(new Date(message.getSendTime()), DateTimePatternEnum.YYYYMM.getPattern());
File folder = new File(appConfig.getProjectFolder() + Constants.FILE_FOLDER_FILE + month);
if (!folder.exists()) {
folder.mkdirs();
}
File uploadFile = new File(folder.getPath() + "/" + fileRealName);
try {
file.transferTo(uploadFile);
if (cover != null) {
cover.transferTo(new File(uploadFile.getPath() + Constants.COVER_IMAGE_SUFFIX));
}
} catch (Exception e) {
logger.error("上传文件失败", e);
throw new BusinessException("文件上传失败");
}
然后更新chat_message表,利用拿到的messageId,状态改为已发送.1
2
3
4
5ChatMessage updateInfo = new ChatMessage();
updateInfo.setStatus(MessageStatusEnum.SENDED.getStatus());
ChatMessageQuery messageQuery = new ChatMessageQuery();
messageQuery.setMessageId(messageId);
chatMessageMapper.updateByParam(updateInfo, messageQuery);
最后通过messageHandler发送给消息的接收者,表明文件上传成功,可以下载了.消息内容包含messageId,这样接收者可以利用这个id下载文件
下载文件
注意文件包括用户/群聊头像还包括消息中的文件,如果是消息id(全为整数),就会根据消息id查询发送时间,拼接为文件路径,然后下载. 首先检查消息接收者是否符合.
然后通过消息id和发送时间找到对应路径的文件,BASE_FOLDER+FILE+yyyyMM+message_id1
2
3
4
5
6
7
8
9
10
11
12
13
14
15
16
17
18String month = DateUtil.format(new Date(message.getSendTime()), DateTimePatternEnum.YYYYMM.getPattern());
File folder = new File(appConfig.getProjectFolder() + Constants.FILE_FOLDER_FILE + month);
if (!folder.exists()) {
folder.mkdirs();
}
String fileName = message.getFileName();
String fileExtName = StringTools.getFileSuffix(fileName);
String fileRealName = messageId + fileExtName;
if (cover != null && cover) {
fileRealName = fileRealName + Constants.COVER_IMAGE_SUFFIX;
}
File file = new File(folder.getPath() + "/" + fileRealName);
if (!file.exists()) {
logger.info("文件不存在");
throw new BusinessException(ResponseCodeEnum.CODE_602);
}
return file;
否则是用户/群聊Id(U或者G前缀),拼接用户id找到路径然后下载1
2
3
4
5
6
7
8
9String avatarFolderName = Constants.FILE_FOLDER_FILE + Constants.FILE_FOLDER_AVATAR_NAME;
String avatarPath = appConfig.getProjectFolder() + avatarFolderName + fileId + Constants.IMAGE_SUFFIX;
if (showCover) {
avatarPath = avatarPath + Constants.COVER_IMAGE_SUFFIX;
}
file = new File(avatarPath);
if (!file.exists()) {
throw new BusinessException(ResponseCodeEnum.CODE_602);
}
下载使用FileInputStream和HttpServletResponse.getOutputStream(),每次读1024字节(1KB),避免文件过大.注意设置response头1
2
3response.setContentType("application/x-msdownload; charset=UTF-8");
response.setHeader("Content-Disposition", "attachment;");
response.setContentLengthLong(file.length());
主要设置content-type,content-disposition,content-length头
EasyPan
IDE设置
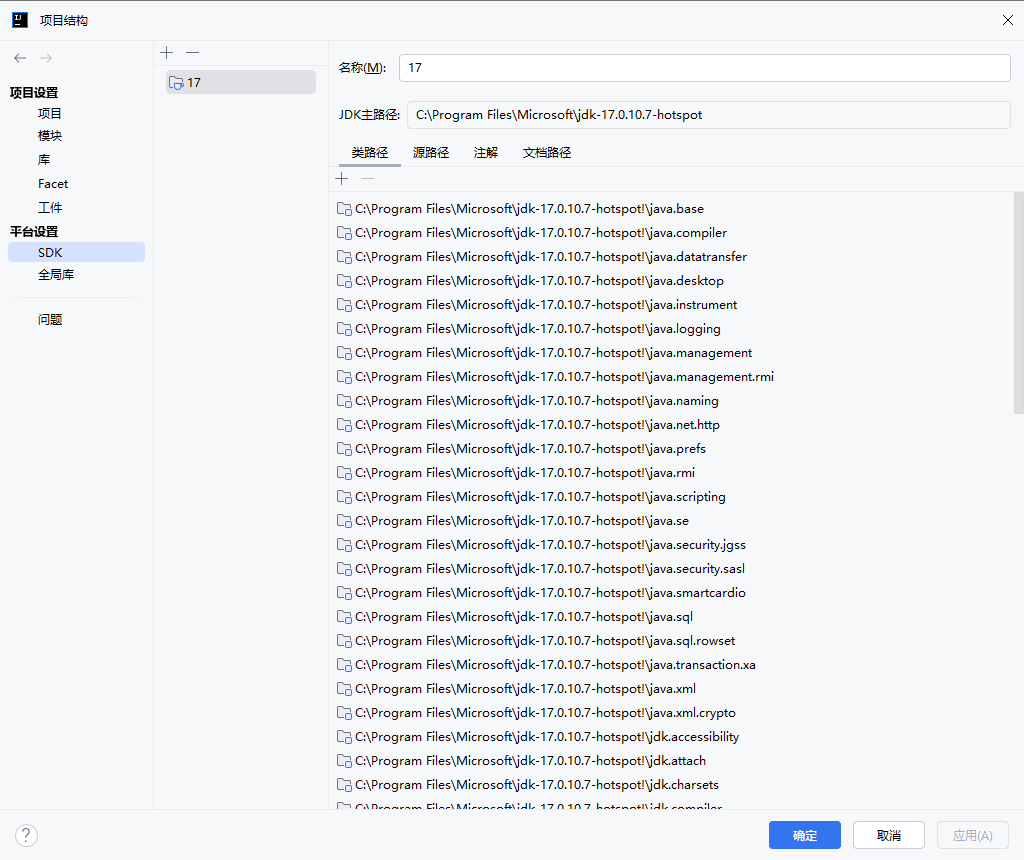
JDK位置设置
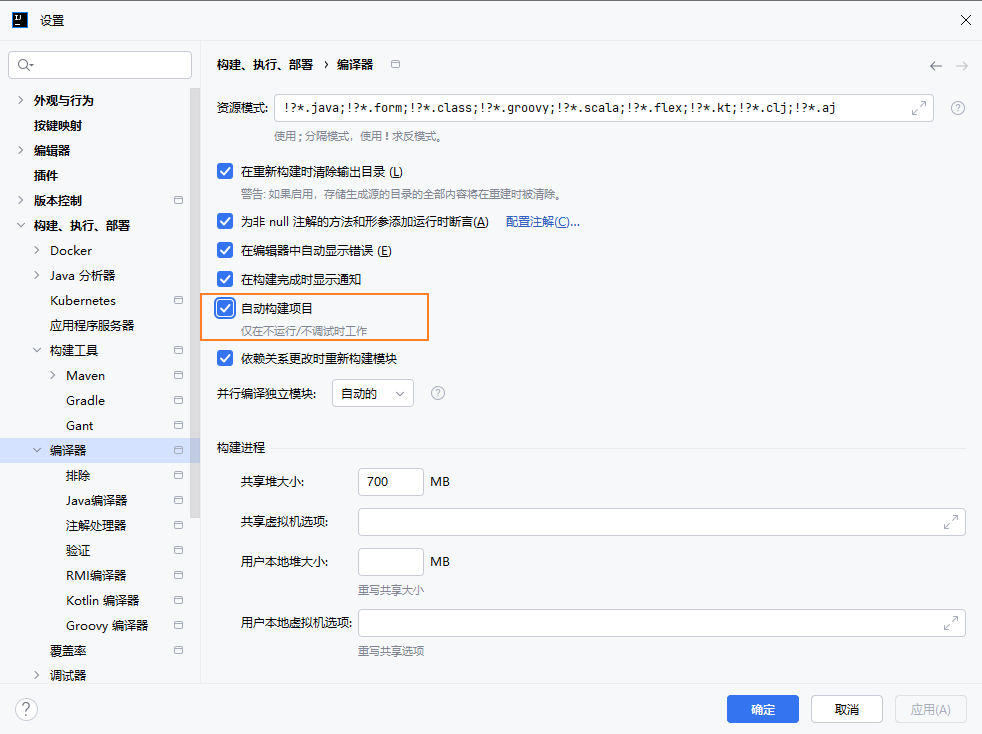
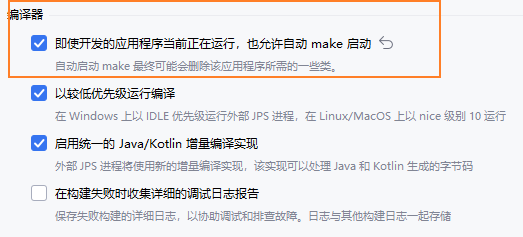
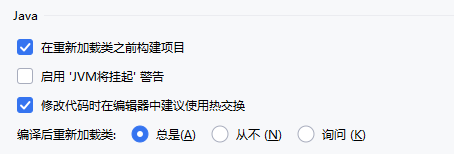
编译器自动构建与热交换
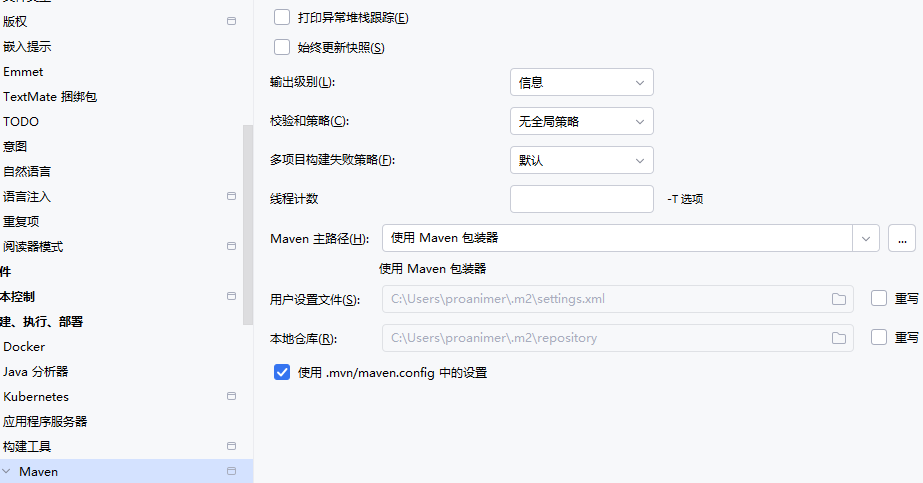
设置Maven位置
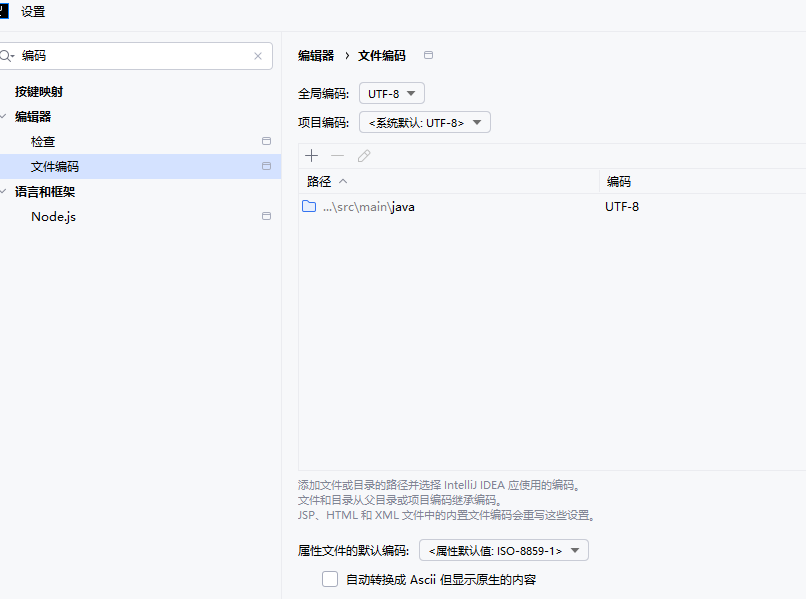
设置文件编码
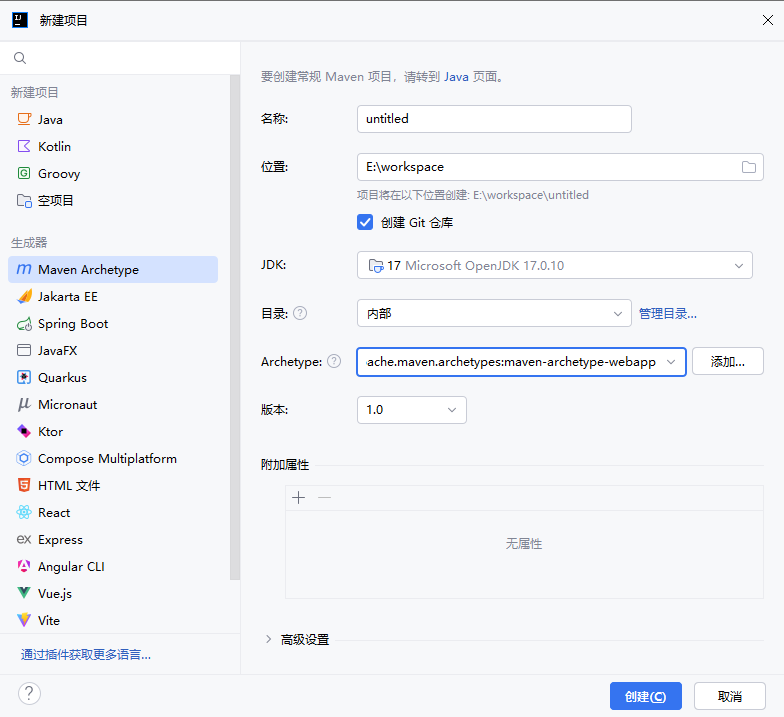
创建工程
或创建Spring Boot项目
配置文件
POM.xml
项目基本信息
<modelVersion>:指定 POM 模型的版本,通常为4.0.0。<groupId>:定义项目所属的组织或公司,通常使用反向域名表示。<artifactId>:项目的唯一标识符,通常对应项目名称。<version>:项目的当前版本号。<packaging>:指定项目的打包方式,如jar、war等。<name>:项目的名称。<description>:项目的简要描述。
继承与模块管理
<parent>:指定当前项目继承的父 POM,便于共享统一的配置和依赖管理。<modules>:在多模块项目中,列出所有子模块的目录名称。
依赖管理
<dependencies>:列出项目所需的所有依赖项。<dependencyManagement>:用于统一管理依赖的版本信息,子项目可以引用而无需指定版本。<repositories>:指定额外的远程仓库地址,以获取依赖。
构建配置
<build>:定义项目的构建相关配置。<sourceDirectory>:指定源代码目录。<outputDirectory>:指定编译输出目录。<plugins>:配置构建过程中使用的插件,如maven-compiler-plugin等。
默认目录结构
- 主源代码目录:
src/main/java - 主资源目录:
src/main/resources - 测试源代码目录:
src/test/java - 测试资源目录:
src/test/resources - 构建输出目录:
target/ - 主类输出目录:
target/classes - 测试类输出目录:`target/test-classes
这些默认设置源自于 Maven 的 Super POMMaven Model Builder – Super POM,所有项目在未显式配置的情况下都会继承这些设置
自定义输入目录
如果项目结构不同于 Maven 的默认结构,可以在
pom.xml中自定义输入目录。例如:1
2
3
4
5
6
7
8
9<build>
<sourceDirectory>src/my-src</sourceDirectory>
<testSourceDirectory>src/my-test</testSourceDirectory>
<resources>
<resource>
<directory>src/my-resources</directory>
</resource>
</resources>
</build>上述配置将主源代码目录更改为
src/my-src,测试源代码目录更改为src/my-test,资源目录更改为src/my-resources。
属性定义
<properties>:定义可在 POM 中引用的变量,便于统一管理版本号等信息。
构建环境与发布配置
<profiles>:定义不同的构建配置,便于在不同环境下使用。<distributionManagement>:配置项目的发布信息,如部署到的仓库地址等。
Introduction to the POM – Maven
日志记录
Spring Boot 使用 Commons Logging 进行所有内部日志记录,但底层日志实现保持开放。为 Java Util Logging、Log4j2 和 Logback 提供了默认配置。在每种情况下,日志记录器都预先配置为使用控制台输出,同时也可以选择文件输出。

当前版本logback中重要组件包括appender,也就是配置日志的输出目的地,通过 name 属性指定名字,通过 class 属性指定目的地:
- ch.qos.logback.core.ConsoleAppender:输出到控制台。
- ch.qos.logback.core.FileAppender:输出到文件。
- ch.qos.logback.core.rolling.RollingFileAppender:文件大小超过阈值时产生一个新文件。
encoder,logger以及root,它只支持一个属性——level,值可以为:TRACE、DEBUG、INFO、WARN、ERROR、ALL、OFF.
<property>:定义的变量可以在整个配置文件中通过 ${} 引用,便于维护和修改。
<appender>:定义日志的输出方式。
ConsoleAppender:将日志输出到控制台。RollingFileAppender:将日志输出到文件,并支持按时间滚动生成新文件。
<logger>:为特定的包或类设置日志级别和输出方式。
<root>:定义默认的日志级别和输出方式,适用于未被其他 logger 捕获的日志。
pattern 用来指定日志的输出格式:
%d:输出的时间格式。%thread:日志的线程名。%-5level:日志的输出级别,填充到 5 个字符。比如说 info 只有 4 个字符,就填充一个空格,这样日志信息就对齐了。%logger{length}:logger 的名称,length 用来缩短名称。没有指定表示完整输出;0 表示只输出 logger 最右边点号之后的字符串;其他数字表示输出小数点最后边点号之前的字符数量。%msg:日志的具体信息。%n:换行符。%relative:输出从程序启动到创建日志记录的时间,单位为毫秒。
logback-spring.xml提供了<springProperty>以及<springProfile>可以读取springBoot配置文件中的属性.1
2
3
4
5
6
7
8
9
10
11
12
13
14
15
16
17
18
19
20
21
22
23
24
25
26
27
28
29
30
31
32
33
34
35
36
37
38
39
40
41
42
43
44
45
<configuration>
<appender name="stdot" class="ch.qos.logback.core.ConsoleAppender">
<encoder class="ch.qos.logback.classic.encoder.PatternLayoutEncoder">
<pattern>%d{yyyy-MM-dd HH:mm:ss,GMT+8} [%p][%c][%M][%L]-> %m%n</pattern>
</encoder>
</appender>
<appender name="file" class="ch.qos.logback.core.rolling.RollingFileAppender">
<file>${log.path}/${LOG_FOLDER}/${LOG_FILE_NAME}</file>
<!-- <rollingPolicy class="ch.qos.logback.core.rolling.TimeBasedRollingPolicy">-->
<!-- <fileNamePattern>${log.path}/${LOG_FOLDER}/${LOG_FILE_NAME}.%d{yyyy-MM-dd}.%i</fileNamePattern>-->
<!-- <totalSizeCap>5G</totalSizeCap>-->
<!-- <maxHistory>30</maxHistory>-->
<!-- </rollingPolicy>-->
<rollingPolicy class="ch.qos.logback.core.rolling.SizeAndTimeBasedRollingPolicy">
<!-- rollover daily -->
<fileNamePattern>${log.path}/${LOG_FOLDER}/${LOG_FILE_NAME}.%d{yyyy-MM-dd}.%i</fileNamePattern>
<!-- each file should be at most 100MB, keep 60 days worth of history, but at most 20GB -->
<maxFileSize>100MB</maxFileSize>
<maxHistory>60</maxHistory>
<totalSizeCap>20GB</totalSizeCap>
</rollingPolicy>
<encoder>
<pattern>%d{yyyy-MM-dd HH:mm:ss,GMT+8} [%p][%c][%M][%L]-> %m%n</pattern>
</encoder>
</appender>
<springProperty scope="context" name="log.path" source="project.folder"/>
<springProperty scope="context" name="log.root.level" source="log.root.level"/>
<property name="LOG_FOLDER" value="logs"/>
<property name="LOG_FILE_NAME" value="easypan.log"/>
<!-- <logger name="top.sekyoro.easypan" level="${log.root.level}">-->
<!-- <appender-ref ref="stdot"/>-->
<!-- <appender-ref ref="file"/>-->
<!-- </logger> -->
<!-- -->
<root level="${log.root.level}">
<appender-ref ref="stdot"/>
<appender-ref ref="file"/>
</root>
</configuration>
- Logging :: Spring Boot
- Chapter 5: Encoders
- Logback Error Codes
- Logback:Spring Boot内置的日志处理框架 | 二哥的Java进阶之路
- 26. Logging
application.properties
服务器配置
server.port=8080:设置应用的端口号。server.servlet.context-path=/api:设置应用的上下文路径。
应用信息
spring.application.name=myapp:设置应用的名称。
数据源配置(以 MySQL 为例)
spring.datasource.url=jdbc:mysql://localhost:3306/db_examplespring.datasource.username=rootspring.datasource.password=secretspring.datasource.driver-class-name=com.mysql.cj.jdbc.Driverspring.jpa.hibernate.ddl-auto=update:设置 JPA 的 DDL 策略。
日志配置
logging.level.root=INFO:设置根日志级别。logging.level.com.example=DEBUG:设置特定包的日志级别。logging.file.name=logs/app.log:设置日志文件名称。logging.pattern.console=%d{yyyy-MM-dd HH:mm:ss} - %msg%n:设置控制台日志输出格式
邮件配置
spring.mail.host=smtp.example.comspring.mail.port=587spring.mail.username=user@example.comspring.mail.password=secretspring.mail.properties.mail.smtp.auth=truespring.mail.properties.mail.smtp.starttls.enable=true
安全配置
spring.security.user.name=adminspring.security.user.password=secretspring.security.user.roles=USER,ADMIN
缓存配置
spring.cache.type=simple:设置缓存类型。spring.cache.cache-names=users,transactions:定义缓存名称。
国际化配置
spring.messages.basename=messages:设置消息资源文件的基础名称。spring.messages.encoding=UTF-8:设置消息资源文件的编码。
测试配置
spring.main.allow-bean-definition-overriding=true:允许覆盖 Bean 定义。spring.profiles.active=dev:设置活动的配置文件。
注意:1.新版本中,spring.mvc.throw-exception-if-no-handler-found 属性已被弃用,建议不再使用。默认情况下,Spring Boot 会返回 404 响应,无需额外配置。
2.spring.mvc.favicon.enable=false配置属性已弃用。此外,Spring Boot 不再提供默认的 favicon,因为此图标可被视为信息泄露,可以增加对应handler.1
2
3
4
5
6
7
8
public class FaviconConfig implements WebMvcConfigurer {
public void addResourceHandlers(ResourceHandlerRegistry registry) {
registry.addResourceHandler("/favicon.ico")
.addResourceLocations("classpath:/static/");
}
}
Spring Boot中favicon的指南 | Baeldung中文网
相关文档
1 | # 应用服务 WEB 访问端口 |
业务重点流程
文件管理
查看文件
文件上传
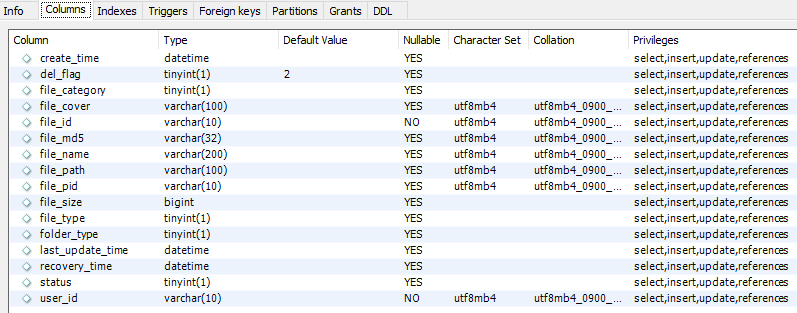
表中(file_id,user_id)为联合主键. controller参数包含fileId,file,fileName,filePid,fileMd5,chunkIndex,chunks.
当刚开始上传时,chunkIndex=0,查看filemd5是否包含这个文件,并且当前空闲空间+文件空间大于总空间,如果查到了,则直接上传,如果文件名重复,重命名,插入数据库(file_id和文件名可能不同,还需要在数据库中插入)
然后更新使用空间,然后返回秒传响应即可.1
2
3
4
5
6
7
8
9
10
11
12
13
14
15
16
17
18
19
20
21
22
23
24
25
26
27
28
29
30
31// chunkIndex=0下
FileInfoQuery infoQuery = new FileInfoQuery();
infoQuery.setFileMd5(fileMd5);
infoQuery.setSimplePage(new SimplePage(0, 1));
infoQuery.setStatus(FileStatusEnums.USING.getStatus());
List<FileInfo> dbFileList = this.fileInfoMapper.selectList(infoQuery);
//秒传
if (!dbFileList.isEmpty()) {
FileInfo dbFile = dbFileList.get(0);
//判断文件状态
if (dbFile.getFileSize() + spaceDto.getUseSpace() > spaceDto.getTotalSpace()) {
throw new BusinessException(ResponseCodeEnum.CODE_904);
}
dbFile.setFileId(fileId);
dbFile.setFilePid(filePid);
dbFile.setUserId(webUserDto.getUserId());
dbFile.setFileMd5(null);
dbFile.setCreateTime(curDate);
dbFile.setLastUpdateTime(curDate);
dbFile.setStatus(FileStatusEnums.USING.getStatus());
dbFile.setDelFlag(FileDelFlagEnums.USING.getFlag());
dbFile.setFileMd5(fileMd5);
fileName = autoRename(filePid, webUserDto.getUserId(), fileName);
dbFile.setFileName(fileName);
this.fileInfoMapper.insert(dbFile);
resultDto.setStatus(UploadStatusEnums.UPLOAD_SECONDS.getCode());
//更新用户空间使用
updateUserSpace(webUserDto, dbFile.getFileSize());
return resultDto;
}
然后获取这个切片当前占用存储,如果大于总空间就报异常.
然后确定下载的chunk路径,BASE_FOLDER+FILE+user_id_file_id+chunkIndex,然后下载到对应位置,增加占用的临时存储空间.1
2
3
4
5
6
7
8
9
10
11
12
13
14
15
16
17
18
19
20
21
22
23
24//暂存在临时目录
String tempFolderName = appConfig.getProjectFolder() + Constants.FILE_FOLDER_TEMP;
String currentUserFolderName = webUserDto.getUserId() + fileId;
//创建临时目录
tempFileFolder = new File(tempFolderName + currentUserFolderName);
if (!tempFileFolder.exists()) {
tempFileFolder.mkdirs();
}
//判断磁盘空间
Long currentTempSize = redisComponent.getFileTempSize(webUserDto.getUserId(), fileId);
if (file.getSize() + currentTempSize + spaceDto.getUseSpace() > spaceDto.getTotalSpace()) {
throw new BusinessException(ResponseCodeEnum.CODE_904);
}
File newFile = new File(tempFileFolder.getPath() + "/" + chunkIndex);
file.transferTo(newFile);
//保存临时大小
redisComponent.saveFileTempSize(webUserDto.getUserId(), fileId, file.getSize());
//不是最后一个分片,直接返回
if (chunkIndex < chunks - 1) {
resultDto.setStatus(UploadStatusEnums.UPLOADING.getCode());
return resultDto;
}
如果不是最后一个分片,直接返回,响应设置上传状态.
当上传完最后一个文件分片时,表示上传完成,将相关文件信息插入数据库,文件状态设置为TRANSFER. 也做了缩略图处理,如果是视频,生成缩略图(使用ffmepg String cmd = “ffmpeg -i %s -y -vframes 1 -vf scale=%d:%d/a %s”;),如果是图片,也可以压缩得到缩略图String cmd = “ffmpeg -i %s -vf scale=%d:-1 %s -y”; 此外,视频会进行切割,得到不同的ts片段和m3u8索引文件. 如果是h.265转为h.264,h.264转成ts,然后进行切片得到ts文件与m3u8索引文件.1
2
3
4
5
6
7
8
9
10
11
12
13
14
15
16
17
18
19
20
21
22
23
24
25
26
27
28
29
30
31
32
33
34
35//创建同名切片目录
File tsFolder = new File(videoFilePath.substring(0, videoFilePath.lastIndexOf(".")));
if (!tsFolder.exists()) {
tsFolder.mkdirs();
}
final String CMD_GET_CODE = "ffprobe -v error -select_streams v:0 -show_entries stream=codec_name %s";
String cmd = String.format(CMD_GET_CODE, videoFilePath);
String result = ProcessUtils.executeCommand(cmd, false);
result = result.replace("\n", "");
result = result.substring(result.indexOf("=") + 1);
String codec = result.substring(0, result.indexOf("["));
//转码
if ("hevc".equals(codec)) {
String newFileName = videoFilePath.substring(0, videoFilePath.lastIndexOf(".")) + "_" + videoFilePath.substring(videoFilePath.lastIndexOf("."));
new File(videoFilePath).renameTo(new File(newFileName));
String CMD_HEVC_264 = "ffmpeg -i %s -c:v libx264 -crf 20 %s";
cmd = String.format(CMD_HEVC_264, newFileName, videoFilePath);
ProcessUtils.executeCommand(cmd, false);
new File(newFileName).delete();
}
final String CMD_TRANSFER_2TS = "ffmpeg -y -i %s -vcodec copy -acodec copy -bsf:v h264_mp4toannexb %s";
final String CMD_CUT_TS = "ffmpeg -i %s -c copy -map 0 -f segment -segment_list %s -segment_time 30 %s/%s_%%4d.ts";
String tsPath = tsFolder + "/" + Constants.TS_NAME;
//生成.ts
cmd = String.format(CMD_TRANSFER_2TS, videoFilePath, tsPath);
ProcessUtils.executeCommand(cmd, false);
//生成索引文件.m3u8 和切片.ts
cmd = String.format(CMD_CUT_TS, tsPath, tsFolder.getPath() + "/" + Constants.M3U8_NAME, tsFolder.getPath(), fileId);
ProcessUtils.executeCommand(cmd, false);
//删除index.ts
new File(tsPath).delete();
同时异步进行文件合并,文件合并就是将chunks写入到一个文件中.同时更新数据库中文件状态.
在事务提交之后调用合并,截取封面以及视频编码等业务.1
2
3
4
5
6
7//事务提交后调用异步方法
TransactionSynchronizationManager.registerSynchronization(new TransactionSynchronization() {
public void afterCommit() {
fileInfoService.transferFile(fileInfo.getFileId(), webUserDto);
}
});
文件预览
普通文件预览
缩略图预览
视频预览
返回m3u8索引文件以及ts文件,
如果是下载ts文件,为了避免下载单个文件过大或者说进行播放时需要分片播放,可以通过在请求头携带range
而响应头携带
206 响应通常伴随的头部:
当服务器返回 206 Partial Content 状态码时,通常会同时设置以下响应头:
Content-Range:- 作用: 这是最重要的头,它明确告知客户端当前响应体中包含的是整个资源的哪一部分,以及整个资源的总大小。
- 格式:
Content-Range: bytes <start>-<end>/<total_length> - 示例:
Content-Range: bytes 1024-2047/2048表示响应体中是文件的第 1024 字节到第 2047 字节,整个文件总大小是 2048 字节。
Content-Length:- 作用: 表示当前响应体中实际传输的字节数(即
end - start + 1)。 - 示例: 如果
Content-Range是bytes 1024-2047/2048,那么Content-Length应该是1024。
- 作用: 表示当前响应体中实际传输的字节数(即
Content-Type:- 作用: 仍然需要指示响应体中内容的媒体类型(MIME type),即使是部分内容。
Accept-Ranges:- 作用: 通常在第一次(完整)请求时就设置
Accept-Ranges: bytes,告诉客户端服务器支持范围请求。如果服务器返回206状态码,这意味着它肯定支持bytes范围。
分片下载,也称为断点续传(Resumable Download)或范围请求(Range Request),是 HTTP 协议允许客户端只请求资源的部分内容的一种机制。当客户端需要进行分片下载时,它会在请求头中携带特定的信息来告诉服务器它想要哪些部分的数据。
分片下载时客户端请求头携带的关键信息
在分片下载场景中,客户端的 HTTP 请求头主要会携带以下一个或多个关键信息:
Range请求头这是进行分片下载最核心、最重要的请求头。它明确告诉服务器客户端想要获取资源内容的哪一部分。
作用: 指示客户端请求的是文件的特定字节范围。
格式:
Range: bytes=<start>-<end><start>: 想要获取的起始字节偏移量(从 0 开始计数)。<end>: 想要获取的结束字节偏移量。
常用变体:
- 请求从某个字节到文件末尾:
Range: bytes=1024-- 这表示客户端想要从文件的第 1024 字节开始,一直到文件末尾的所有内容。
- 请求文件的最后 N 个字节:
Range: bytes=-500- 这表示客户端想要文件的最后 500 个字节。
- 请求多个不连续的范围:
Range: bytes=0-100, 200-300(服务器不一定支持,但 HTTP 规范允许)- 这表示客户端想要第 0-100 字节和第 200-300 字节。
- 请求从某个字节到文件末尾:
示例:
1
2
3GET /path/to/large_file.zip
Host: example.com
Range: bytes=5242880-10485759 # 请求文件的第 5MB 到 第 10MB 部分
If-Range请求头 (用于条件范围请求)这个请求头通常与
Range一起使用,以实现条件性断点续传。它允许客户端在请求特定范围之前,先验证资源是否在上次下载后被修改过。作用: 如果服务器上资源的
ETag或Last-Modified日期与If-Range中的值匹配,服务器才会返回请求的范围内容(206 Partial Content)。否则,服务器会忽略Range头,并返回整个文件(200 OK),因为资源已经被修改,部分内容可能已经不再有效。格式:
If-Range: "<ETag_value>"(使用资源的 ETag)If-Range: <HTTP-date>(使用资源的 Last-Modified 日期)
示例:
1
2
3
4GET /path/to/large_file.zip
Host: example.com
Range: bytes=5242880- # 客户端请求续传
If-Range: "abcdef1234567890" # 如果资源的ETag与此匹配,则继续传输范围内容- 如果服务器发现文件的 ETag 变了,说明文件被修改了,它会返回整个文件(
200 OK)。 - 如果 ETag 没变,服务器就会返回请求的范围内容(
206 Partial Content)。
- 如果服务器发现文件的 ETag 变了,说明文件被修改了,它会返回整个文件(
- 作用: 通常在第一次(完整)请求时就设置
重要响应状态码:206 部分内容 301 永久重定向 302 暂时重定向
目录相关
创建目录
首先校验文件名字,在当前目录下不能有重名的
插入file_info表,设置FOLER类型,插入即可. 但注意插入完成后再次进行查询确保只有一个
这时因为在并发条件下,如果一个两个事务执行,开始时它们查到没有重名,而进行插入,其中一个拿到互斥锁插入成功并提交事务. 释放锁后,另一个拿到锁也进行插入,插入后需要进行当前读看是否唯一.1
2
3
4
5
6
7
8
9
10
11
12
13
14
15
16
17
18
19
20
21
22
23
24
25
26
27checkFileName(filePid, userId, folderName, FileFolderTypeEnums.FOLDER.getType());
Date curDate = new Date();
FileInfo fileInfo = new FileInfo();
fileInfo.setFileId(StringTools.getRandomString(Constants.LENGTH_10));
fileInfo.setUserId(userId);
fileInfo.setFilePid(filePid);
fileInfo.setFileName(folderName);
fileInfo.setFolderType(FileFolderTypeEnums.FOLDER.getType());
fileInfo.setCreateTime(curDate);
fileInfo.setLastUpdateTime(curDate);
fileInfo.setStatus(FileStatusEnums.USING.getStatus());
fileInfo.setDelFlag(FileDelFlagEnums.USING.getFlag());
this.fileInfoMapper.insert(fileInfo);
FileInfoQuery fileInfoQuery = new FileInfoQuery();
fileInfoQuery.setFilePid(filePid);
fileInfoQuery.setUserId(userId);
fileInfoQuery.setFileName(folderName);
fileInfoQuery.setFolderType(FileFolderTypeEnums.FOLDER.getType());
fileInfoQuery.setDelFlag(FileDelFlagEnums.USING.getFlag());
Integer count = this.fileInfoMapper.selectCount(fileInfoQuery); // select xx for update
if (count > 1) {
throw new BusinessException("文件夹" + folderName + "已经存在");
}
fileInfo.setFileName(folderName);
fileInfo.setLastUpdateTime(curDate);
return fileInfo;
获取当前目录
传入路径,路径是每个目录的id相连,比如11122/3344,表示在这个目录下.
获取这两个目录的信息,相当于获取了从根目录到当前目录的所有目录信息
文件重命名
根据传入的fileId判断文件是否存在(是否合法),然后检查文件名是否重复,不重复再进行更新文件名称.
重命名类似新建目录,重命名完成后也需要看是否唯一1
2
3
4
5
6
7
8
9
10
11
12
13
14
15
16
17
18
19
20
21
22
23
24
25
26
27
28
29
30
31FileInfo fileInfo = this.fileInfoMapper.selectByFileIdAndUserId(fileId, userId);
if (fileInfo == null) {
throw new BusinessException("文件不存在");
}
if (fileInfo.getFileName().equals(fileName)) {
return fileInfo;
}
String filePid = fileInfo.getFilePid();
checkFileName(filePid, userId, fileName, fileInfo.getFolderType());
//文件获取后缀
if (FileFolderTypeEnums.FILE.getType().equals(fileInfo.getFolderType())) {
fileName = fileName + StringTools.getFileSuffix(fileInfo.getFileName());
}
Date curDate = new Date();
FileInfo dbInfo = new FileInfo();
dbInfo.setFileName(fileName);
dbInfo.setLastUpdateTime(curDate);
this.fileInfoMapper.updateByFileIdAndUserId(dbInfo, fileId, userId);
FileInfoQuery fileInfoQuery = new FileInfoQuery();
fileInfoQuery.setFilePid(filePid);
fileInfoQuery.setUserId(userId);
fileInfoQuery.setFileName(fileName);
fileInfoQuery.setDelFlag(FileDelFlagEnums.USING.getFlag());
Integer count = this.fileInfoMapper.selectCount(fileInfoQuery);
if (count > 1) {
throw new BusinessException("文件名" + fileName + "已经存在");
}
fileInfo.setFileName(fileName);
fileInfo.setLastUpdateTime(curDate);
return fileInfo;
获取所有目录
获得父目录id,同时为了方便移动文件,传递需要移动文件的id,排除掉这些文件1
2
3
4
5
6
7
8
9
10
11FileInfoQuery query = new FileInfoQuery();
query.setUserId(getUserInfoFromSession(session).getUserId());
query.setFilePid(filePid);
query.setFolderType(FileFolderTypeEnums.FOLDER.getType());
if (!StringTools.isEmpty(currentFileIds)) {
query.setExcludeFileIdArray(currentFileIds.split(","));
}
query.setDelFlag(FileDelFlagEnums.USING.getFlag());
query.setOrderBy("create_time desc");
List<FileInfo> fileInfoList = fileInfoService.findListByParam(query);
return getSuccessResponseVO(CopyTools.copyList(fileInfoList, FileInfoVO.class));
移动文件/目录
首先判断传入的文件id是否合法,比如文件是否存在,移动到的目录是否存在,然后取出移动到的目录的所有文件名放在一个map中,遍历需要移动的文件,如果名称在map中,则进行重命名,然后更新文件信息,例如pid(目录)和文件名.1
2
3
4
5
6
7
8
9
10
11
12
13
14
15
16
17
18
19
20
21
22
23
24FileInfoQuery query = new FileInfoQuery();
query.setFilePid(filePid);
query.setUserId(userId);
List<FileInfo> dbFileList = fileInfoService.findListByParam(query);
Map<String, FileInfo> dbFileNameMap = dbFileList.stream().collect(Collectors.toMap(FileInfo::getFileName, Function.identity(), (file1, file2) -> file2));
//查询选中的文件
query = new FileInfoQuery();
query.setUserId(userId);
query.setFileIdArray(fileIdArray);
List<FileInfo> selectFileList = fileInfoService.findListByParam(query);
//将所选文件重命名
for (FileInfo item : selectFileList) {
FileInfo rootFileInfo = dbFileNameMap.get(item.getFileName());
//文件名已经存在,重命名被还原的文件名
FileInfo updateInfo = new FileInfo();
if (rootFileInfo != null) {
String fileName = StringTools.rename(item.getFileName());
updateInfo.setFileName(fileName);
}
updateInfo.setFilePid(filePid);
this.fileInfoMapper.updateByFileIdAndUserId(updateInfo, item.getFileId(), userId);
}
回收站回收、还原以及彻底删除文件
回收文件/目录
将传入的文件id依次加入到list中,如果它是目录,再递归将其下的文件放入list中1
2
3
4
5
6
7
8
9
10
11
12private void findAllSubFolderFileIdList(List<String> fileIdList, String userId, String fileId, Integer delFlag) {
fileIdList.add(fileId);
FileInfoQuery query = new FileInfoQuery();
query.setUserId(userId);
query.setFilePid(fileId);
query.setDelFlag(delFlag);
query.setFolderType(FileFolderTypeEnums.FOLDER.getType());
List<FileInfo> fileInfoList = this.fileInfoMapper.selectList(query);
for (FileInfo fileInfo : fileInfoList) {
findAllSubFolderFileIdList(fileIdList, userId, fileInfo.getFileId(), delFlag);
}
}
这样选中的所有文件目录以及子目录都在list中,都进行更新为删除状态即可.
然后再将选中的文件和目录更新为回收状态1
2
3
4
5
6
7
8
9
10
11
12
13
14
15
16
17
18
19
20
21
22
23
24
25
26String[] fileIdArray = fileIds.split(",");
FileInfoQuery query = new FileInfoQuery();
query.setUserId(userId);
query.setFileIdArray(fileIdArray);
query.setDelFlag(FileDelFlagEnums.USING.getFlag());
List<FileInfo> fileInfoList = this.fileInfoMapper.selectList(query);
if (fileInfoList.isEmpty()) {
return;
}
List<String> delFilePidList = new ArrayList<>();
for (FileInfo fileInfo : fileInfoList) {
findAllSubFolderFileIdList(delFilePidList, userId, fileInfo.getFileId(), FileDelFlagEnums.USING.getFlag());
}
//将目录下的所有文件更新为已删除
if (!delFilePidList.isEmpty()) {
FileInfo updateInfo = new FileInfo();
updateInfo.setDelFlag(FileDelFlagEnums.DEL.getFlag());
this.fileInfoMapper.updateFileDelFlagBatch(updateInfo, userId, delFilePidList, null, FileDelFlagEnums.USING.getFlag());
}
//将选中的文件更新为回收站
List<String> delFileIdList = Arrays.asList(fileIdArray);
FileInfo fileInfo = new FileInfo();
fileInfo.setRecoveryTime(new Date());
fileInfo.setDelFlag(FileDelFlagEnums.RECYCLE.getFlag());
this.fileInfoMapper.updateFileDelFlagBatch(fileInfo, userId, null, delFileIdList, FileDelFlagEnums.USING.getFlag());
回收站相关
加载回收站文件
设置好文件删除标志即可1
2
3
4
5
6
7
8FileInfoQuery query = new FileInfoQuery();
query.setPageSize(pageSize);
query.setPageNo(pageNo);
query.setUserId(getUserInfoFromSession(session).getUserId());
query.setOrderBy("recovery_time desc");
query.setDelFlag(FileDelFlagEnums.RECYCLE.getFlag());
PaginationResultVO result = fileInfoService.findListByPage(query);
return getSuccessResponseVO(convert2PaginationVO(result, FileInfoVO.class));
回收站文件复原
关键是需要复原目录中的所有文件,同时如果文件在复原的目录中有重名需要改名.1
2
3
4
5
6
7
8
9
10
11
12
13
14String[] fileIdArray = fileIds.split(",");
FileInfoQuery query = new FileInfoQuery();
query.setUserId(userId);
query.setFileIdArray(fileIdArray);
query.setDelFlag(FileDelFlagEnums.RECYCLE.getFlag());
List<FileInfo> fileInfoList = this.fileInfoMapper.selectList(query);
List<String> delFileSubFolderFileIdList = new ArrayList<>();
//找到所选文件子目录文件ID
for (FileInfo fileInfo : fileInfoList) {
if (FileFolderTypeEnums.FOLDER.getType().equals(fileInfo.getFolderType())) {
findAllSubFolderFileIdList(delFileSubFolderFileIdList, userId, fileInfo.getFileId(), FileDelFlagEnums.DEL.getFlag());
}
}
获取要复原的所有文件的id以及子目录的id,迭代的获取文件id,将文件状态都更新为在使用(从DELETE到USING).
然后默认恢复文件到根目录,获取根目录中的所有文件放在一个map中,遍历回收站中文件如果有重名更新名字,然后更新状态(从RECYCLE到USING)
删除回收站文件
直接删除即可.
更新用户可用空间以及缓存.1
2
3
4
5
6
7
8
9
10
11
12
13
14
15
16
17
18
19
20
21
22
23
24
25
26
27
28
29
30
31
32
33String[] fileIdArray = fileIds.split(",");
FileInfoQuery query = new FileInfoQuery();
query.setUserId(userId);
query.setFileIdArray(fileIdArray);
if (!adminOp) {
query.setDelFlag(FileDelFlagEnums.RECYCLE.getFlag());
}
List<FileInfo> fileInfoList = this.fileInfoMapper.selectList(query);
List<String> delFileSubFolderFileIdList = new ArrayList<>();
//找到所选文件子目录文件ID
for (FileInfo fileInfo : fileInfoList) {
if (FileFolderTypeEnums.FOLDER.getType().equals(fileInfo.getFolderType())) {
findAllSubFolderFileIdList(delFileSubFolderFileIdList, userId, fileInfo.getFileId(), FileDelFlagEnums.DEL.getFlag());
}
}
//删除所选文件,子目录中的文件
if (!delFileSubFolderFileIdList.isEmpty()) {
this.fileInfoMapper.delFileBatch(userId, delFileSubFolderFileIdList, null, adminOp ? null : FileDelFlagEnums.DEL.getFlag());
}
//删除所选文件
this.fileInfoMapper.delFileBatch(userId, null, Arrays.asList(fileIdArray), adminOp ? null : FileDelFlagEnums.RECYCLE.getFlag());
Long useSpace = this.fileInfoMapper.selectUseSpace(userId);
UserInfo userInfo = new UserInfo();
userInfo.setUseSpace(useSpace);
this.userInfoMapper.updateByUserId(userInfo, userId);
//设置缓存
UserSpaceDto userSpaceDto = redisComponent.getUserSpaceUse(userId);
userSpaceDto.setUseSpace(useSpace);
redisComponent.saveUserSpaceUse(userId, userSpaceDto);
外部分享文件
创建下载链接
主要是返回一个密码给用户端,用户端后续携带下载文件1
2
3
4
5
6
7
8
9
10
11
12
13
14
15
16FileInfo fileInfo = fileInfoService.getFileInfoByFileIdAndUserId(fileId, userId);
if (fileInfo == null) {
throw new BusinessException(ResponseCodeEnum.CODE_600);
}
if (FileFolderTypeEnums.FOLDER.getType().equals(fileInfo.getFolderType())) {
throw new BusinessException(ResponseCodeEnum.CODE_600);
}
String code = StringTools.getRandomString(Constants.LENGTH_50);
DownloadFileDto downloadFileDto = new DownloadFileDto();
downloadFileDto.setDownloadCode(code);
downloadFileDto.setFilePath(fileInfo.getFilePath());
downloadFileDto.setFileName(fileInfo.getFileName());
redisComponent.saveDownloadCode(code, downloadFileDto);
return getSuccessResponseVO(code);
根据fileId,userId获取文件信息,将文件信息与code存入缓存
下载文件
根据传入的code获取缓存中的文件信息,根据文件信息拼接下载地址下载文件.注意设置response的响应头.content-type和content-disposition1
2
3
4
5
6
7
8
9
10
11
12
13
14DownloadFileDto downloadFileDto = redisComponent.getDownloadCode(code);
if (null == downloadFileDto) {
return;
}
String filePath = appConfig.getProjectFolder() + Constants.FILE_FOLDER_FILE + downloadFileDto.getFilePath();
String fileName = downloadFileDto.getFileName();
response.setContentType("application/x-msdownload; charset=UTF-8");
if (request.getHeader("User-Agent").toLowerCase().indexOf("msie") > 0) {//IE浏览器
fileName = URLEncoder.encode(fileName, "UTF-8");
} else {
fileName = new String(fileName.getBytes("UTF-8"), "ISO8859-1");
}
response.setHeader("Content-Disposition", "attachment;filename=\"" + fileName + "\"");
readFile(response, filePath);
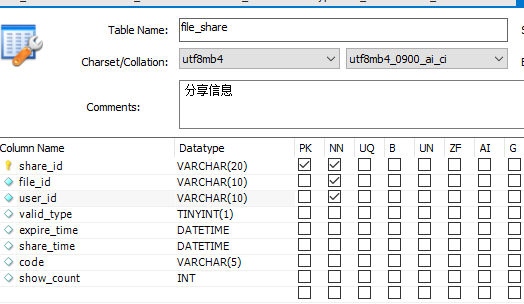
分享文件就是创建分享信息,并设置shared插入file_share表.1
2
3
4
5
6
7
8
9
10
11
12
13
14ShareValidTypeEnums typeEnum = ShareValidTypeEnums.getByType(share.getValidType());
if (null == typeEnum) {
throw new BusinessException(ResponseCodeEnum.CODE_600);
}
if (typeEnum != ShareValidTypeEnums.FOREVER) {
share.setExpireTime(DateUtil.getAfterDate(typeEnum.getDays()));
}
Date curDate = new Date();
share.setShareTime(curDate);
if (StringTools.isEmpty(share.getCode())) {
share.setCode(StringTools.getRandomString(Constants.LENGTH_5));
}
share.setShareId(StringTools.getRandomString(Constants.LENGTH_20));
this.fileShareMapper.insert(share);
其他人要来下载,传入sharedId,查表获得分享信息,同时增加分享浏览次数.并将分享信息存入session1
2
3
4
5
6
7
8
9
public ResponseVO checkShareCode(HttpSession session,
String shareId,
String code) {
SessionShareDto shareSessionDto = fileShareService.checkShareCode(shareId, code);
session.setAttribute(Constants.SESSION_SHARE_KEY + shareId, shareSessionDto);
return getSuccessResponseVO(null);
}1
2
3
4
5
6
7
8
9
10
11
12
13
14
15
16
17
18
19
20
21
22
23
public ResponseVO getShareInfo( String shareId) {
return getSuccessResponseVO(getShareInfoCommon(shareId));
}
private ShareInfoVO getShareInfoCommon(String shareId) {
FileShare share = fileShareService.getFileShareByShareId(shareId);
if (null == share || (share.getExpireTime() != null && new Date().after(share.getExpireTime()))) {
throw new BusinessException(ResponseCodeEnum.CODE_902.getMsg());
}
ShareInfoVO shareInfoVO = CopyTools.copy(share, ShareInfoVO.class);
FileInfo fileInfo = fileInfoService.getFileInfoByFileIdAndUserId(share.getFileId(), share.getUserId());
if (fileInfo == null || !FileDelFlagEnums.USING.getFlag().equals(fileInfo.getDelFlag())) {
throw new BusinessException(ResponseCodeEnum.CODE_902.getMsg());
}
shareInfoVO.setFileName(fileInfo.getFileName());
UserInfo userInfo = userInfoService.getUserInfoByUserId(share.getUserId());
shareInfoVO.setNickName(userInfo.getNickName());
shareInfoVO.setAvatar(userInfo.getQqAvatar());
shareInfoVO.setUserId(userInfo.getUserId());
return shareInfoVO;
}
然后后续通过sharedId可以获得分享的文件信息和分享者等信息.1
2
3
4
5
6
7
8
9
10
11
12
13
14
15public ResponseVO getShareLoginInfo(HttpSession session, String shareId) {
SessionShareDto shareSessionDto = getSessionShareFromSession(session, shareId);
if (shareSessionDto == null) {
return getSuccessResponseVO(null);
}
ShareInfoVO shareInfoVO = getShareInfoCommon(shareId);
//判断是否是当前用户分享的文件
SessionWebUserDto userDto = getUserInfoFromSession(session);
if (userDto != null && userDto.getUserId().equals(shareSessionDto.getShareUserId())) {
shareInfoVO.setCurrentUser(true);
} else {
shareInfoVO.setCurrentUser(false);
}
return getSuccessResponseVO(shareInfoVO);
}
类似的,通过shareId获取文件表,注意检查对应的文件id等于filePid或者filePid文件的filePid1
2
3
4
5
6
7
8
9
10
11
12
13SessionShareDto shareSessionDto = checkShare(session, shareId);
FileInfoQuery query = new FileInfoQuery();
if (!StringTools.isEmpty(filePid) && !Constants.ZERO_STR.equals(filePid)) {
fileInfoService.checkRootFilePid(shareSessionDto.getFileId(), shareSessionDto.getShareUserId(), filePid);
query.setFilePid(filePid);
} else {
query.setFileId(shareSessionDto.getFileId());
}
query.setUserId(shareSessionDto.getShareUserId());
query.setOrderBy("last_update_time desc");
query.setDelFlag(FileDelFlagEnums.USING.getFlag());
PaginationResultVO resultVO = fileInfoService.findListByPage(query);
return getSuccessResponseVO(convert2PaginationVO(resultVO, FileInfoVO.class));
获取对应文件信息.
下载类似的,首先通过createDownloadUrl创建下载连接以及code,存入缓存,然后后续可以下载1
2
3
4
5
6
7
8
9
10
11
12
13
14
15
16
17
18
19
20
21
22
public ResponseVO createDownloadUrl(HttpSession session,
String shareId,
String fileId) {
SessionShareDto shareSessionDto = checkShare(session, shareId);
return super.createDownloadUrl(fileId, shareSessionDto.getShareUserId());
}
/**
* 下载
*
* @param request
* @param response
* @throws Exception
*/
public void download(HttpServletRequest request, HttpServletResponse response,
String code) throws Exception {
super.download(request, response, code);
}
流程是首先checkShareCode通过sharedId进行校验并设置session,更新文件浏览次数,然后通过getShareLoginInfo获取shareInfoVO.
